cooling
 learning center
 product and brands insights

Why Right Sizing a Mini Split in 2026 Is the Single Most Important Decision
Getting the capacity right is everything for comfort, efficiency, and equipment life. In 2026, right-sizing is the single most important decision because oversizing wastes energy and shortens runtimes, and undersizing leaves rooms clammy and noisy as the system struggles. This section gives a practical, stepwise path you can follow with confidence.
Sizing goes beyond square-foot rules. Start with a room-by-room BTU lookup, then adjust for climate, insulation quality, window area and orientation, ceiling height, occupancy, and how each room is used. This guide will also help you choose between single and multi zone approaches and plan electrical capacity, outdoor unit placement, and line set routing so you right-size once and avoid common pitfalls.
What the right size feels like: the system is almost invisible, quiet and steady without constant on and off cycling, like cruise control keeping speed on a gentle grade. Temperatures hold, humidity stays in check, and parts last longer.
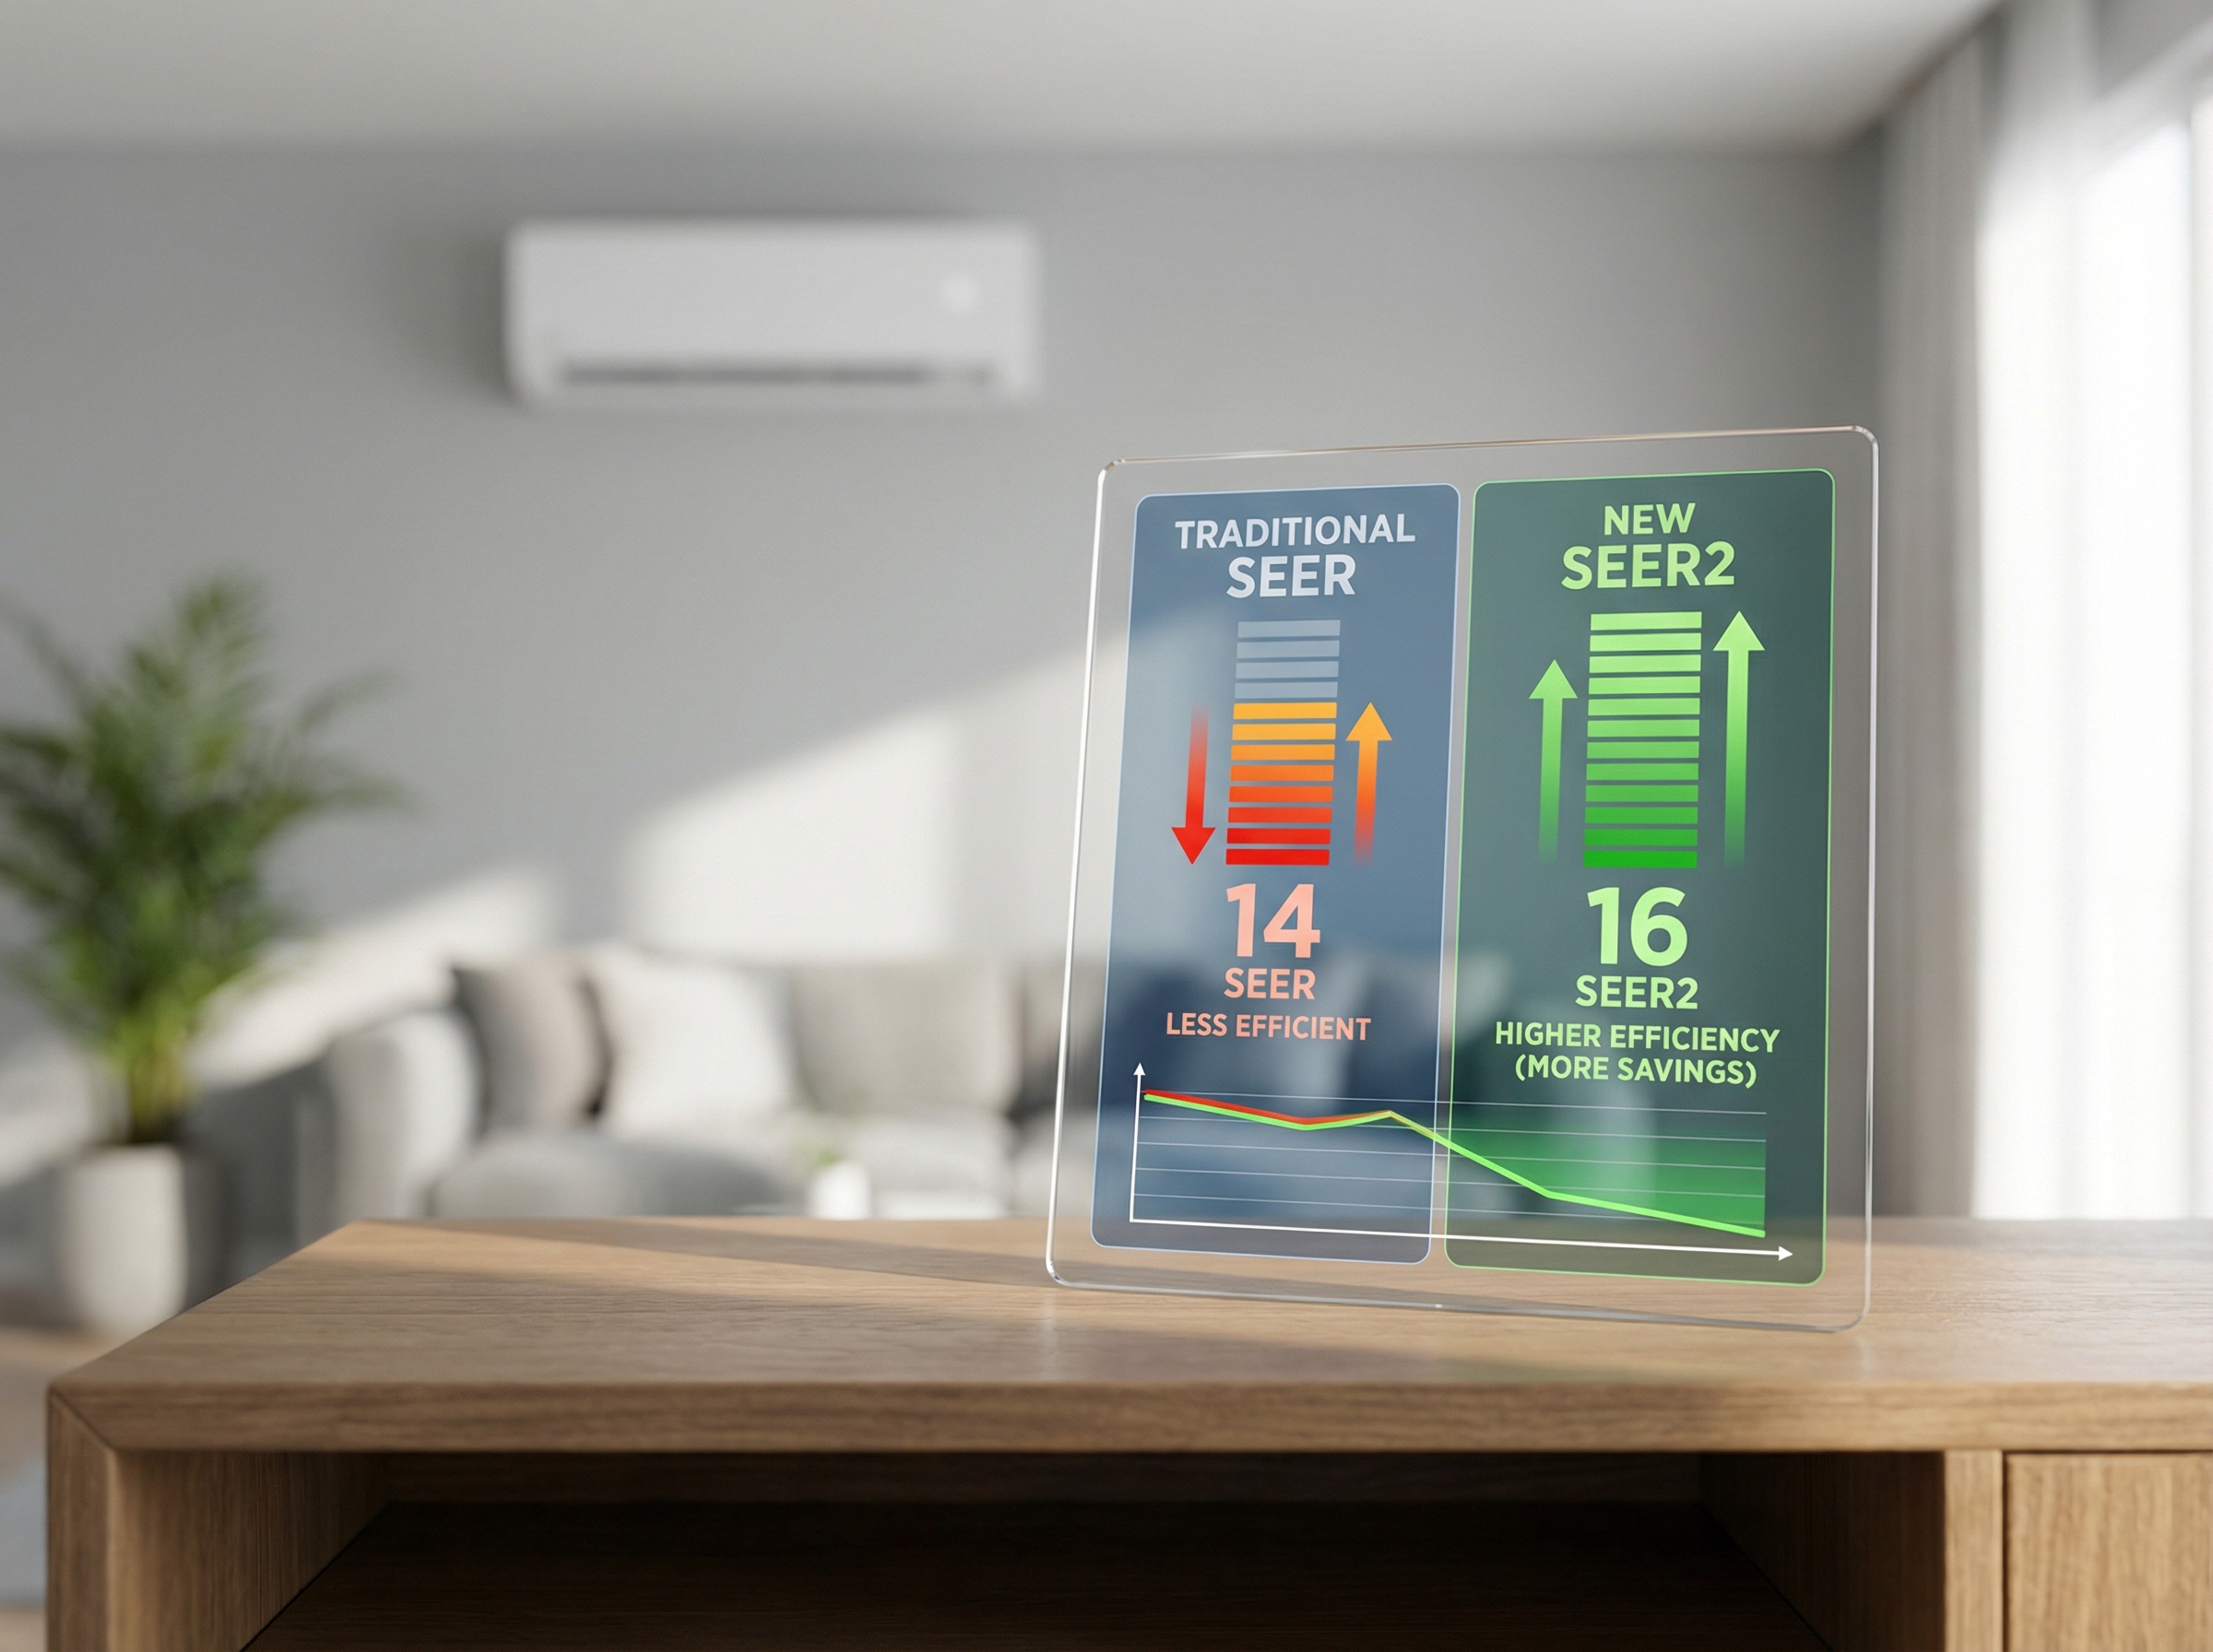
Mini Split Efficiency 2026: SEER2, EER2 and What the Numbers Mean
SEER2 is the 2026 federal efficiency metric for cooling, replacing legacy SEER. It rates seasonal performance using a more stringent, realistic test, so the same unit will show a lower SEER2 number than its old SEER score. EER2 is the companion snapshot rating for fixed conditions. Think of SEER2 as miles per gallon across a full driving season, with hills and stops included.
Regulations set the backdrop: some southern regions require split systems under 45,000 BTU to meet about 14.3 SEER2. New central splits often target about 17 SEER2 and 12 EER2 and must be demand response capable. By 2026 labels and comparisons use SEER2, so compare SEER2 to SEER2 only.
From our decades in HVAC we see most modern inverter mini splits landing in the mid to high teens SEER2. Premium models exceed 20 SEER2, while budget systems cluster in the mid teens. Choose based on climate, run hours, and utility rates.
Quick BTU Rules of Thumb: A Fast Starting Point by Room Size
We size quickly by matching room square footage to an approximate BTU. Use these rules of thumb as a first pass, then verify before selecting equipment.
- Up to ~250 sq ft → ~6,000 BTU
- 250-400 sq ft → ~9,000 BTU
- 400-550 sq ft → ~12,000 BTU
- 550-800 sq ft → ~18,000 BTU
- 800-1,200 sq ft → ~24,000 BTU
- 1,200-1,500 sq ft → ~30,000 BTU
This is the BTU per square foot concept in practice: square footage gives a solid ballpark so you can land near the right size quickly. Most single zone indoor heads cover about 6,000 to 36,000 BTU, roughly 0.5 to 3 tons, which aligns well with the ranges above. Treat these as starting numbers, not final answers.
How to Calculate Mini Split Size: A Step by Step Load Based Method
A Manual J style approach sizes for how your home actually gains and loses heat, not just a simple per square foot rule. Use this quick load based path to get close, then verify.
- Measure conditioned area: total square footage of the rooms the system will serve.
- Pick a starting band: most homes land between 20 and 40 BTU per square foot, with many moderate climates closer to 20 to 30 BTU per square foot. Multiply area by a value in that band.
- Refine for envelope and climate: better insulation and tight air sealing point to the low end, leaky or older construction and harsher climates push higher.
- Adjust for windows and sun: large west or south glass, minimal shading, or big slider doors raise the load.
- Account for ceiling height and people: ceilings above 8 feet and higher occupancy or cooking add BTUs.
- Validate: run an online or manufacturer calculator, then confirm with a full Manual J when possible.
Before a pro visit, gather a room list, insulation notes, window sizes and orientations, and simple sketches of indoor and outdoor unit locations. In our experience at Budget Heating (BudgetHeating.com), those details make the Manual J faster and more accurate, which helps you land on the right mini split capacity with confidence.
Multi Zone vs Single Zone: How to Size and When to Use Each
Start simple: one problem room or a small addition uses a single zone. A small home or a large open area often works with one to two heads. For whole home comfort, plan a designed multi zone system or several well placed single zones. If you need primary heat in cold climates, choose cold climate heat pumps.
Multi zone capacity is shared, like Wi Fi bandwidth. Do not add indoor head BTUs and match 1:1 to the outdoor unit. Manufacturers allow diversity because rooms rarely peak together. Use the manufacturer selection tables, paired with a Manual J load, or lean on a mini split savvy designer. In our experience at Budget Heating (BudgetHeating.com), 1:1 head summing leads to short cycling and uneven rooms.
- Pros: one outdoor unit, mixed indoor head types, cleaner exterior.
- Cons: single point of failure, easy to oversize small rooms, control complexity.
Factors That Change Sizing: Ceiling Height, Insulation, Sun Exposure and Occupancy
Quick BTU rules need trimming based on the space. Adjust for ceiling height, envelope, sun, people, equipment, ventilation, and climate. High ceilings increase volume, so treat tall rooms as a 10-20% add. Windows and orientation matter: big south or west exposure or lots of glass can justify a 10-20% increase, while deep shade can allow a 10-15% reduction. Insulation and air leakage shift loads too: poor or leaky envelopes trend higher, tight and well insulated trend lower. Occupancy, lighting, computers, and appliances add heat, so busy or equipment heavy rooms lean high. Ventilation and required outside air raise load as well. Climate sets the baseline: very hot or humid regions or poorly insulated homes sit near the top of the 20-40 BTU/ft² band, while moderate climates sit lower. Humid areas also benefit from strong dehumidification and good turndown.
Installation Considerations: Placement, Clearances, Line set Limits and Electrical Readiness
With 30+ years in HVAC, we know the install plan often decides the size before equipment is ordered. Verify these early:
- Outdoor placement: meet side and top clearances, keep service access, and avoid bedroom or neighbor windows to limit noise.
- Line-set and lift: confirm model limits for total length and vertical separation; long runs can cut capacity and change head or outdoor size.
- Condensate: prefer gravity drains; if not, specify pumps, routing, and safe termination for each indoor unit.
- Electrical: panel capacity, dedicated breaker space, correct wire and breaker size, outdoor disconnect.
- Code and permits: local rules on breaker sizing, setbacks, mounting, noise, and manufacturer limits shape feasible routing and combinations.
Safety, Maintenance and Honest Tradeoffs: When a Mini Split Isn’t the Best Choice
Mini-splits can be outstanding, but they are not set-and-forget. In our field work, the safest results come when owners handle basic care and licensed pros handle anything involving refrigerant or wiring.
- Shut off power at the outdoor disconnect before working near the condenser. Do not open service panels: capacitors can hold charge even with power off.
- A2L refrigerants (R-32, R-454B) are mildly flammable. Leaks require ventilation and certified handling. Only trained techs should recover or charge systems.
- Maintain clearances from combustion appliances and keep CO alarms working when altering HVAC.
- Pro-only tasks: multi-zone balancing, condensate pump installs, ceiling cassette mounting and structural anchoring. Mistakes cause leaks, noise, or damage.
- If you see icing, oil stains, poor cooling, or error codes, shut the system off and call a technician.
Owner maintenance: rinse washable indoor filters monthly, keep grilles clear, gently hose outdoor coils, maintain 2 to 3 feet of clearance, keep condensate drains clear, and remove snow or ice. Schedule an annual tune-up to inspect electricals, verify charge, clean coils, check defrost and condensate operation, and update controls.
- Common sizing mistakes: sizing only by square footage (use a load-based approach), accepting frequent on/off cycling, summing indoor BTUs 1:1 on multi-zone, ignoring cold-climate capacity, assuming one large outdoor is best, and overvaluing SEER2 versus installation quality.
- Extreme cold: choose a documented cold-climate heat pump or use fossil-fuel backup.
- Many small rooms: several single-zone units often beat one large multi-zone and avoid single-point failure.
- Very humid climates: prioritize strong dehumidification and deep turndown, or add a dedicated dehumidifier.
Selecting the Right Mini Split in 2026: Efficiency, Refrigerants, Features and Rebates
In our experience, for primary areas, aim for SEER2 around 20 or higher. For occasional use zones, 16 to 18 can be sensible. Right sizing protects ROI. Heating and cooling are near 48 percent of home energy.
In 2026 many units moved from R 410A to lower GWP A2Ls like R 32 or R 454B, which require safety and permit practices. Match features to the space: confirm SEER2 and HSPF2, choose low noise indoor units for bedrooms, strong dehumidify modes and wide inverter turndown in humid climates, and desired controls.
Expect a 10 percent upfront premium for efficiency. Savings: moving from 14.3 to 20 SEER2 can cut cooling 28 percent, 67 dollars at 0.16 per kWh, and stepping from 15 to 20 SEER2 can save 200 dollars per year in high electricity cost regions. Federal 25C and local rebates often require about 17 SEER2 and 12 EER2, so check eligibility. Before purchase, reconfirm rooms and goals, zoning and BTU sizing, chosen ratings and refrigerant, electrical readiness and install plan, then have a professional validate with Manual J.
Practical Takeaways: Right Size, Validate with a Pro, and Prioritize Efficiency
Treat sizing like engineering, not guesswork: start with room BTU guides, adjust for climate, insulation, windows, and ceiling height, then refine with a load calc and pair with 2026-appropriate SEER2/HSPF2 and low GWP refrigerants. Avoid oversizing and favor inverter variable speed for steady part-load comfort. Final step, have a pro validate: Manual J, electrical and breaker capacity, line-set length and elevation, and zoning so the system runs quiet and efficient.
- Get a Custom Quote
- Talk to Our Team by phone, U.S.-based technical support
- Shop Mini Splits
 Heating
 Money Saving Tips
 Buying Guides
 State by State
 HVAC Systems