




 buying guides
 hvac systems
 learning center
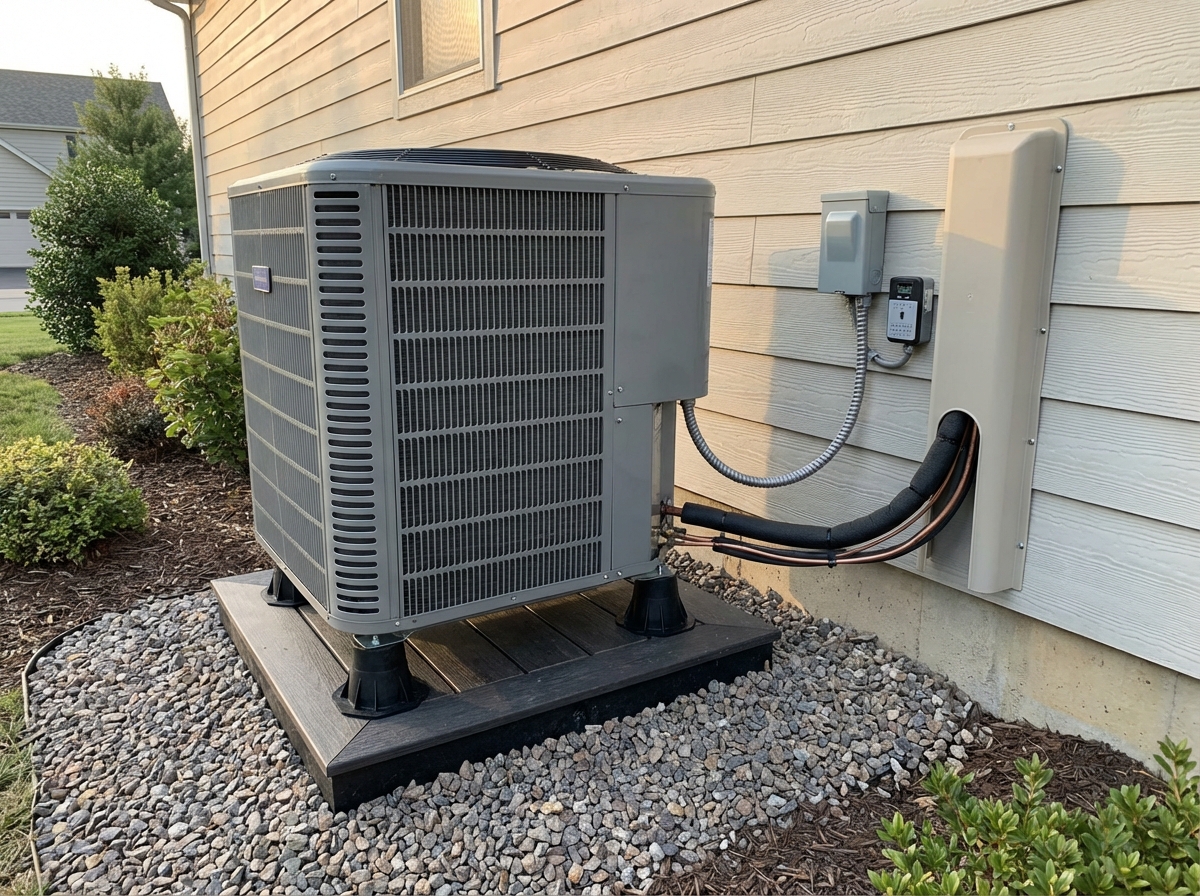
A condenser install is only as reliable as the details around it. The right accessories turn a "working" outdoor unit into a quiet, serviceable setup that avoids the slow-burn problems that drive callbacks: vibration noise, rub-through leaks, unsafe electrical work, and weather-driven damage.
This guide breaks down five must-have accessories-starting at the base (pads, stands, and isolation), then moving to the exposed connections (line sets and electrical), and finishing with the hazards that show up later (water, hail, snow, and airflow restrictions). Each section focuses on what the accessory prevents and the checks that make it perform the way it should.
1. Condenser Pad or Wall Stand
The pad or stand under the outdoor unit is performance hardware, not decoration. If the base stays level and stable, the cabinet stays square, condensate and defrost water leave the way they are supposed to, and you avoid the slow creep of vibration-related nuisance that shows up months later as rattles, humming, and callbacks.
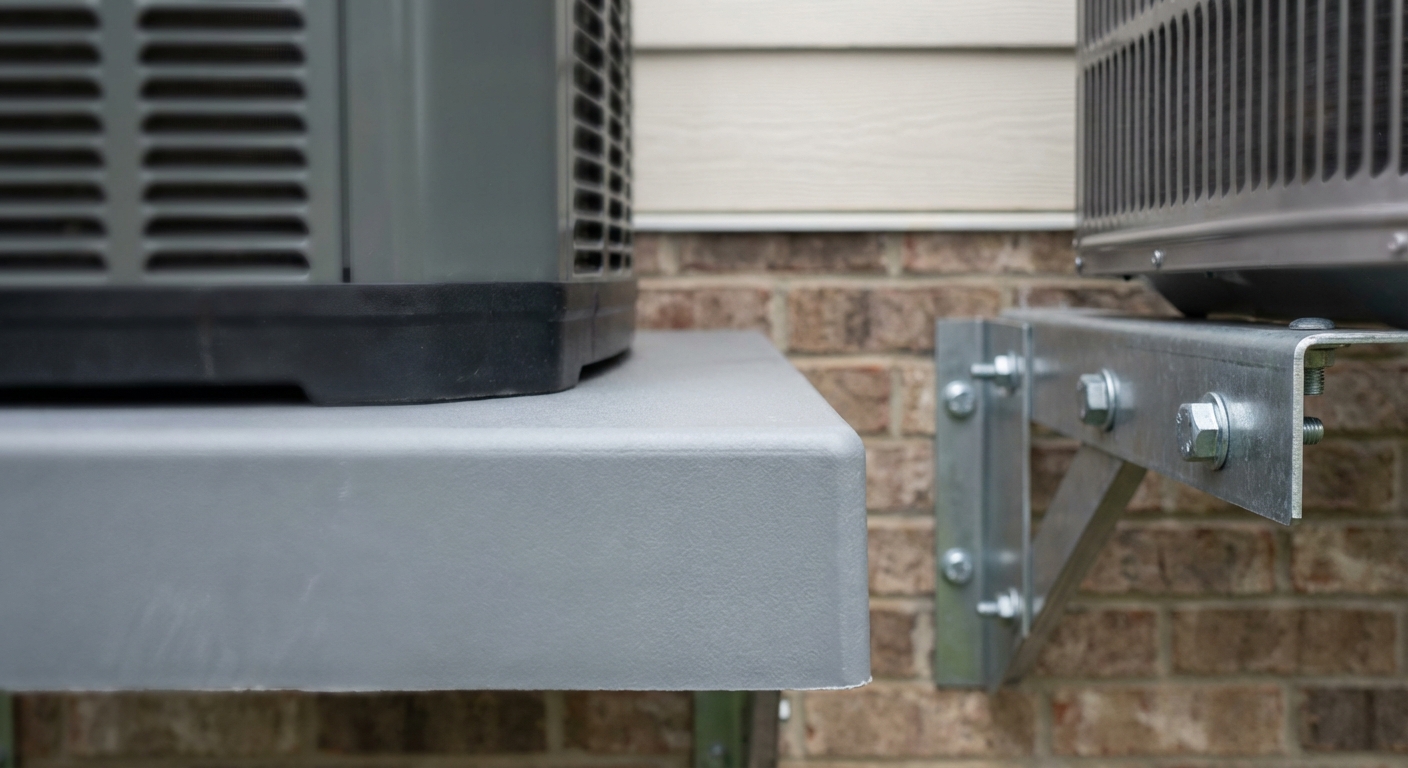
Support problems rarely start on day one. Soil settles after the first hard rain, mulch migrates, and pavers tilt. Concrete can crack or heave at edges. Wall-mounted installs create a different failure mode: a rigid bracket tied into framing can transmit structure-borne sound into bedrooms if the mounting point and stiffness are chosen poorly. The clean-looking base becomes the noisy one.
Composite or plastic pads win on speed and cleanliness. They resist rot and are the right answer when the grade is already stable and you can keep water from pooling under the unit.
Concrete pads earn their keep when you need mass and permanence. Manufacturers publish load capacities across standard concrete equipment pads in roughly the 1,000 to 2,400 lb range, which is exactly what you want when settlement is the enemy.
Wall stands, brackets, and elevated stands solve the jobs where ground placement is the problem: snow burial, narrow side yards, and flood-prone grades. Heat pumps add urgency here because heating-mode defrost creates regular water shedding in freezing conditions, so elevation and drainage readiness matter. Cold-climate guidance commonly recommends elevating the outdoor unit at least 12 inches above the highest expected snow level.
Many common residential pads land in the 36 inch by 36 inch footprint class, and 3 inch-thick injection-molded pads are common in listings. As a concrete reference point, the DiversiTech EcoPad EP3640-3 is 40 inch W x 36 inch D x 3 inch H and is rated around a 1,400 lb load capacity.
- Measure the unit footprint and confirm the installed weight, then choose a pad or stand with published capacity margin.
- Assess grade stability: firm, compacted soil favors composite; uncertain soil favors mass or elevation.
- Plan for water: no standing water under the unit, and a clear path for defrost runoff in heating season.
- Set elevation by risk: raise above flood-prone grades and at least 12 inches above the highest expected snow line in cold climates.
- Confirm whether wind-zone approvals require tie-downs; some systems are designed around ASCE 7-22 and Florida Building Code use cases.
A stable base prevents a lot of future noise, but it can't fix vibration transfer on its own. If the unit is mechanically "coupled" to the structure, sound will still travel-so isolation is the next decision that separates clean installs from complaints.
2. Anti-Vibration Pads & Isolation Mounts
Controlling vibration is what turns a "working" condenser into a quiet install that stays quiet. It prevents the two most common outcomes after set-down: noise complaints you hear through the structure and long-term wear on connected components from constant shake.
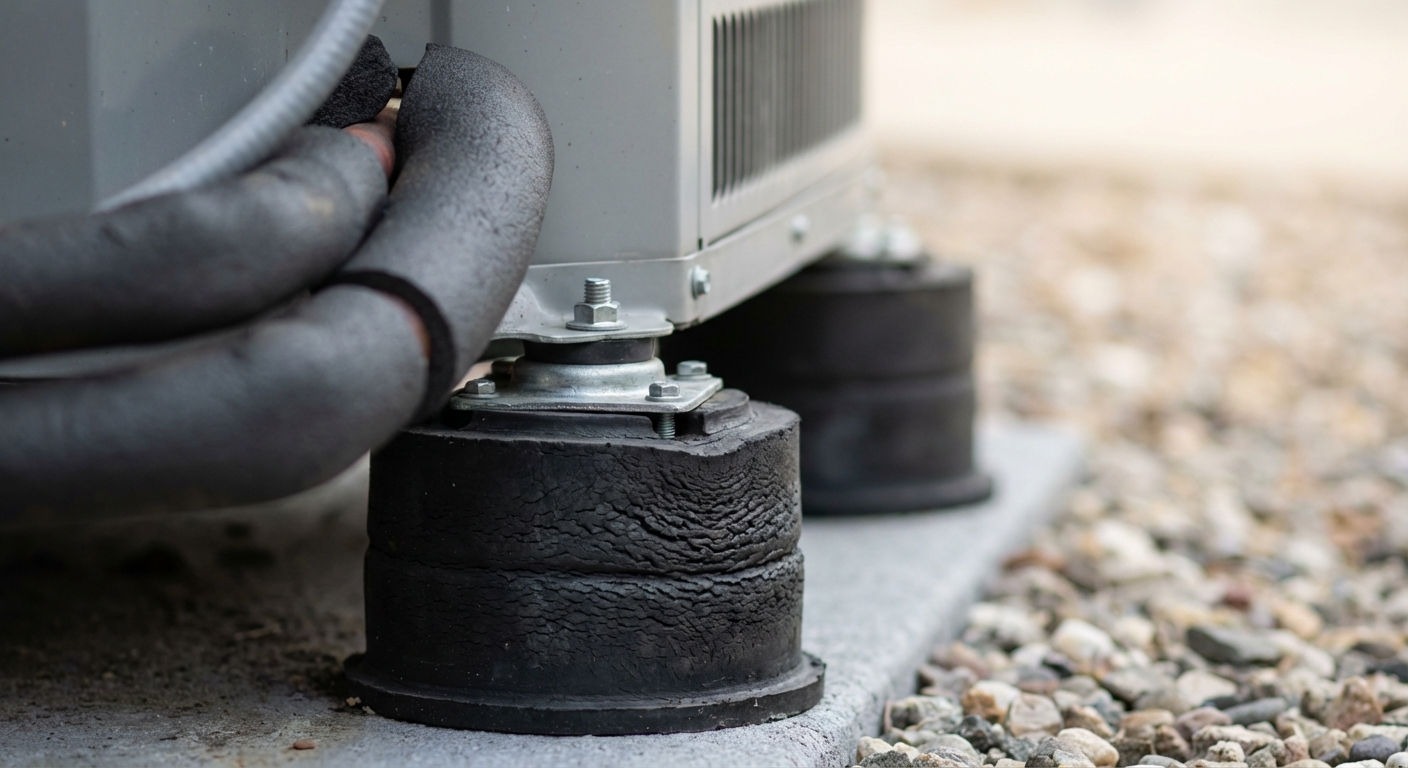
Vibration isolation is used to prevent or limit the amount of force transferred to the supporting structure by rotating equipment such as fans, and the payoff is immediate: less structure-borne noise through pads or stands, fewer cabinet rattles against nearby framing, and less cyclic stress carried into tubing and fittings. Isolation performance is frequency-dependent, which is why a "quiet" unit on one job can be a problem on the next.
Transmissibility (%) is the field shorthand for this behavior: 20% transmissibility means 20% of the vibration force passes through the isolator into whatever it is sitting on, and a well-matched isolator should land in that range or lower rather than passing most of the force through.
Isolation fails when the load is not evenly shared. One high corner, a rocked base, or an over-tightened hold-down makes the unit behave like it is bolted to the structure. The other failure mode is a rigid bridge: any hard contact point like lines, brackets, or rails touching framing bypasses the isolator completely.
Rubber and neoprene are common isolator materials, and 45 durometer neoprene is a common spec used for vibration isolation pads. Pads or feet handle general buzzing and minor imbalance well; spring isolators outperform rubber pads when low-frequency vibration or higher isolation is required.
Riser and rail setups still need isolation at the feet, because elevation changes the noise path, not the vibration source.
- Verify even support at all feet with zero rocking.
- Confirm isolators are centered under each foot and not pinched.
- Eliminate rigid bridges so nothing hard ties the unit back to framing.
- Listen at start and ramp (especially inverter speeds) and correct before leaving.
Once the unit is sitting flat and isolated, the next weak link is what connects it to the building. A poorly protected line set can turn a clean mechanical install into an efficiency loss, a water problem, or an avoidable leak—especially when you're aiming for quiet HVAC performance in noise-sensitive rooms.
3. Line Set Cover, Insulation, and Clamps
A protected and finished refrigerant piping run is an efficiency decision and a durability decision. When insulation stays intact and dry, the system stops bleeding capacity to heat gain and condensation. When the run is shielded from sun, weather, and impact, you avoid the slow damage that turns into service calls.
The line set, the pair of copper tubes that transport refrigerant between the indoor and outdoor units of an air conditioning or heat pump system, only performs as well as its routing and protection—especially on ductless mini-split systems. Clean bends, continuous insulation, and sealed penetrations keep the refrigerant path stable and the building envelope tight.
UV cooks exposed insulation until it cracks and powders. Unsupported tubing moves, then wears at rub points and fittings. Wall penetrations that are left rough or unsealed become water paths, and the damage usually shows up indoors. Even careful homeowners nick exposed insulation with gardening tools and weed trimmers because it is in the wrong place.
Line set covers (line-hide channels) put a hard shell over the run for UV and physical protection, plus a cleaner appearance—an especially common detail on single-zone mini-split AC systems. Typical systems are PVC or UV-resistant plastic, sized for common bundles like a 3/4 inch suction line plus a 3/8 inch liquid line plus control wire, and they include elbows, couplers, and wall-penetration fittings to avoid exposed gaps.
Insulation upgrades and repairs prevent energy loss and condensation, but only if every joint is sealed (see this mini-split AC buying guide for install details that affect performance). Jurisdictions can also drive minimum thickness: treat 1/2-inch insulation as a floor for field-installed refrigerant piping, and check your local energy code, since many jurisdictions require thicker insulation, particularly on suction lines running outside the conditioned envelope.
Clamps, supports, and penetration finishing keep the run from shifting and keep the wall opening sealed and clean. Routing still matters, maintain a minimum bend radius around 5 to 7 times the tube OD, so a 1/2-inch OD tube needs roughly a 2.5 to 3.5-inch radius to avoid kinks.
- Verify bends meet the 5 to 7 times OD radius guideline, no flattened spots.
- Demand continuous, sealed insulation, especially at joints and terminations.
- Support the run so it cannot rub, sag, or swing in wind.
- Finish every wall penetration with a clean fitting and a weather-tight seal.
Mechanical protection keeps refrigerant lines from becoming the failure point, but the condenser still depends on one other connection that has to be right the first time: the electrical path that feeds and protects the equipment.
4. Outdoor Disconnect Box, Electrical Whip & Surge Protection
A condenser install is only as professional as its power path. The right outdoor disconnect, whip, and surge protection prevent the two failures that cost the most: unsafe service conditions and damaged control boards.
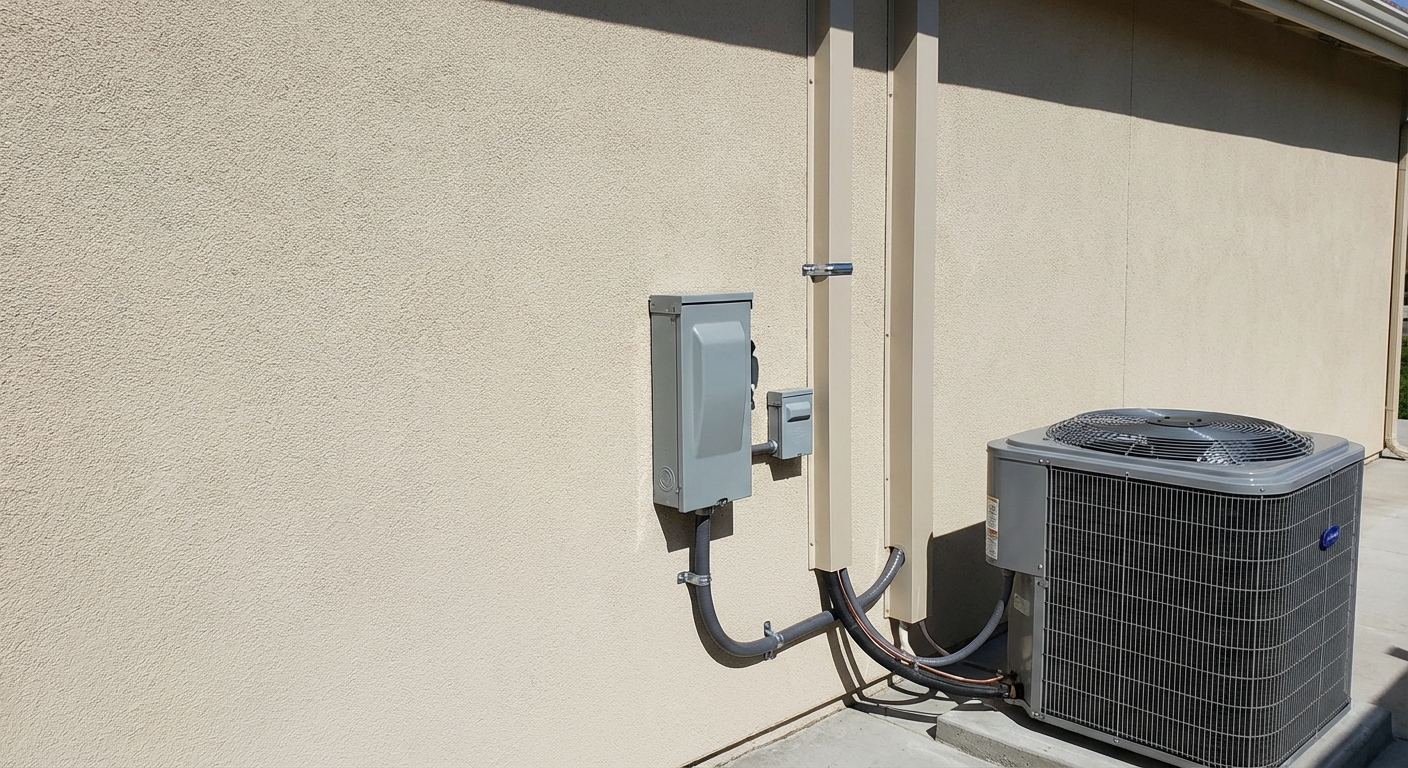
Plenty of outdoor units will start and cool with a disconnect that's awkward to reach, a whip that rubs on sharp metal, or a box that lets water track inside. Those shortcuts don't show up on startup day. They show up months later as a tech who can't safely isolate power, corrosion and nuisance trips from water intrusion, or a dead inverter board after a utility event.
Start with the nameplate, because MCA (Minimum Circuit Ampacity) used to size conductors is the manufacturer's minimum wire ampacity requirement for that specific unit. MCA is commonly calculated as 125% of motor running load ampacity (RLA) plus 100% of other continuous loads, so it can be higher than what you see on an ammeter during steady operation.
Then lock in protection: MOCP/MOP (Maximum Overcurrent Protection) is the max breaker/fuse allowed, and the overcurrent device must be at or below that value even if a larger breaker "stops the trips."
NEMA 3R enclosures protect against rain and sleet, which is why a 3R-rated disconnect box belongs on exterior walls. Placement still matters: NEC 440.14 (NFPA 70) requires the disconnecting means to be located within sight from, and readily accessible from, the equipment, and "within sight" means visible and not more than 50 feet away. The 2023 NEC also clarifies that the disconnect must meet the working space requirements of 110.26(A), so don't bury it behind the line set or the unit itself. A reachable, clearly located disconnect is a service feature, not a cosmetic one.
Modern outdoor units carry sensitive inverter-driven controls (including many R-32 HVAC systems), so surge protection is straightforward risk management. UL 1449 defines SPD types; Type 2 and permanently-connected Type 3 (non-receptacle) are intended to be installed at the utilization equipment being protected. A practical example is Eaton's CHSPT2, documented as a Type 2 device for installation after the main disconnect that requires a dedicated circuit breaker.
- Read the nameplate and confirm conductors meet or exceed MCA (Minimum Circuit Ampacity) and overcurrent protection does not exceed MOCP/MOP (Maximum Overcurrent Protection).
- Specify outdoor hardware that's actually outdoor-rated: a NEMA 3R disconnect enclosure, weatherproof fittings, and proper strain relief where the whip enters metal.
- Confirm service access and compliance: disconnect within sight (visible and within 50 feet) and readily accessible, with clear working space in front of it, plus a licensed electrician and permitted work where required.
Electrical protection prevents sudden failures, but outdoor units also take steady abuse from water, ice, and impact. That's where weather management earns its keep-provided it doesn't compromise airflow or service access.
5. Weather & Water Management
Cold and storm weather doesn't usually "mysteriously" kill outdoor units. The predictable failures are bent coils from hail, airflow loss from ice and snow packing, and corrosion from standing water. The right weather and drainage accessories prevent those problems before they start.
Guards and elevation only work if the unit can still breathe and be serviced. Anything that blocks the coil face, restricts discharge air, or makes panels impossible to remove turns "protection" into a performance and maintenance problem. Treat airflow and service access as non-negotiable constraints, then select the accessory that matches the hazard.
Common hail-guard designs use an aluminum frame with roughly 1/2 inch by 1 inch woven galvanized-wire mesh, or louvered panels. Mesh resists impacts while still presenting open area; louvers trade visibility for a more rigid face.
Clearance is the catch, and it varies widely by kit: one manufacturer's published requirement calls for roughly 39 inches (100 cm) of space on the top, sides, front, and back, which rules out many tight side-yard installs. Always confirm the specific kit's clearance requirements, the unit's accessory compatibility, and any manufacturer approval before ordering.
Snow legs or stands keep the unit above accumulation so the coil and fan maintain airflow. In exposed locations, a properly designed wind baffle can stabilize operation, but only if it preserves the unit's required air path. Drainage matters just as much: heat-pump defrost produces water, and the base-pan drain path must stay clear. For more detail, see how to prep your HVAC system for severe weather. Fix roof drip lines, grade the area so water runs away, and keep defrost water from re-freezing at the base where it accelerates ice buildup and corrosion.
Look up: roof edges and gutters that will dump water or ice onto the coil. Look down: low spots that trap defrost water at the base. Look around: hail exposure and wind funnels, then pick the guard, elevation, or drainage fix that solves that specific threat without compromising airflow or serviceability.
Summary + Next Steps
A clean accessory plan is what separates a quiet, serviceable condenser install from the slow-burn problems that drive callbacks: noise complaints, rub-through leaks, unsafe electrical work, and weather-driven damage. The payoff is straightforward: less noise, fewer leaks, safer service, and better resilience when the yard turns into a wind, ice, and water test.
Start with the base: a properly chosen condenser pad or wall stand prevents rocking and settling, and isolation mounts keep vibration from telegraphing into the structure. Protect the connections next-line set covers, insulation, and clamps reduce UV damage, rub points, and kinks, while the right disconnect, whip, and surge protection keep service safe and electronics protected. Finally, match weather accessories to the actual hazards on site with airflow and serviceability as fixed constraints.
- Confirm your system type and install context (split heat pump/AC vs. mini split routing needs).
- Verify site constraints: level, stable base; noise sensitivity; hail, snow, and roof-drip exposure; electrical service location.
- Check permit and inspection requirements with your AHJ; coordinate licensed pros for electrical work where required.
- Assemble the full accessory list before installation day so nothing gets improvised in a way that blocks service access.
Use Budget Heating to build the order as one complete package with wholesale pricing, a rebates and HVAC incentives guide, ordering tools, and U.S.-based support that helps you track your order status and avoid the missing-parts install.
Wrapping Up
A dependable condenser setup comes down to the small choices that prevent big headaches later. The right pad or stand keeps the unit level and stable, isolation mounts reduce vibration transfer and noise, and a properly protected line set preserves efficiency while preventing rub-through, UV damage, and moisture intrusion.
Just as important, the electrical path needs to be built for safety and longevity: a correctly sized disconnect, properly protected whip, and surge protection help avoid unsafe service conditions and costly electronics failures. Finally, weather and water management, from elevation and drainage to hail or snow protection, should match the site's real risks without restricting airflow or blocking service access.
Use these five accessories as a pre-install checklist so the job is quiet, serviceable, code-aware, and built to handle the conditions outside, then gather the right parts before installation day to avoid last-minute compromises.
 Cooling
 Heating
 Money Saving Tips
 Product and Brands Insights
 State by State