learning center
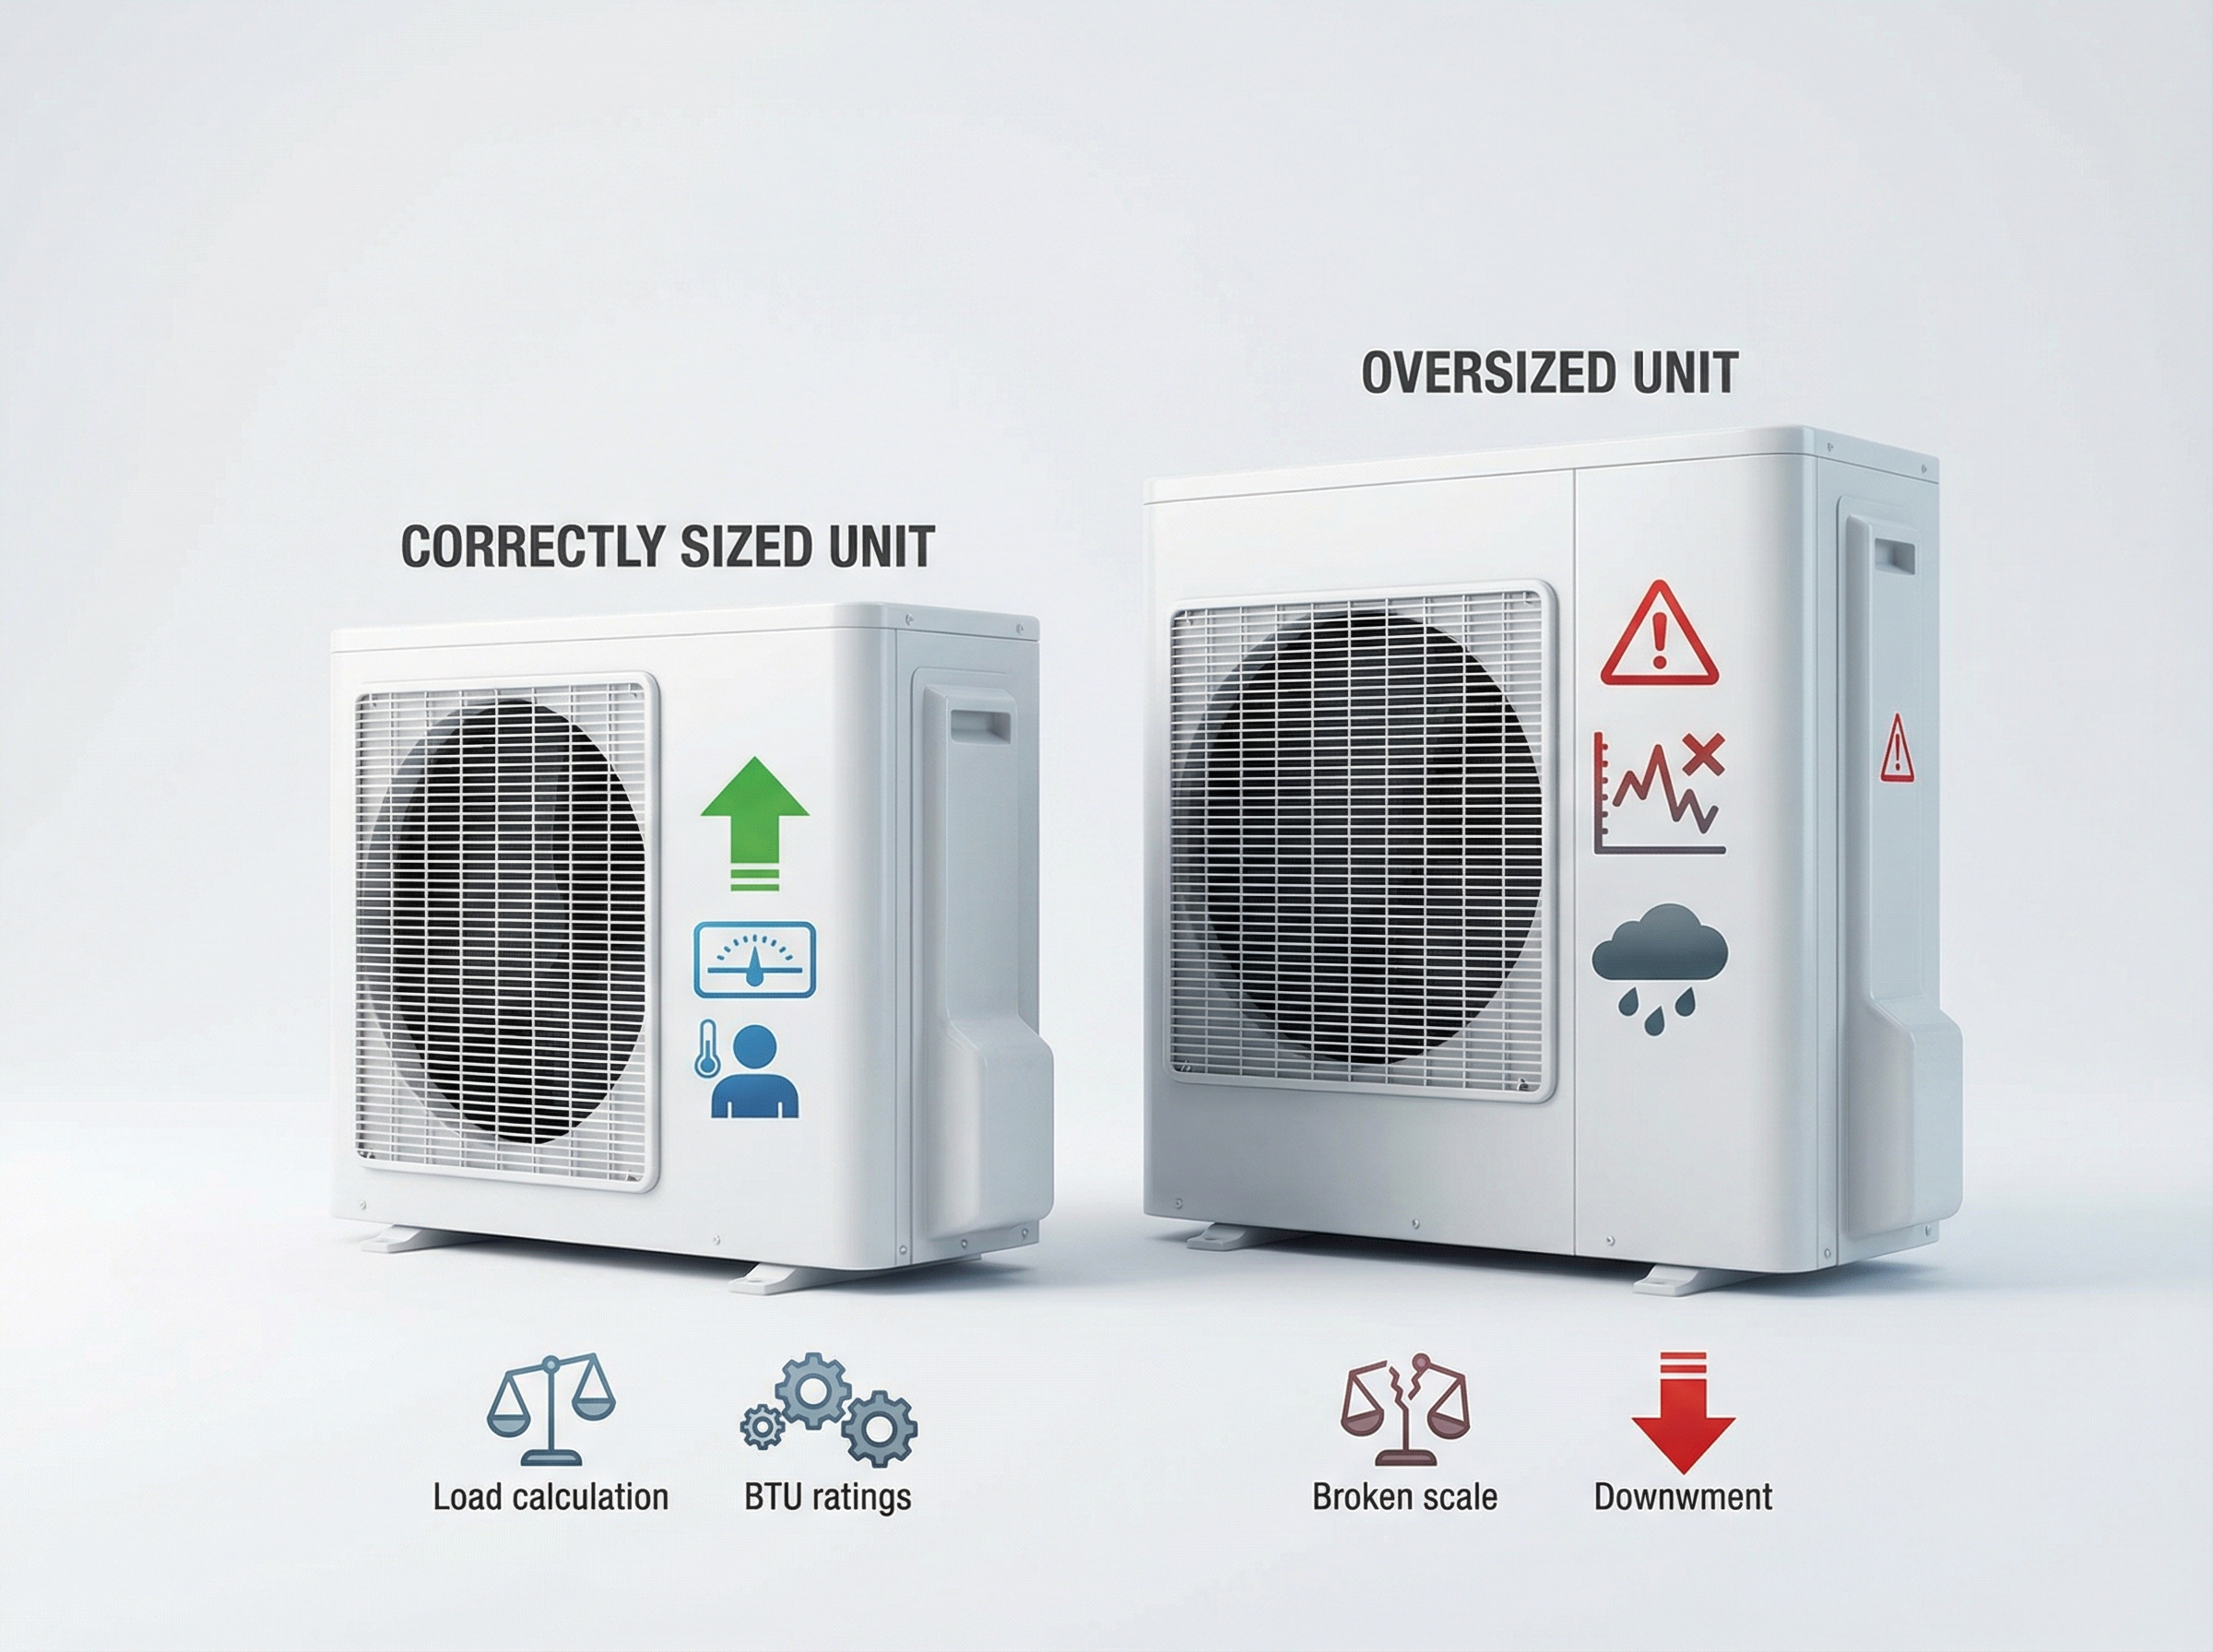
Is It Better to Oversize the Condenser for a Mini Split? Quick Answer
Quick answer: in most homes, it is not better to oversize the outdoor condenser. Right sizing delivers the best comfort, efficiency, and system life. Oversizing means choosing a condenser with more capacity than the space requires or than the connected indoor heads can use. Right sizing means matching the condenser's capacity to the home's calculated heating and cooling load, considering typical weather.
Why it matters: comfort improves when the system runs long enough to stabilize rooms, energy use stays in check when output matches demand, and equipment tends to last longer when it operates within its intended range. Regional climate, local rules, and maintenance practices also influence the choice, but they generally point to proper sizing rather than upsizing.
Think of it like shoe size: the pair that fits simply works better.
How Mini Split Sizing Works: BTUs, Load Calculations, Inverter Modulation, and SEER2
Right sizing starts with a load calculation, then matching the unit's BTUs per hour to that load. Capacity is only half the picture, because efficiency ratings tell you how much electricity the system uses to deliver that cooling or heating.
SEER and SEER2 are seasonal cooling efficiency ratings, think of them like miles per gallon for air conditioning. Higher numbers mean the same cooling for less electricity over a typical season. The federal baseline for many ductless mini split systems is 13.4 SEER2, market models run from about 13.4 into the high teens, and some incentives require SEER2 16 or higher. Moving from 13.4 to 16 SEER2 can trim cooling use roughly 15 to 20 percent, while upgrading from an older SEER around 10 to SEER around 18 can cut costs on the order of up to about 50 percent depending on climate and use. SEER applies only to cooling, heat pump heating is rated with HSPF2 and COP, so check those separately.
Modern inverter mini splits modulate capacity, so they can ramp up and down to match the load. That wide turndown makes modest oversizing more tolerable, but there is always a minimum output. If the unit is too large, it will not run in long, steady part load conditions, and it will miss the efficiency implied by its SEER or SEER2 rating. In the field, we see this whenever minimum output exceeds the room's actual load.
Why Homeowners Are Tempted to Oversize (and the Myths That Fuel It)
Homeowners often reach for a larger condenser to cool faster, ride out heat waves, or allow future expansion. It feels safer, but upsizing usually backfires in the real world. In our experience at Budget Heating (BudgetHeating.com), right sizing wins.
- Future proofing: bigger to be safe. Reality: higher cost, short cycles, shorter life.
- Square-foot rules: ignore insulation, leakage, windows. Do a Manual J.
- Bigger dehumidifies better: no. Fast cool, clammy rooms.
- Bigger is better: no. More cycling, temp swings, higher bills.
- Oversizing saves energy: no. Starts and stops waste energy and add wear.
- Inverters cannot be oversized: minimum output may still be too high.
Right sized equipment runs like a steady jogger, consistent and comfortable. Oversized gear sprints, stops, and leaves you sticky and paying more.
Risks of Oversizing: Short Cycling, Poor Humidity Control, Efficiency Loss, and Reliability Problems
Oversizing is not extra comfort. It is like using a sledgehammer for a finishing nail. An oversized mini split reaches the thermostat setpoint quickly, then shuts off, only to restart again minutes later. That rapid start and stop pattern is short cycling. During these brief runs the coil does not stay cold long enough to wring out moisture, so the room can feel cool but clammy. Short cycling also wastes energy at every restart, raises utility bills, and piles wear on compressors, fans, and electronic controls.
Multi zone setups are even more sensitive. When only one or two indoor heads call, an oversized outdoor unit may not be able to throttle low enough, so it hunts, ramps, and clicks off repeatedly. In our experience at Budget Heating (BudgetHeating.com), that is when customers notice temperature swings, noisy operation, and poor humidity control most.
Oversizing undermines seasonal efficiency. Even with a strong SEER or SEER2 rating on the nameplate, the unit spends much of its time outside the sweet spot where the inverter is most efficient, so real world performance drops. Over time, the mismatch between a larger condenser and the indoor heads it serves can disrupt airflow and control logic, contributing to premature failures and a shorter system lifespan.
Mini splits are designed and listed as matched systems. Always pair condensers and indoor units exactly as the manufacturer specifies. Proper matching protects performance, preserves warranty coverage, and ensures the system can modulate smoothly instead of short cycling its way into comfort and reliability problems.
Choosing the Right Unit and Brand: Costs, SEER2 Rules, Incentives, and Refrigerant Changes
Selecting a condenser and matched indoor units is a balance of price, efficiency tier, and correct sizing. From our field experience, right sizing delivers more value than simply chasing the highest label number.
- Load and permits: Many jurisdictions require ACCA Manual J and Manual S for permitted installs. Incentives often require documented calculations plus minimum SEER2 and HSPF2 levels.
- Efficiency tiers: Replacing ~SEER 10 gear with ~SEER 18 mini splits can cut cooling costs by up to about 50%. Stepping from 13.4 SEER2 to 16 SEER2 typically trims seasonal kWh 15 to 20 percent.
- Oversizing: Short cycling keeps the system out of its efficient part-load range and can erase expected savings.
- Regulatory context: Since 2023, DOE uses SEER2/EER2/HSPF2 tests with regional minimums. Capacity breaks, such as 45,000 Btu/h, can shift required tiers.
- Refrigerant: New models are moving to R-32 or R-454B under the AIM Act. This affects product availability and installation, not sizing principles.
- Lifecycle cost: Larger condensers cost more up front, and frequent cycling can shorten compressor and electronics life.
When Oversizing Might Be Acceptable: Real Tradeoffs, Limits, and Better Options
Oversizing is tempting for fast pull-down or rare extremes. In our field experience, a modest step up can make sense only for unusual, intermittent-use spaces like a workshop or vacation cabin where speed matters more than day-to-day efficiency. In hot, humid climates, bigger units are a poor fit, short run times slash dehumidification. In cold climates, choose a cold-climate heat pump with documented low-ambient capacity and acceptable COP, not a larger standard model. In hot, dry regions, a small increase can work only if the unit can still modulate low enough at typical conditions to avoid short cycling.
- Improve the envelope first, air sealing and insulation.
- Add a second head to serve difficult rooms.
- Use a small supplemental heater for rare extreme snaps.
Proper Sizing Steps: Perform a Manual J, Account for Insulation, Orientation, and Window Area
Right sizing starts with a clear plan. Use this checklist to align loads, equipment, and comfort.
- We define comfort and design targets: note humidity issues, hot or cold rooms, temperature swings, noise, and air distribution. Set local outdoor design temperatures.
- Require a written room by room Manual J, not rules by square foot. This prevents over or undersizing individual zones.
- Verify Manual J inputs include room area and ceiling height, insulation and air sealing, window size, orientation and shading, occupancy and internal gains, and sun exposure.
- Translate loads into equipment with Manual S. Confirm model capacities at design temperatures, not just nameplate ratings.
- Prefer equipment with strong modulation. Check turndown ratio and minimum capacity so it can run low instead of cycling.
- Match indoor heads to zone loads. Do not assign the same BTU to every room.
- Expect longer, steadier cycles that remove both heat and moisture, which improves comfort.
- Vet proposals and commissioning: request the Manual J summary, chosen models with capacities at design temps, expected runtime, and proof of proper vacuum, charge by weight and spec, condensate management, and airflow verification.
Practical Installation & Operation Tips: Line Lengths, Mounting Height, Placement, and Dehumidification Settings
At commissioning, we keep lines within manufacturer limits and mount the indoor head where intake and throw are unobstructed. Proper placement promotes long, low-speed runs, which pull moisture from the air. In humid regions, prioritize dehumidification: right-sized inverter systems beat oversizing. Use Dry mode or a lower fan when rooms feel cool yet clammy, and review unit's sensible heat ratio.
Homeowner care: clean or replace filters every 1 to 3 months. Disconnect power before wiping grilles, keep vegetation clear, and do not open service panels. Use PPE and a stable ladder, and maintain CO detectors if gas appliances are present. Watch for frequent on/off cycling with short run times, cool but clammy air, uneven rooms, and higher energy use.
DIY vs Professional: What Homeowners Can Do and What Requires an HVAC Pro
We draw a simple line: handle basics, leave the guts to licensed techs. Homeowners can replace filters on schedule and gently rinse outdoor cabinets and fins, but do not open covers or touch internal components. Electrical diagnostics, control board swaps, deep coil cleaning, refrigerant charge checks, and annual tune-ups belong to professionals to protect safety and warranties. Any refrigerant work, including charging, recovery, or leak checks, requires EPA-certified handling and specialized tools. Do not oversize condensers or re-match indoor and outdoor units, since mini splits are engineered as matched systems.
Conclusion: Best Practices, Right-size, Use Inverter Tech Carefully, and Commission Properly
No, grossly oversizing a mini-split condenser is generally not better. Best practice is to size to a room-by-room Manual J, choose inverter equipment with suitable turndown, match indoor heads to room loads, and prioritize commissioning and maintenance over extra nameplate capacity. Inverters can tolerate modest oversizing, but every system has a minimum output it cannot go below.
If you are weighing options, that is normal. Our team has 30+ years of hands-on HVAC experience and we design systems that stay comfortable and efficient for the long haul.
Ready for next steps? We are a factory-authorized dealer with U.S.-based phone support and wholesale pricing made accessible.
- Get a Custom Quote
- Talk to Our Team by phone for quick sizing guidance
- Shop Ductless Mini Splits
 Cooling
 Heating
 Money Saving Tips
 Product and Brands Insights
 Buying Guides
 State by State
 HVAC Systems