cooling
 heating
 learning center
Why HVAC Is a Core Part of Any High Performance Gaming Room
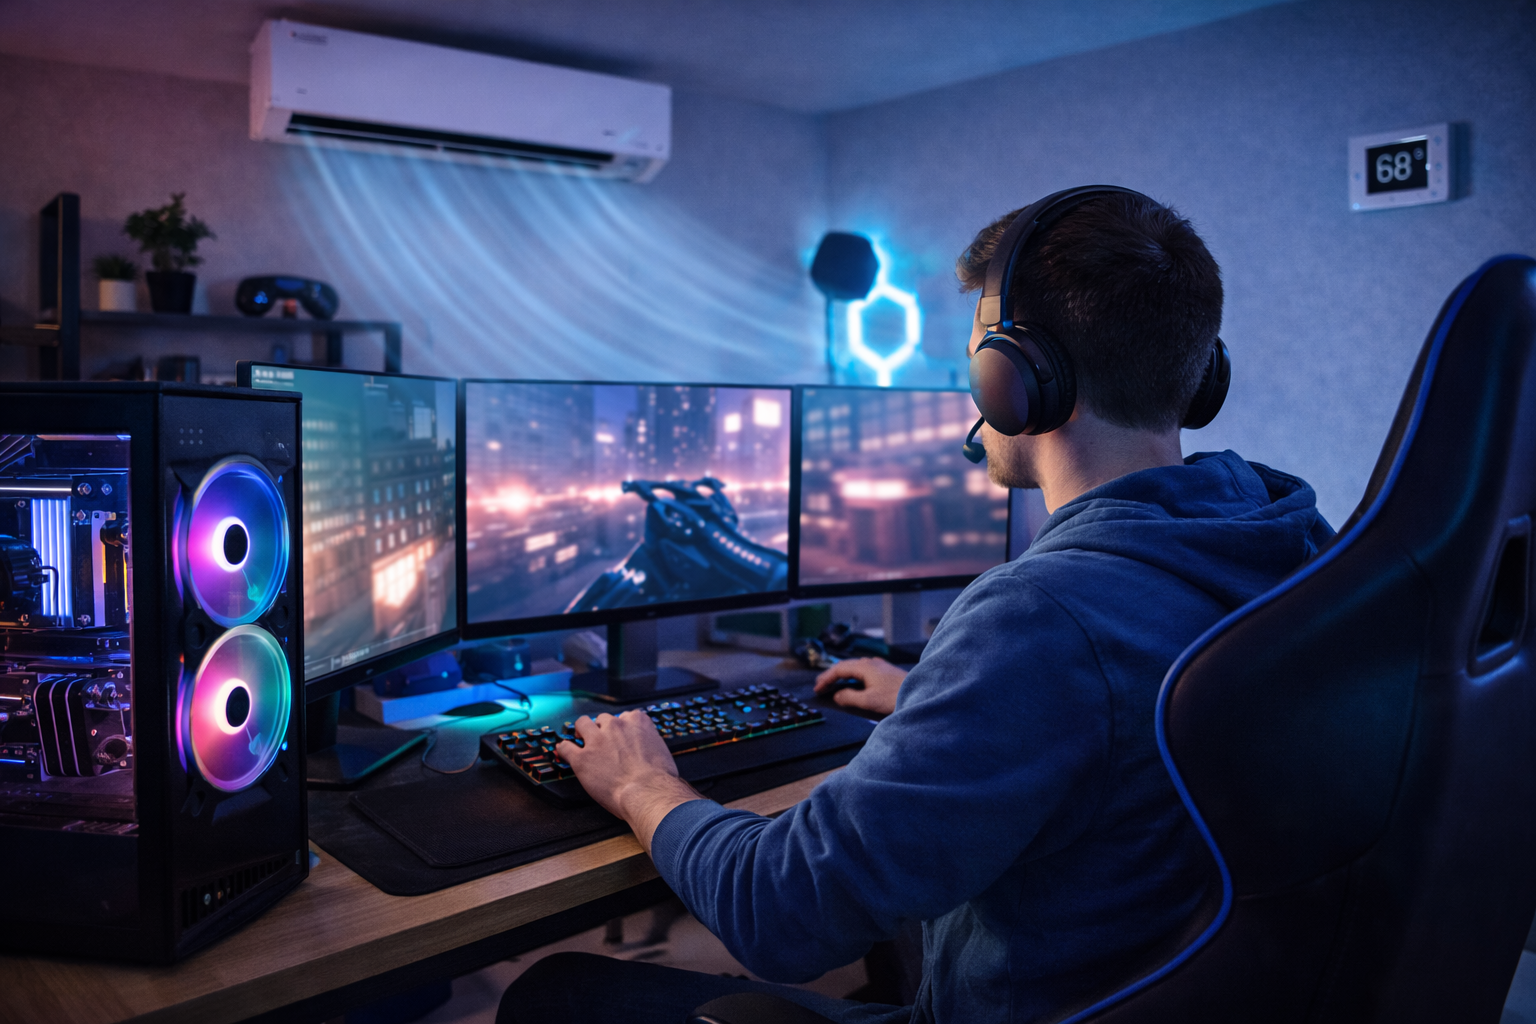
Gaming rooms stress HVAC more than typical living spaces because they pack multiple high wattage PCs, consoles, displays, VR gear, accent lighting and people into a small volume. Internal heat is continuous, sessions run long, and expectations for tight temperature control, low noise and reliability are high. A serious gaming room is a server closet in disguise, only you are in it. If the system cannot carry away that heat quietly and steadily, temperatures creep, hardware throttles, and comfort fades.
This article treats HVAC as part of the immersive experience, not a background utility. We draw on hands on installs and troubleshooting to outline practical choices: right sized cooling for sustained loads, airflow that sweeps hotspots, humidity control that keeps grips and sensors stable, and acoustics that keep fans and compressors out of the storyline. Expect clear guidance on ducted versus ductless options, zoning and controls, filtration, and durability for marathon play.
Assessing Your Gaming Room: Size, Heat Load and Occupancy
Before selecting equipment, quantify the room and its continuous gains so the size is driven by facts, not guesswork.
- Room and envelope: measure length, width and ceiling height to get room volume. Note insulation quality, window size and orientation, and any door leakage.
- Electronics and sessions: convert watts to heat using 1 W ≈ 3.41 BTU/h. Example: a 600 W PC ≈ 2,046 BTU/h. Two rigs plus occupants can push 3,500 to 5,000 BTU/h or more. Record typical session lengths, for example 4 to 12 hours, to reflect continuous operation.
- Occupancy: note how many people are usually in the room during play and for how long, since bodies and devices add steady load.
- Climate classification: determine your climate or ASHRAE zone and humidity type, hot humid, hot dry, mixed, or cold. Climate drives the split between sensible and latent load and steers equipment choices, for example more moisture control in hot humid, more sensible capacity in hot dry, balanced capability in mixed, and proper heating sizing in cold.
Sum the electronic heat with envelope gains, then weigh it against climate and hours of use. That snapshot points to right sized comfort without overspending on capacity you do not need.
Choosing the Right Cooling System: Central AC, Zoning and Ductless Mini Splits
Gaming rooms behave like small server closets: high, fast-changing heat from PCs, monitors, and people. That makes two approaches rise to the top.
- 1:1 ductless mini split: size it with a Manual J that includes gaming plug loads. A dedicated indoor head and outdoor unit focus capacity where it is needed, so you can pre cool the room, respond to sudden heat spikes, and avoid overcooling the rest of the home.
- Central AC with a dedicated zone: give the gaming room its own thermostat, zone damper, and return, paired with a variable speed air handler. You get room by room control without a second condenser.
Inverter or variable speed compressors with ECM blowers act like a dimmer switch rather than an on/off lamp: they modulate to hold the setpoint tightly with little cycling, which improves dehumidification, comfort, and noise compared with single stage systems. That steadiness is ideal for a room that swings from idle to full load in minutes. In our experience at Budget Heating (BudgetHeating.com), this combo keeps frames high and temps steady without freezing the rest of the house. By contrast, single stage, whole house only setups often lag, overcool nearby rooms, and still leave the gaming room warm.
Common Mistakes and When HVAC Solutions Aren't the Right Fit
HVAC shortcuts often backfire. We see recurring issues when folks try to push systems beyond their design. Here are the most common missteps and better options to consider:
- Closing supply vents to force more air into one room raises static pressure, which can cut airflow and stress coils. It is like pinching a garden hose. Proper zoning or a ductless mini split solves the root problem.
- Installing ultra high MERV filters on a standard blower can choke airflow. Use a rating the blower can handle or add room air purifiers.
- Oversizing AC leads to short cycles, weak humidity control, and extra noise. Right-size with a Manual J load calculation.
- Adding refrigerant every season signals a leak. Refrigerant is not consumed and the leak needs repair by a licensed technician.
- Single-hose portable ACs create negative pressure that pulls in hot, humid air. For heavier loads, choose dual-hose, window, or ductless units.
- Dropping the thermostat far below your target does not cool faster. Pre-cool or use variable speed equipment when available.
Sometimes the solution itself is not ideal: in extreme cold, plan on backup heat or a gas furnace; for very temporary setups, go portable or window; tight spaces or exterior limits often require custom ducting or a professional design.
Minimizing Noise: Choosing Quiet HVAC and Smart Acoustic Treatments
We keep streams clean by managing dBA, the ear weighted measure of loudness. Aim for 30-35 dB(A) at the seating and mic position. Start with low sone, low dBA indoor units (ductless or variable speed air handlers). Put equipment on vibration isolating pads, set the outdoor unit away from windows and the streaming wall, and design ducts for low velocity to curb turbulence noise. Use lined boots or longer throws so nearby grilles stay quiet. Add acoustic panels with care, and never cover supply or return registers, which only increases hiss and rumble.
Ductless Mini Splits, Efficiency and Budget: Pros, Cons and Cost Tradeoffs
Gaming rooms run long hours and put off steady heat, so efficiency and control matter. Ductless mini splits pair a dedicated indoor head with an inverter compressor that modulates output for steadier temps and quiet operation. You get targeted supply placement to wash heat off PCs and displays, and you avoid whole home oversizing that can short cycle other rooms. The tradeoffs are proper sizing and placement, clean condensate routing, and a plan for penetrations through the wall.
- Pros: dedicated zone, inverter modulation, quiet indoor units, targeted supply placement, avoids whole home oversizing issues.
- Cons: needs correct sizing and head location, condensate routing, and careful install details.
On efficiency, think of SEER2 like miles per gallon for seasonal cooling, with EER2 reflecting a single test point that helps judge performance on hot peak days. If you use the heat pump in winter, HSPF2 describes seasonal heating efficiency. The Department of Energy updated procedures in 2023 and set new regional minimums, such as 14 SEER in parts of the North and 15 SEER in some Southern regions. SEER2 is the current reference for new equipment.
For budgets, moving from 14 to 18 SEER can cut cooling energy roughly 20 percent in long runtime spaces. Routine maintenance can trim another 5 to 15 percent by keeping performance on spec. In our experience at Budget Heating (BudgetHeating.com), variable speed systems are worth it in gaming rooms. Compare SEER2 and EER2, check HSPF2 if you heat, and ask about rebates plus an estimated annual operating cost based on your expected gaming hours.
Optimizing Airflow and Ventilation: Supplies, Returns and Fresh Air
We place supplies to wash walls and hot equipment, not blow on players, using short throws across surfaces to strip heat and avoid drafts or hot spots. High returns belong near the ceiling to catch rising heat, and an extra return by equipment racks pulls hot air before it spreads. If ducts are used, add a dedicated room return to stabilize pressure, seal and insulate runs, include balancing dampers, and verify external static pressure stays within the air handler's specs. Smart controls help too: a thermostat with a sensor at the gaming seat can run a Gaming mode that pre-cools 20-30 minutes, prioritizes dehumidification or low fan noise, and automates shading. For long sessions, plan fresh air. An ERV or HRV keeps CO2 below about 1,000 ppm and maintains concentration, and in tight rooms a timed ventilation schedule brings in controlled outdoor air.
Humidity, Air Quality and Filtration: Keep Players and PC Hardware Happy
In our experience, 68 to 75°F for space temperature and 40 to 60% relative humidity keeps players comfortable and hardware stable. 40 to 50% is commonly recommended to limit sweat, lens fogging, and static discharge. Think of humidity as traction for people and electronics: too little invites sparks, too much feels slick.
Verify dehumidification in hot humid climates. If the main system cannot hold the setpoint, add a dedicated dehumidifier. Always route condensate drains or pumps safely away from sensitive electronics.
Filtration has tradeoffs. Use MERV 11 to 13 when the blower can handle the added resistance. If not, choose a high performance low resistance filter and supplement with a room HEPA purifier sized to the room’s CADR. Activated carbon helps with odors and VOCs. In tighter rooms, plan fresh air through an ERV or HRV, or use timed ventilation.
Monitoring, Maintenance and Installation Checklist: Keep Your Setup Reliable
Gaming rooms stress HVAC with heat and dust. From decades of installs, we use this checklist to keep systems steady and electronics protected.
- Design and selection: request a Manual J that includes plug loads, plus Manual S and Manual D. Confirm sensible versus latent capacity, CFM per ton, SEER2 and sound.
- Commissioning: confirm electrical circuits, condensate safety switches and proper refrigerant charge. On install day verify delivered airflow in CFM, temperature split, noise and condensate drainage.
- Dust and upkeep: seal cable penetrations, add door sweeps and keep slight positive pressure. Replace filters monthly in heavy use, clean coils, keep outdoor coils clear, vacuum PC dust, and do visual checks for odors, ice or odd noises.
- Call a licensed technician for electrical faults, refrigerant issues or suspected leaks, gas or combustion problems, and any major mechanical or ductwork changes.
Bringing It Together: HVAC Best Practices That Enable Immersive Gaming
Key insight: immersive gaming rooms rely on HVAC basics. Aim for 68 to 75°F and 40 to 60% RH, choose right sized variable speed equipment, often a dedicated zone or ductless mini split, place supplies and returns to pull heat off the rigs, use quality filtration and add ERV or HRV when needed, and maintain for long runtimes and higher dust. Licensed pros should handle refrigerant, electrical, and gas. This systems approach balances comfort, hardware protection, efficiency, and quiet.
You are deciding how to keep a quiet, cool room that protects hardware without inflating bills.
We bundle selection, an electronics focused Manual J, commissioning, and service so performance stays consistent.
- Get a Custom Quote, Manual J with electronics plus variable speed ductless or zoning options
- Talk to Our Team, U.S. based phone support from a factory authorized dealer
- Shop Ductless Mini Splits, ERV or HRV, and filtration, with fast shipping and Affirm financing
 Money Saving Tips
 Product and Brands Insights
 Buying Guides
 State by State
 HVAC Systems