Ultimate Guide: What Is an RV Mini Split and Who Should Consider One?
An RV mini-split is a compact, two-piece heat pump: a small outdoor condenser on the frame and a quiet wall cassette inside, joined by slim refrigerant lines. Unlike rooftop units, it is ductless, usually inverter driven, quieter, and can use less power. It cools and heats, like a fridge in reverse, a heat pump moves heat in or out instead of creating it. Ideal for vanlifers, boondockers, full-timers, DIY converters, and techs replacing loud, power-hungry roof ACs or aiming for four-season comfort.
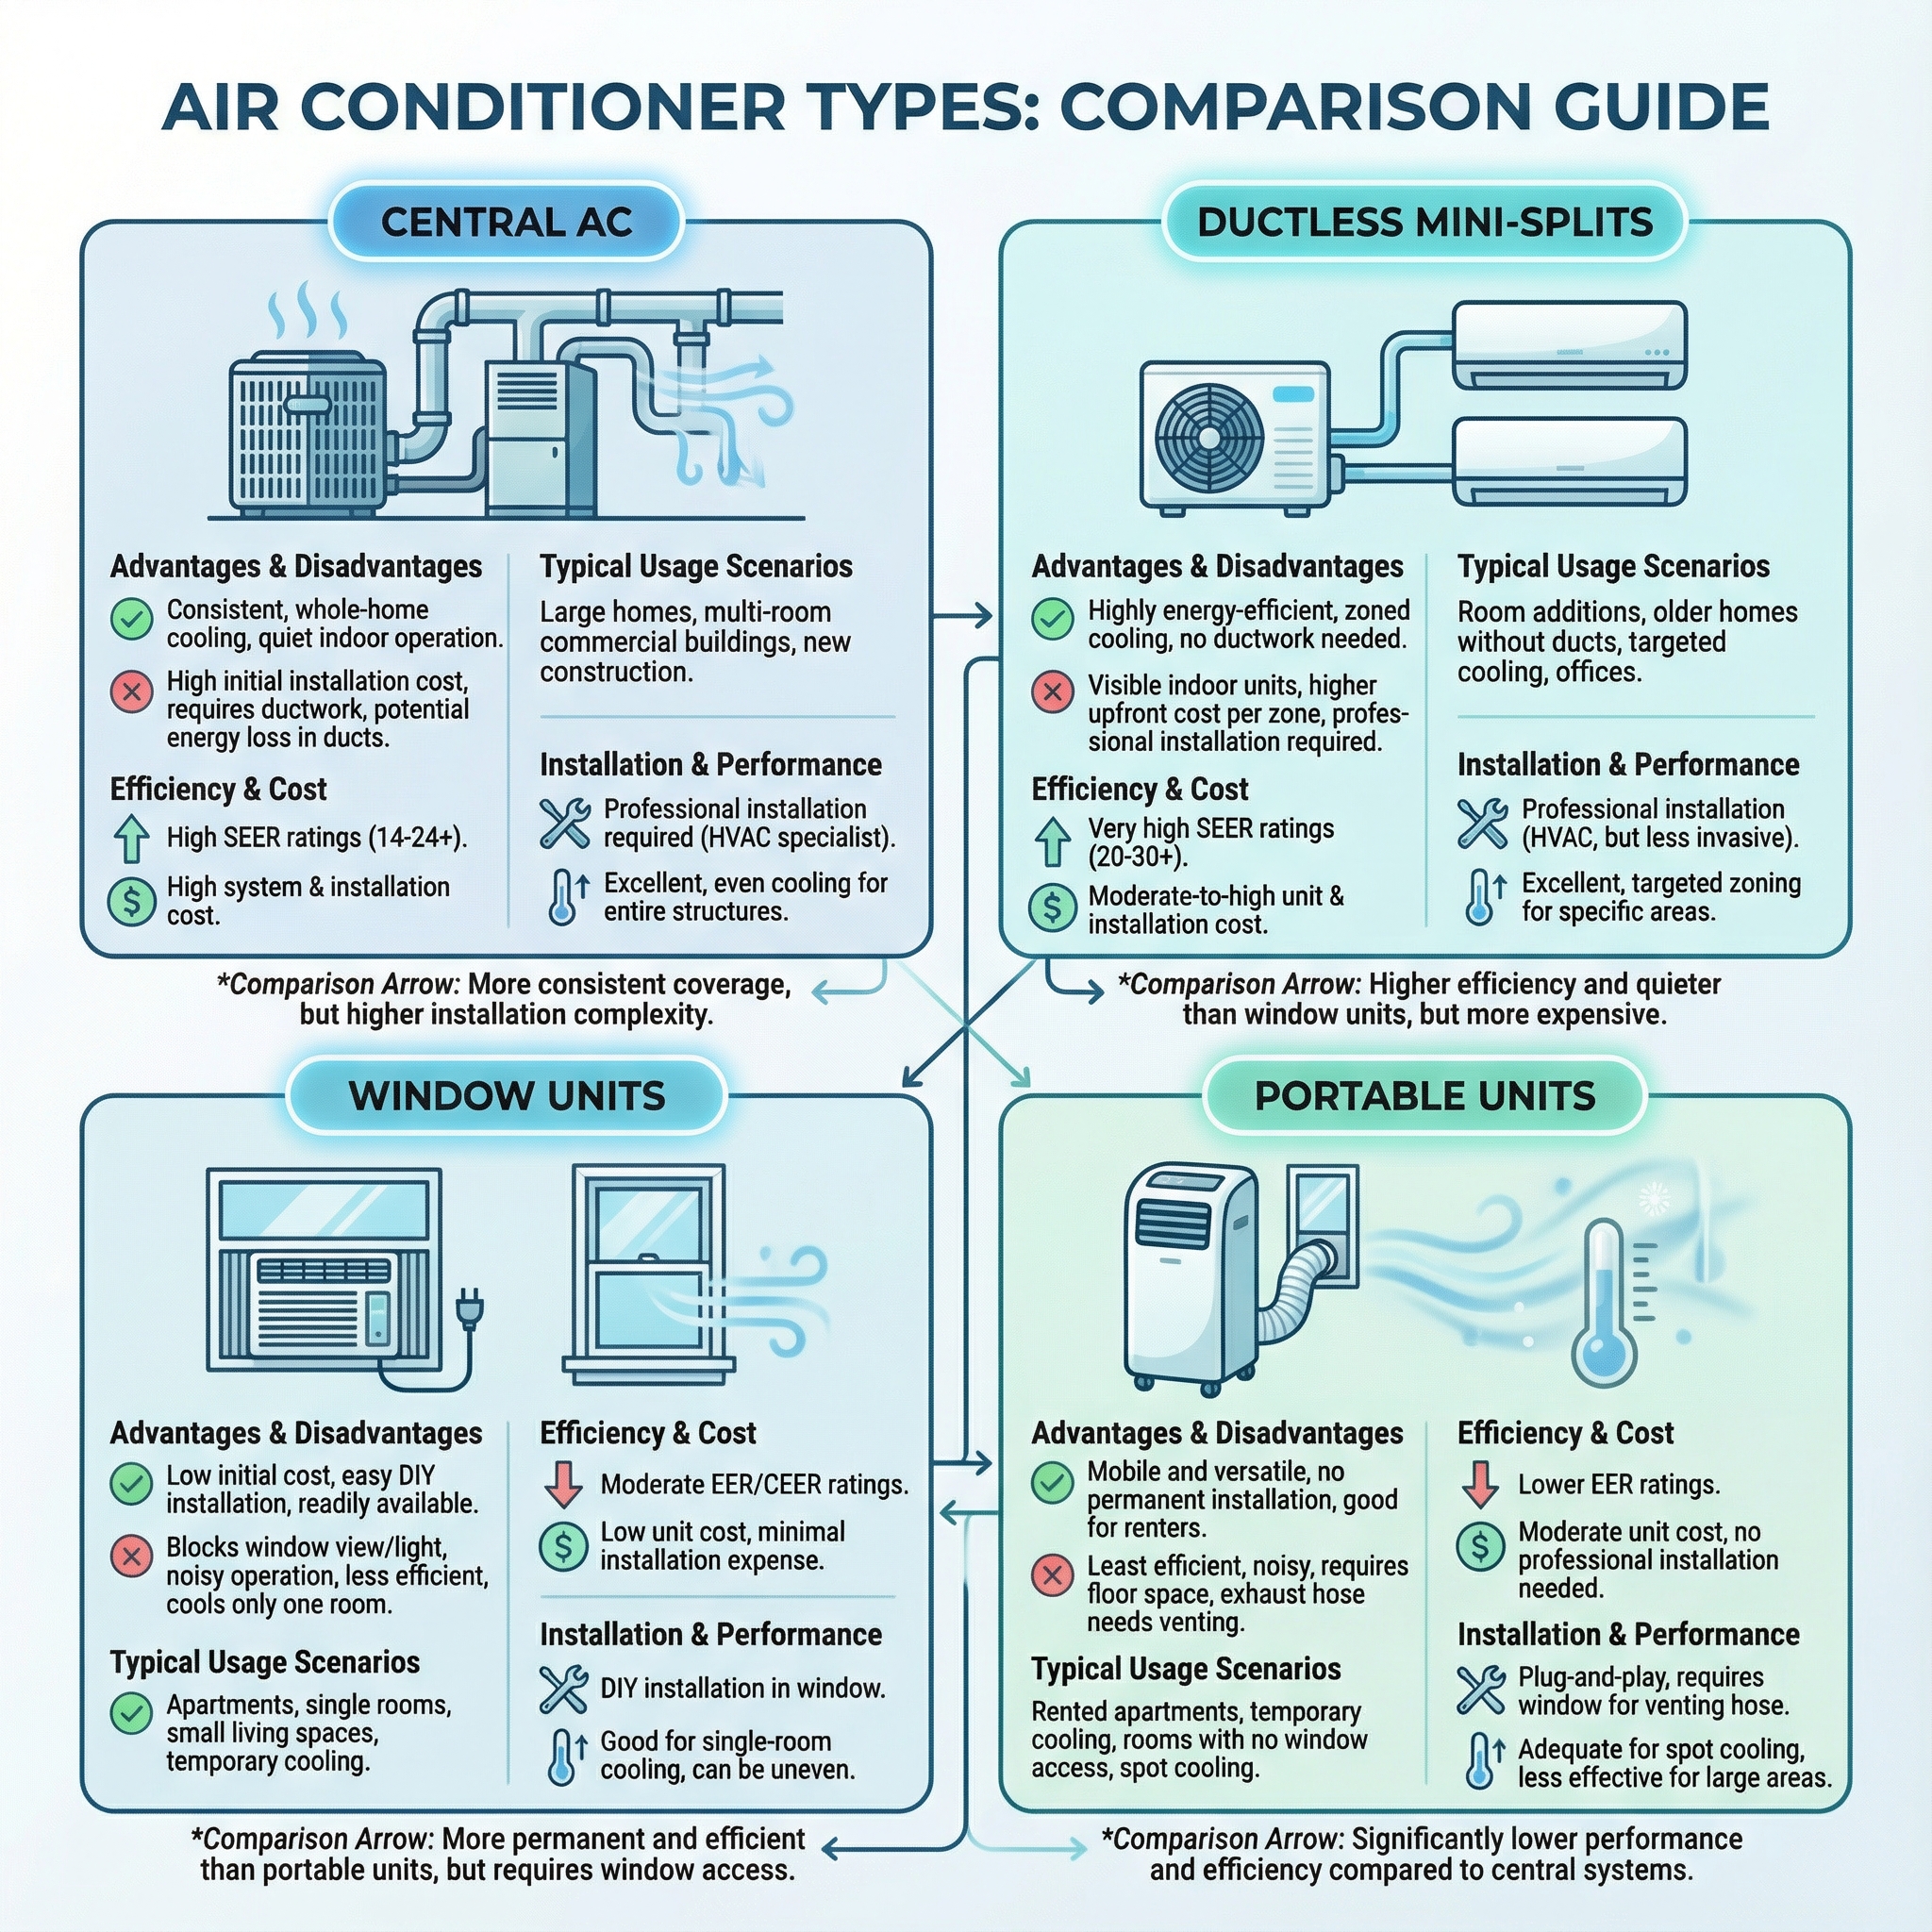
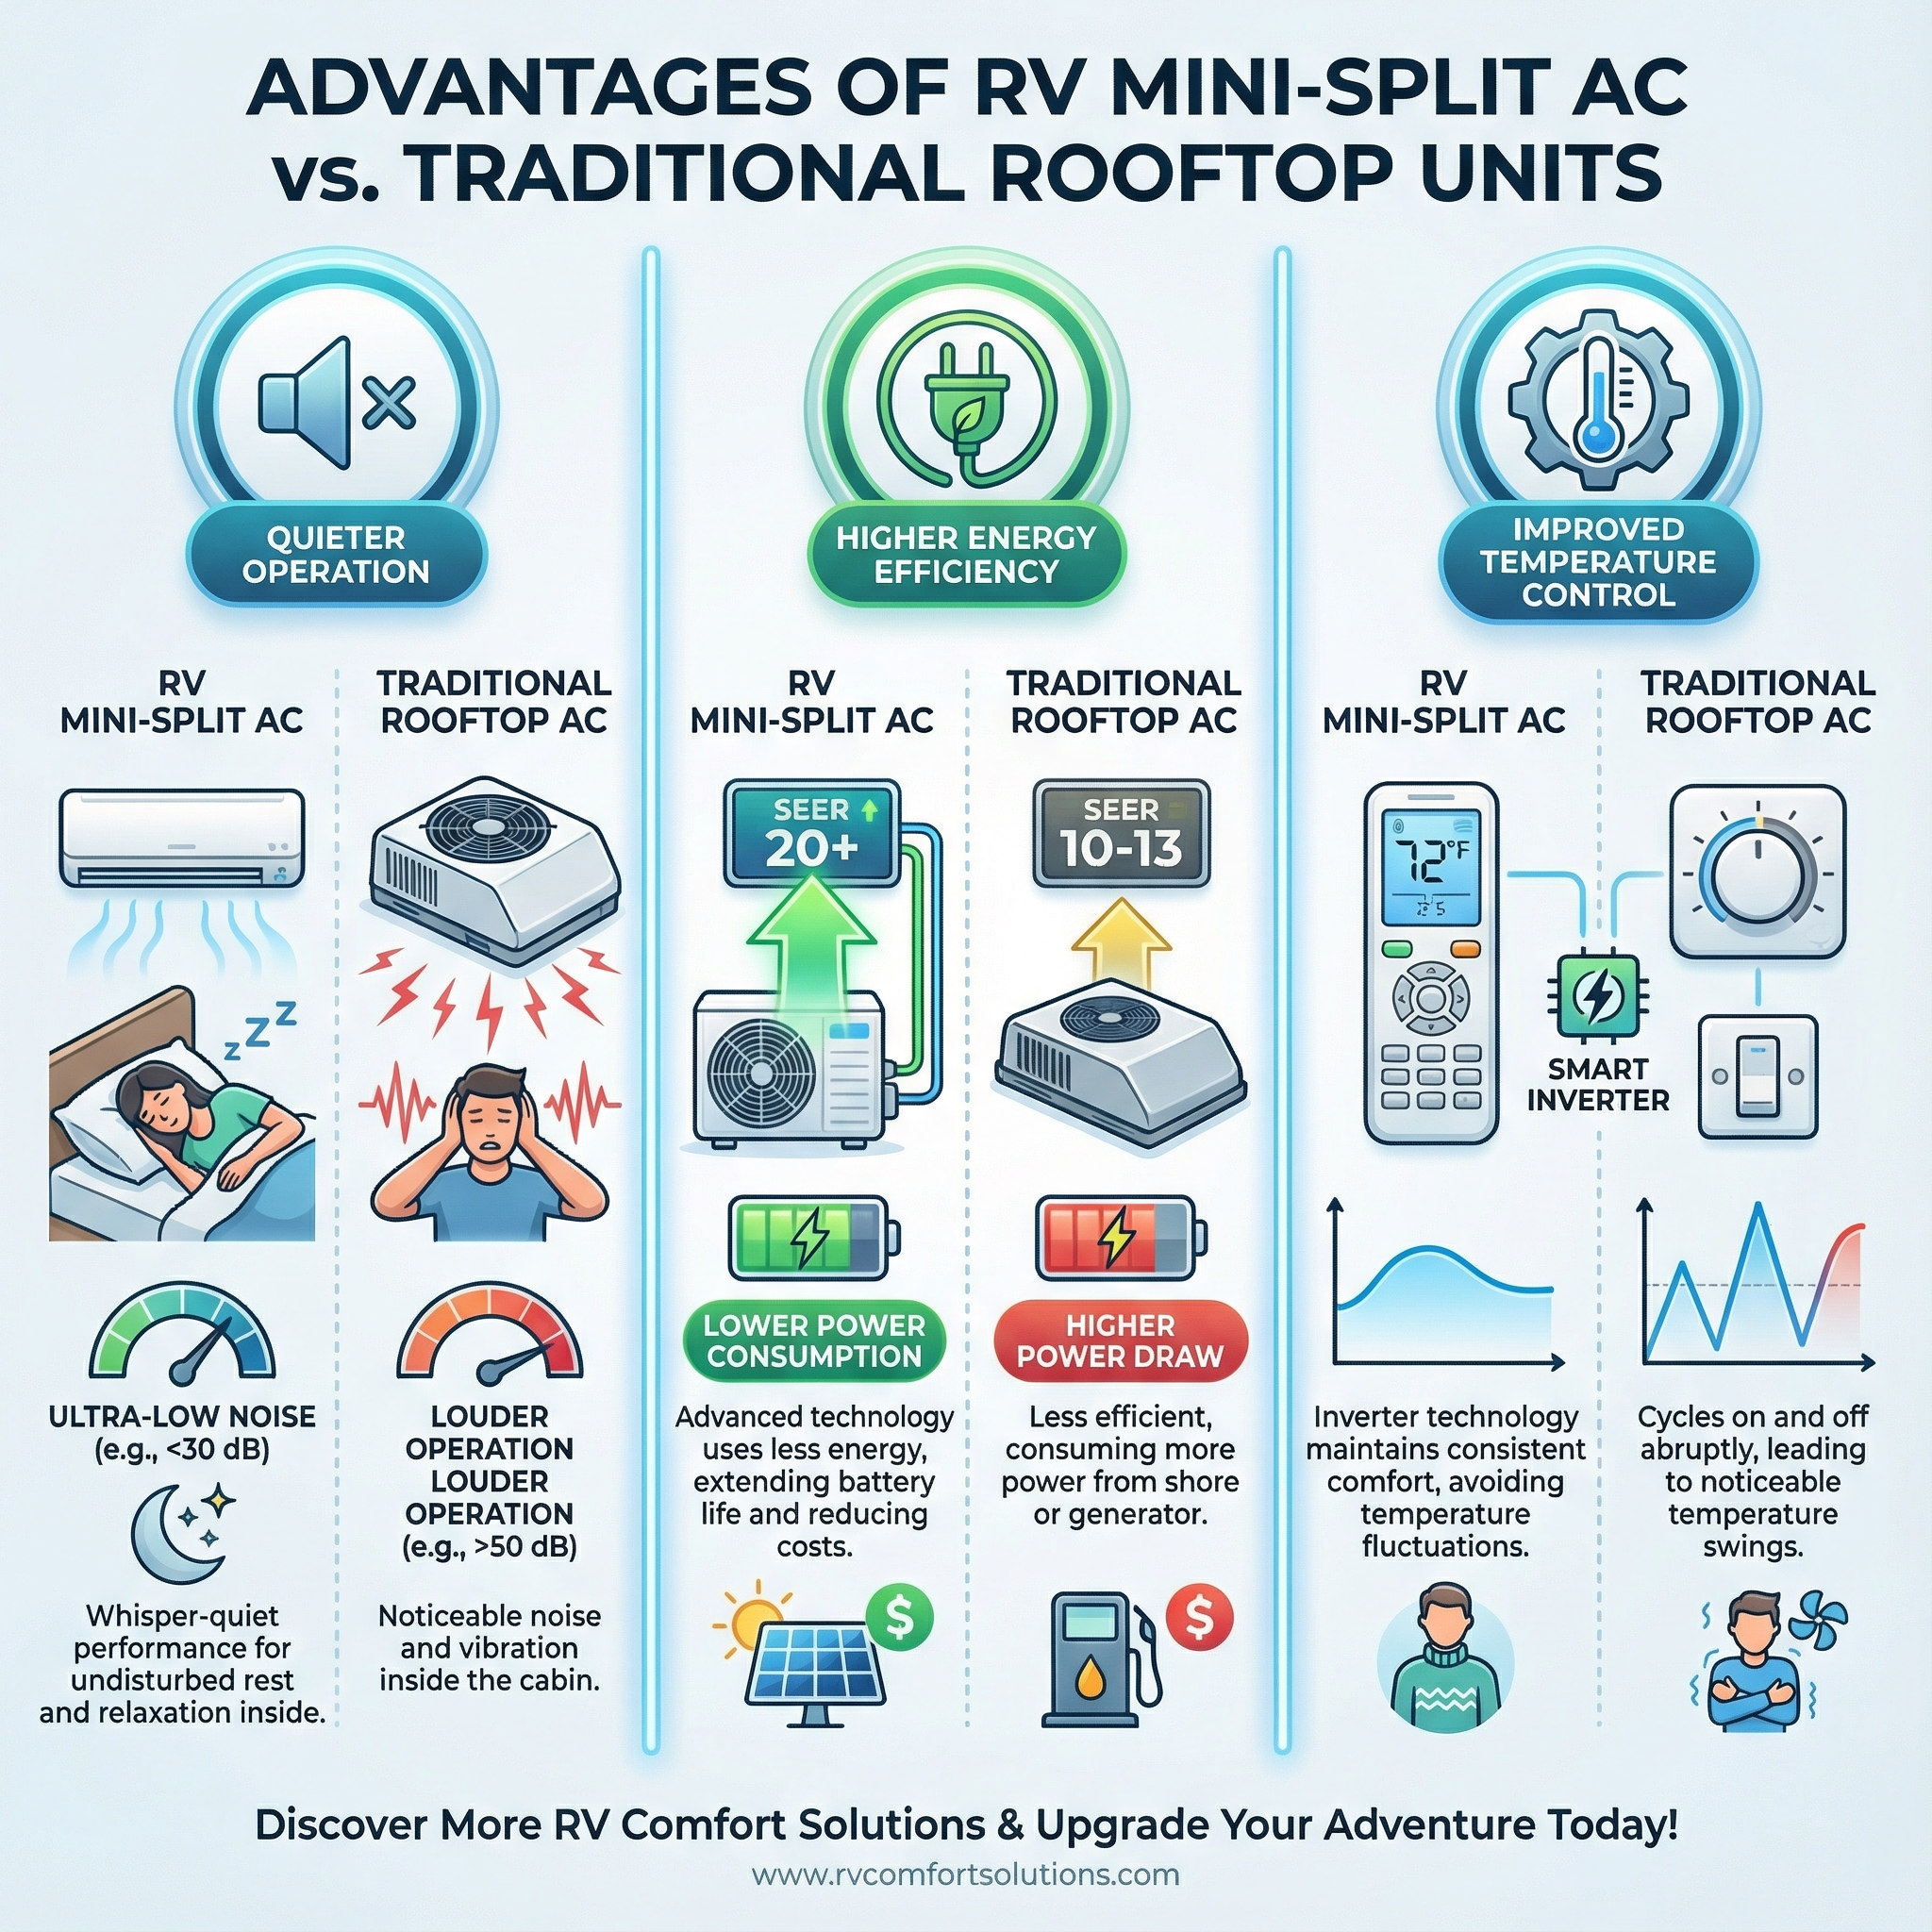
Why Choose a Mini Split for Your RV? Benefits vs. Rooftop Air Conditioners
From years of fitting systems in motorhomes and fifth wheels, we see mini splits deliver smoother comfort and lower stress on RV power systems compared with typical single-speed rooftop A/Cs.
- Comfort and noise: Wall-mounted heads circulate air more evenly and run quieter. Inverter modulation holds temperature and humidity steadier, like a dimmer switch instead of an on off switch.
- Efficiency and power draw: RV-suitable models commonly land around 20 to 22 SEER. Variable-speed compressors draw less on average and have softer startups, easier on generators and inverters.
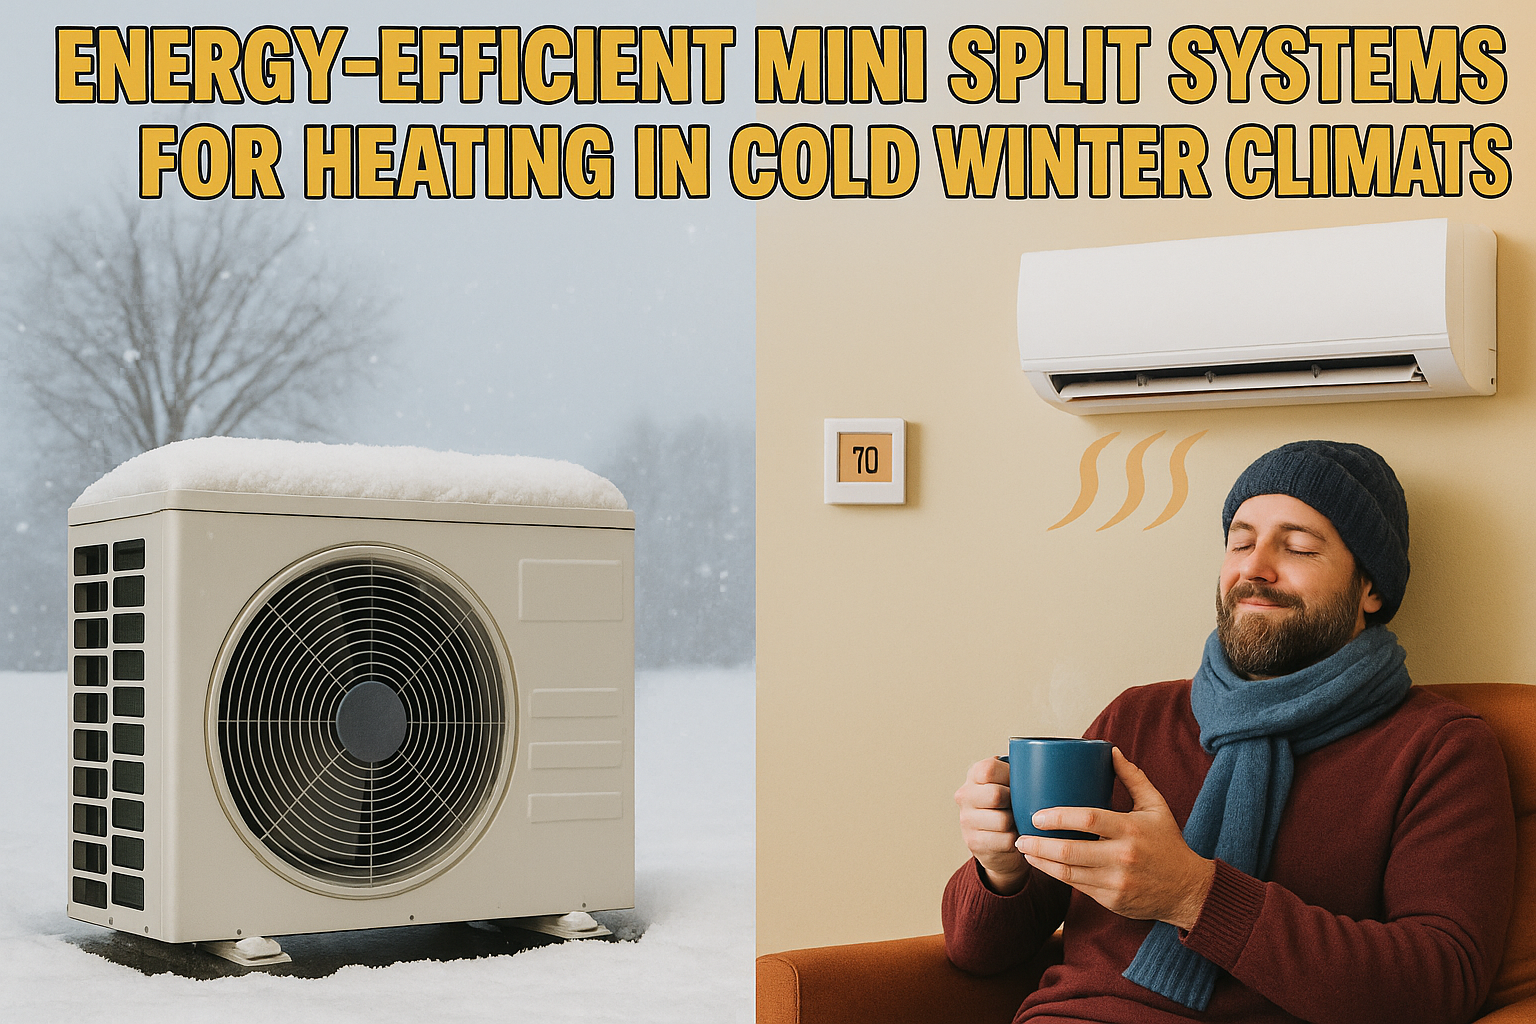
- Heating capability: Many are heat pumps that provide efficient electric heating for year-round use, often covering shoulder seasons and trimming propane usage.
- Zoning and flexibility: Single-zone heads can be placed where you actually sit and sleep, while multi-zone setups let larger rigs target separate spaces.
- Tradeoffs: Expect higher upfront cost and more involved installation than a direct rooftop swap, including mounting the condenser, routing line sets, wiring, and managing condensate.
If your priorities are quieter cabins, tighter temperature control, and lower average energy draw, a mini split is often the upgrade that feels most noticeable once you live with it.

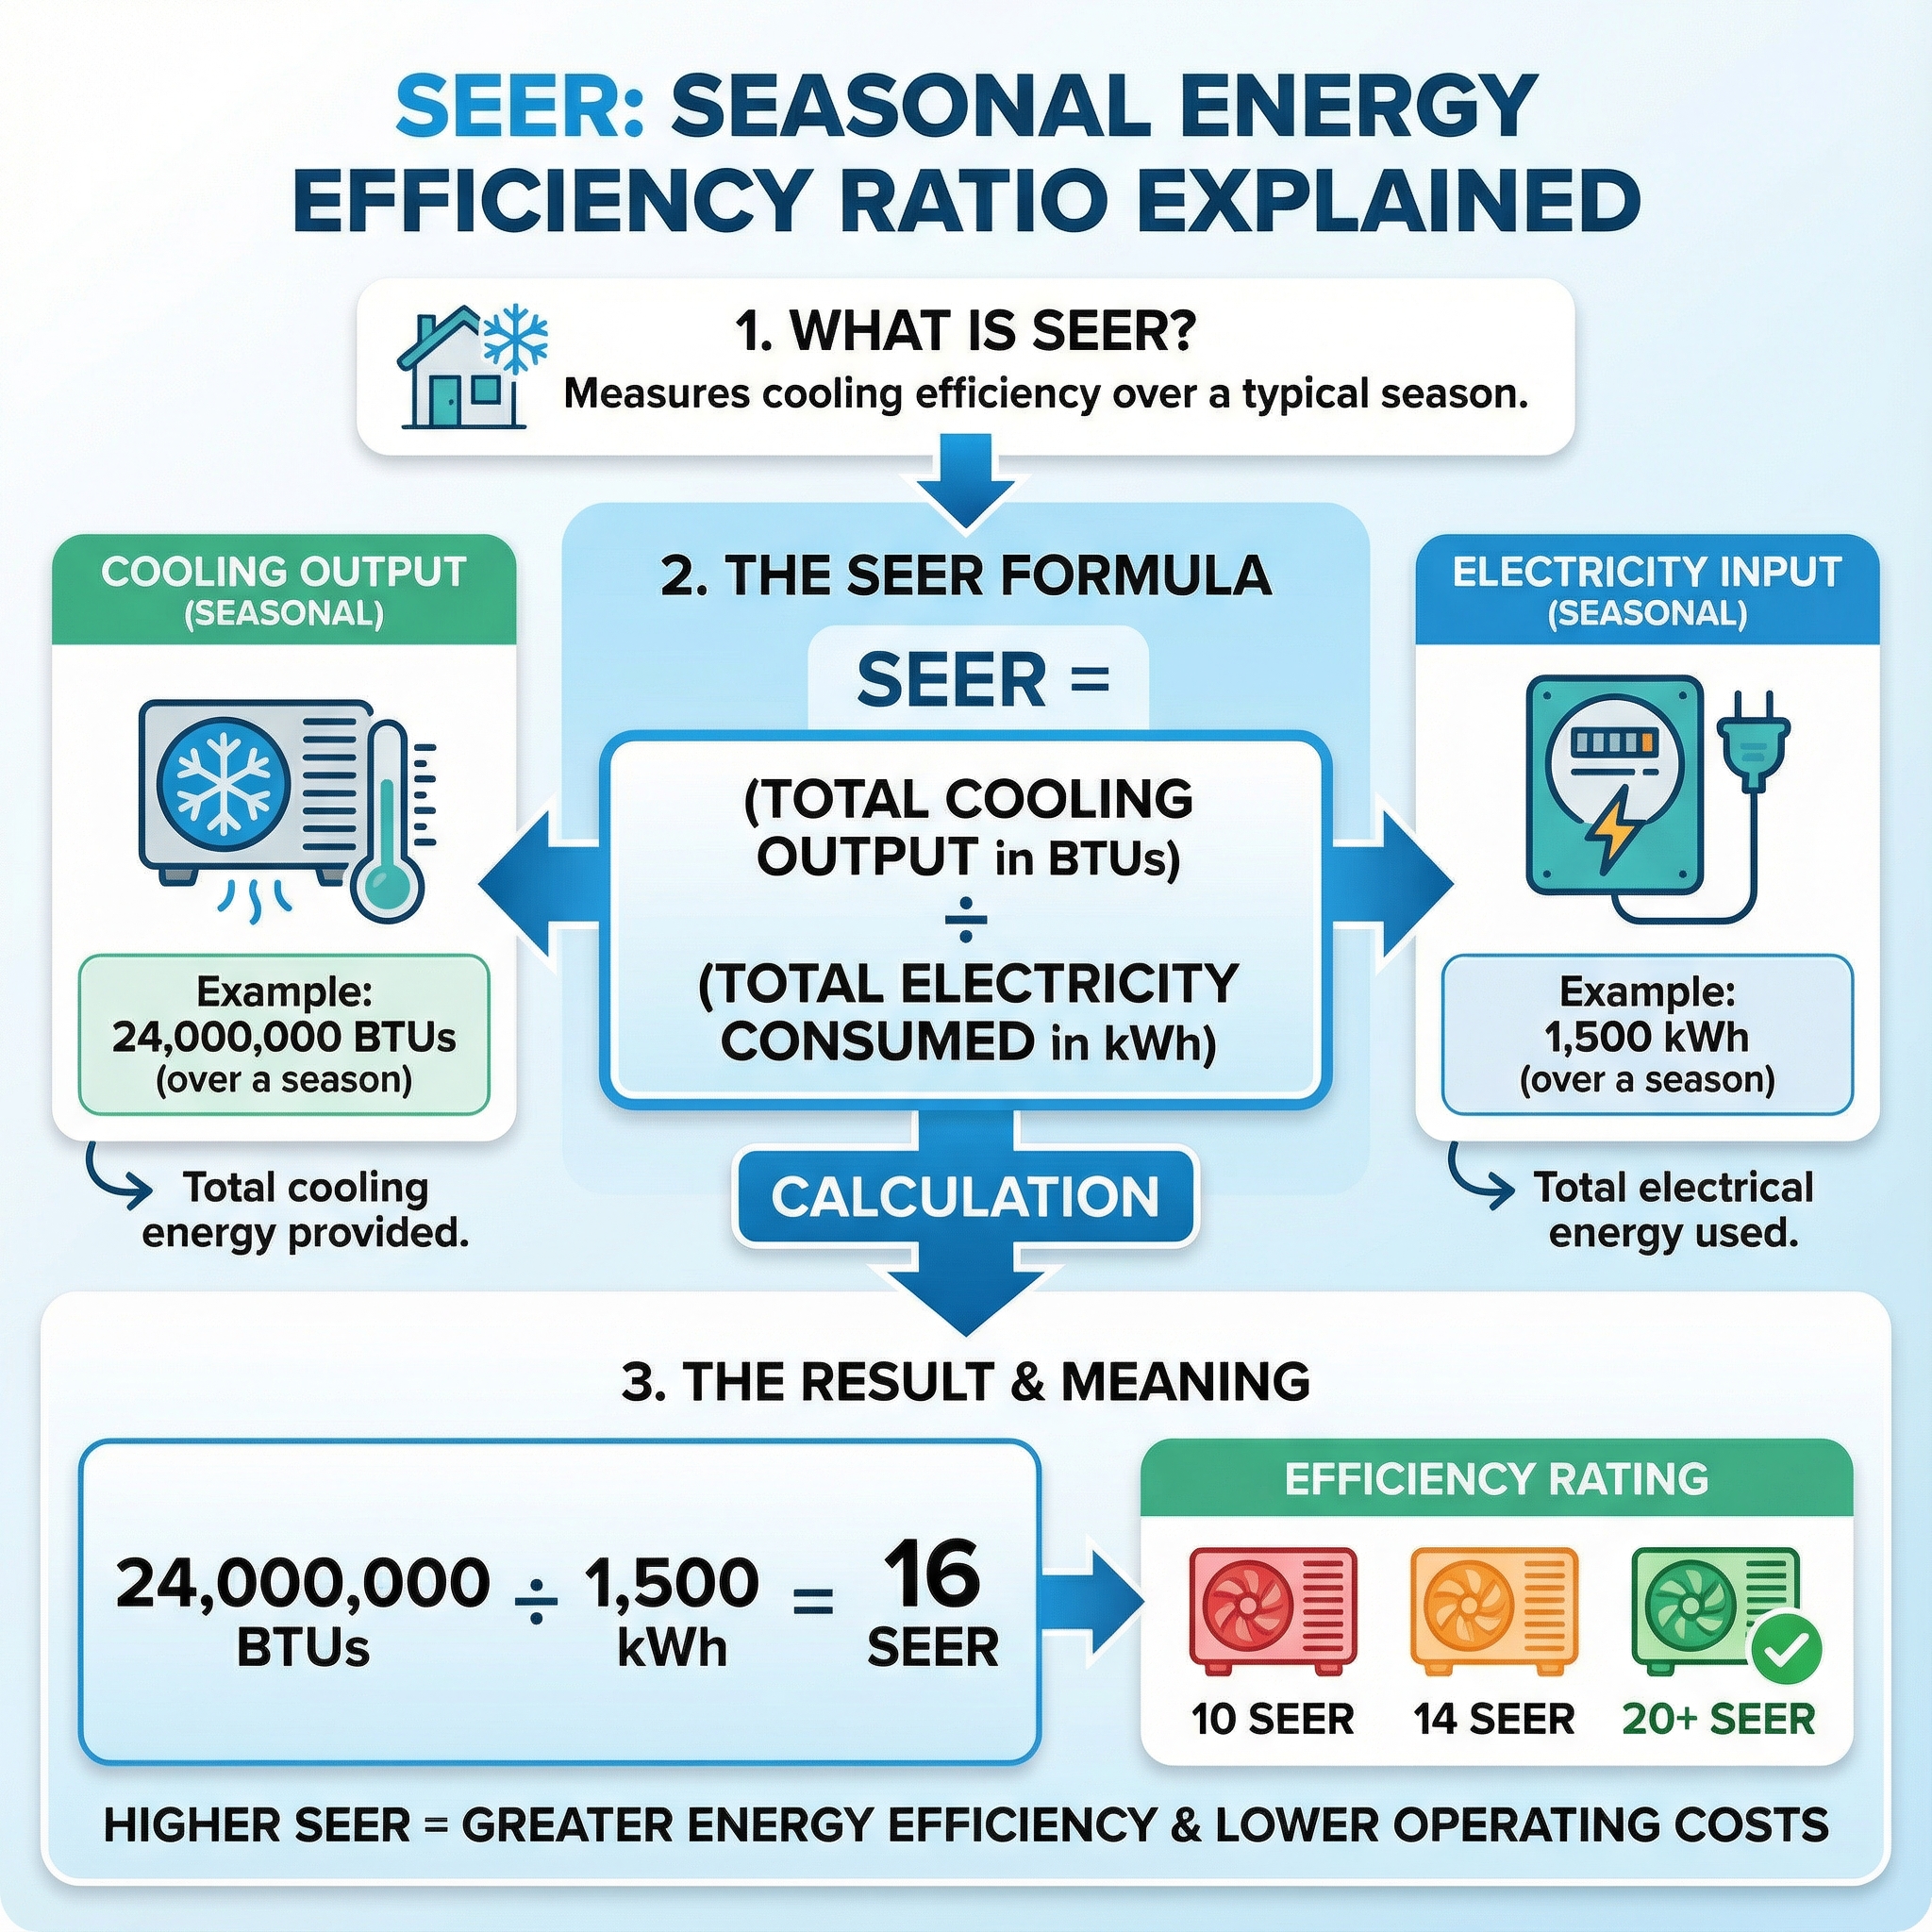
Efficiency Explained: SEER, SEER2, EER and What They Mean for RV Mini Splits
Think of SEER like mpg for cooling. Higher SEER means less kWh for the same comfort. Typical RV rooftop units rarely exceed about 14 SEER, while many RV sized mini splits land around 20 to 22 SEER. Going from 14 to 22 SEER can cut cooling electricity by roughly 35 to 40 percent, which eases generator fuel use, frees capacity on 30 amp hookups, and reduces inverter load on battery systems.
Since 2023 the industry uses SEER2 and EER2 test methods. The same unit will score lower numerically under SEER2 than legacy SEER, so compare SEER to SEER or SEER2 to SEER2 to stay apples to apples.
EER is a single point rating at high outdoor temperature. That matters for RVs parked in very hot locations, because EER hints at peak watt draw when the sun is brutal. Even with inverter compressors handling ramping smoothly, a strong EER helps you size a generator or inverter for worst case heat.

RV Owner Checklist: How to Size, Plan, and Prepare for a Mini Split
Before you buy, run this quick checklist to match a mini-split to your rig and power setup.
- Document your RV and usage: note overall length (under 20 ft, 20-30 ft, over 30 ft), insulation quality, window area, and where you camp most. Think of BTUs like an umbrella for heat load: more sun and glass means a bigger umbrella.
- Size it right: under 20 ft typically needs about 5,000-9,000 BTU. For 20-30 ft, plan on 9,000-12,000 BTU. Over 30 ft, consider 12,000 BTU or two zones. Bump capacity 10-20% for desert climates or light insulation. You can reduce slightly for shaded sites or excellent insulation. In our experience at Budget Heating (BudgetHeating.com), big windows in the Southwest often justify the size bump.
- Electrical compatibility: confirm shore power rating (30A or 50A), generator output, and inverter capacity. Many RV-ready mini-splits run on 110/120V, while larger units may require 220V wiring. Verify breaker space and that wiring can support the running and start amperage.
- Installation logistics: plan a secure condenser mount with vibration isolation, protected routing for line sets and control cable, and a dependable condensate solution, either a gravity drain or a pump.
- When to get help: consult an HVAC pro to confirm capacity, line-set routing feasibility, refrigerant handling, and electrical requirements if anything is uncertain.
Limitations & Tradeoffs: When a Mini Split Is NOT the Best Option
From what we see in the field, mini splits are not always the right answer. If an RV is limited to 30A service, a small generator, or a weak inverter, the load can make a mini split impractical without electrical upgrades, so a modern rooftop ducted or high efficiency rooftop unit is simpler. Weekend only users in mild climates may not recover the higher upfront cost compared with a like for like rooftop swap. Rigs that lack secure mounting or owners who prefer minimal line routing and vibration control are better served by rooftop or portable units.
In extreme cold, gas or propane furnaces provide more reliable backup heat. Avoid common pitfalls: not every residential mini split fits an RV, oversizing harms dehumidification and efficiency, and refrigerant or high voltage work is not DIY without certification.
Costs, Savings, and Payback: Is a Mini Split Worth It for Your RV?
Upfront cost varies with your rig and goals. Mini split equipment spans basic to high efficiency, and installation can be simple or custom.
- Equipment price, higher SEER typically costs more.
- Structural mounting complexity on the wall or frame.
- Line set routing length and access.
- Electrical upgrades, new circuits and shore or generator or inverter changes.
- Whether you contract refrigerant charging and electrical work.
On operating cost, moving from about 10 SEER to 20 to 22 can nearly halve cooling kWh. Replacing a ~14 SEER rooftop with a ~22 SEER mini split often cuts kWh about 35 to 40 percent. That typically yields multi hundred dollars per year, depending on rates and hours of use.
If you cool often, many owners recoup the added upfront cost in roughly 3 to 5 years. In our experience at Budget Heating (BudgetHeating.com), heavy users see the quickest payback.
Safety, Installation and Maintenance: What You Can DIY and What Pros Should Handle
From our field installs, the clean split is simple: owners handle layout and hardware, licensed pros handle refrigerant and high voltage. That keeps RV systems safe, quiet, and reliable.
- Owner safe: plan the layout, mount indoor heads and the condenser, drill and weatherproof penetrations, route line sets and the condensate drain.
- Licensed pro: pressure testing, evacuation, and charging; code compliant high voltage wiring and breakers; formal commissioning.
Maintenance checklist:
- Clean or replace filters regularly.
- Inspect indoor and outdoor coils, clear debris, and confirm drain flow.
- After travel, check line set insulation and vibration mounts, then re secure any loose fasteners.
- Visually inspect the condensing area and keep it free of obstructions.
Safety first: never open a sealed refrigerant system without proper certification. De energize circuits before any electrical work. Use vibration rated mounts and protect refrigerant lines from chafing and heat sources in the RV.
Regional, Regulatory, and Electrical Considerations for RV Mini Splits
From field experience, climate drives selection. In hot, humid regions, pick a unit with strong dehumidification and consider a modest bump in capacity. In cold regions, favor heat pumps with solid low ambient performance and higher HSPF or HSPF2 so heating holds up as temperatures drop.
Since 2023, U.S. labels use SEER2, EER2, and HSPF2. Regional minimums apply, so verify a model’s compliance for your location, and compare AHRI certificates when available to confirm rated capacity and efficiency for the intended match.
Electrical supply is the other gatekeeper. Most RV friendly systems run on 110 to 120 volts, matching common shore power and generators. Higher capacity 220 volt options require dedicated wiring, breaker planning, and confidence your campground or generator can support them.
Top Mini Split Models, Kits, and Installation Options for RVs: Quick Buyer Guide
- Efficiency: aim SEER2 20+ for cooling, HSPF2 9-12 for heat. Inverter compressors work with small generators.
- Low ambient: heat to 5°F or lower, plus crankcase and base-pan heaters.
- Mounting and kits: slim wall cassette, compact outdoor, roof or bumper brackets, vibration pads, quick-connect lines.
- Condensate: gravity drain if possible, or a mini pump; heated drains for winter trips.
- Power and controls: 120V or 230V, soft-start, wired thermostat. Confirm capacity with a sizing checklist.
Conclusion: Is a Mini Split Right for Your RV? Next Steps and Buying Checklist
Mini splits fit RV owners who want quiet, efficient, flexible comfort and have the electrical capacity or a plan to upgrade, though they require more upfront planning than rooftop units. Licensed pros should handle refrigerant and high voltage work for safety, code compliance, and warranty protection.
- Buying checklist: document RV size and insulation, estimate BTU load, verify electrical capacity, get quotes including evacuation, charging, commissioning, plan filter, drain, and mount maintenance.
- Ask installers: will you size by load, route lines with vibration control, and provide startup readings and warranty docs?
We pair 30+ years of HVAC know how with live phone support to map your best path.
- Get a Custom Quote
- Talk to Our Team by phone for sizing and spec review
- Shop Ductless Mini Splits with wholesale pricing, free shipping, and Affirm