how to guide
 learning center
 money saving tips

How to Conduct a Home Energy Audit: What to Expect
A home energy audit is a structured, whole-house assessment that reveals where your home is wasting energy and how to address it most cost effectively. We think of it as a checkup that ties comfort, air quality, and utility costs together.
A professional audit typically takes 2 to 4 hours and blends utility bill analysis, a room by room visual inspection, and diagnostic testing. Auditors track down drafts, insulation gaps, duct leakage, HVAC inefficiencies, and ventilation or moisture issues that can undermine comfort.
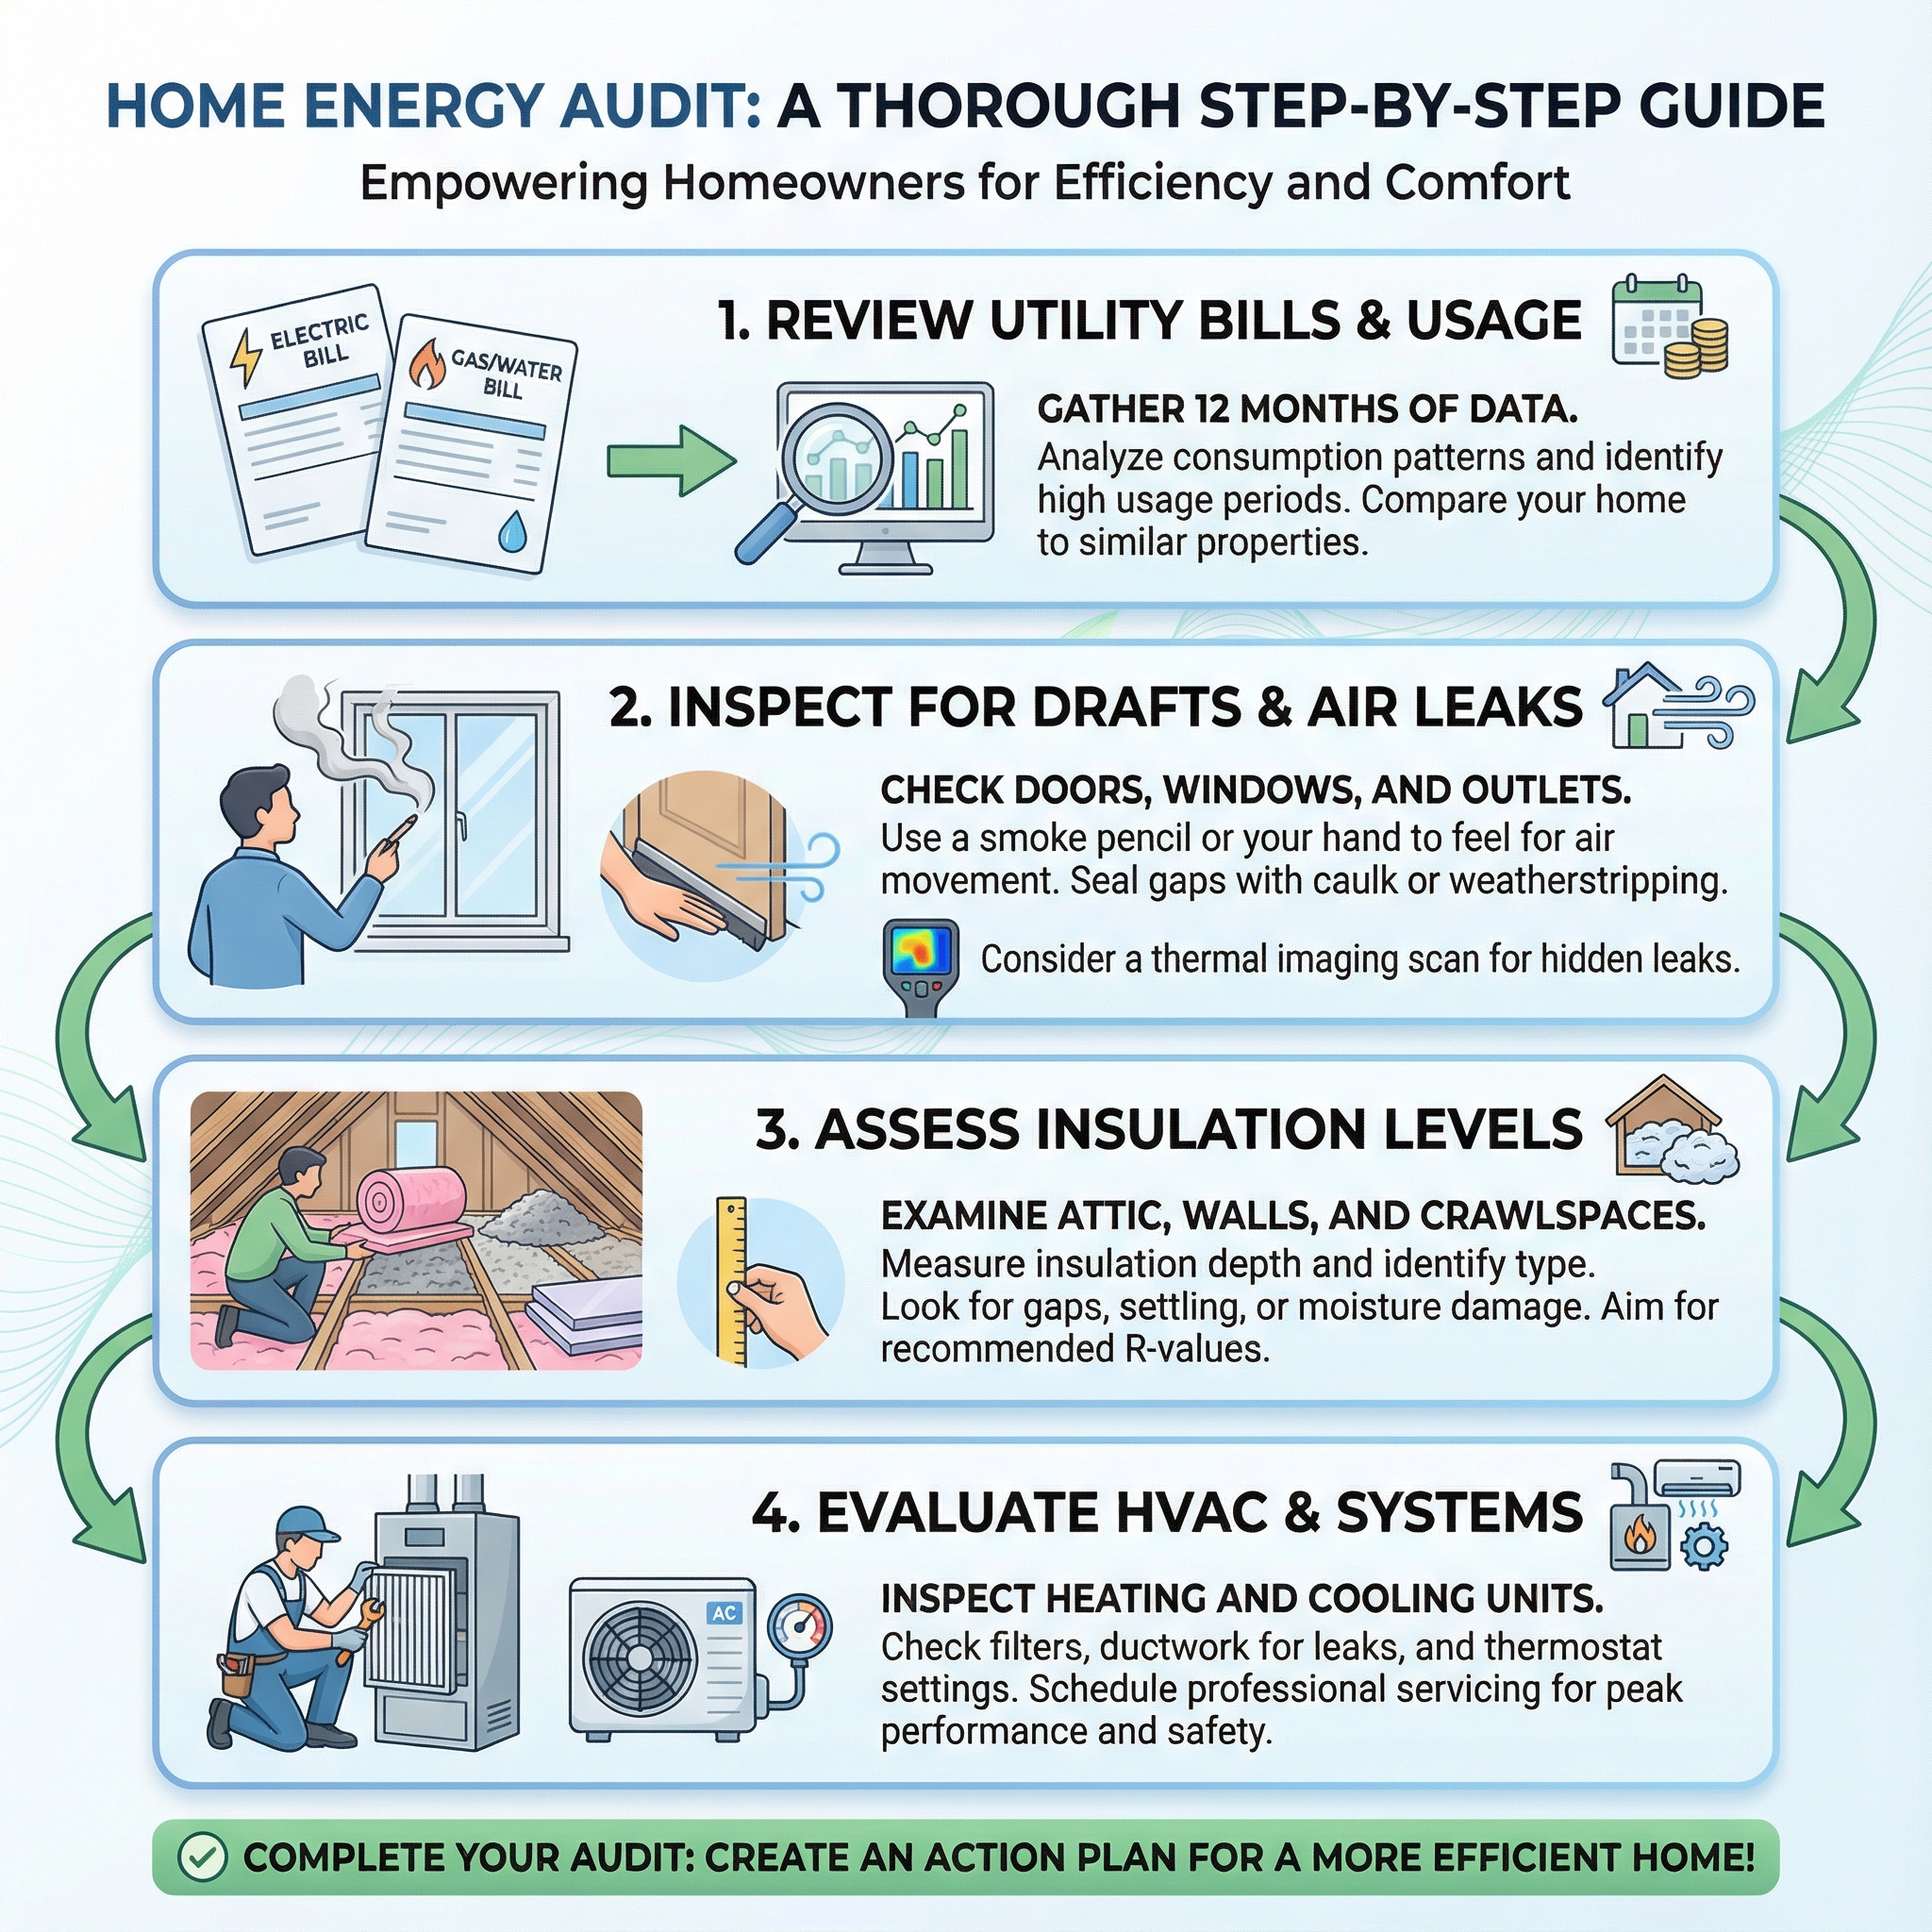
Before the visit, gather 12 months of utility bills, make a list of comfort problems by room and season, and clear access to the attic, basement, crawl spaces, and mechanical equipment.
The result is a detailed report that prioritizes upgrades, estimates energy and cost savings, and guides next steps. A DIY walk through can spot obvious leaks, yet a professional audit quantifies problems and verifies fixes with instruments for a clearer plan.
Why a Home Energy Audit Pays Off: Savings, Comfort, Health, and Resilience
An energy audit pays off in more than lower bills. We routinely see audits pinpoint real loss points, air leaks, inadequate insulation, leaky ducts, and inefficient or poorly tuned HVAC, so you invest where it counts, often cutting energy use 5% to 30% when recommendations are implemented. Comfort improves when sealing, duct repairs, and insulation cut drafts and hot or cold spots. A quality audit evaluates building envelope, insulation, ductwork, ventilation, and HVAC performance, then provides a tailored, prioritized plan with estimated costs, savings, and payback to phase work. Health and safety measures include combustion-safety testing, CO checks, and ventilation assessments. Audits inform right-sizing and can avoid premature replacement while extending equipment life by lowering loads. Documented results support rebates, tax credits, financing, resale value, and a reduced carbon footprint. Clear triggers include high bills, uneven rooms, drafts, HVAC issues, or moisture.
DIY vs Professional Energy Audit: Costs, What's Included, and Typical Savings
DIY audits are basically free, aside from caulk, weatherstripping, outlet gaskets, and maybe a rented thermal camera. They are good for sealing obvious leaks and other visible issues. Professional audits typically cost $100 to $500, often subsidized or free through utilities. Comprehensive diagnostics with a blower door, thermography, and duct testing are $300 to $700+, and large or complex homes can exceed $1,000. Choose pro testing for complex homes, combustion safety, and duct leakage measurement.
In our experience at Budget Heating (BudgetHeating.com), the blower door quantifies leakage so you can prioritize the highest value fixes. A solid report should list each measure's cost estimate, expected annual savings, simple payback, and applicable rebates or incentives. Implementing recommendations typically cuts energy use about 5% to 30%. Low cost fixes often pay back in under a year. Insulation and duct sealing commonly pay back in roughly 2 to 7 years. Capital upgrades take longer but improve comfort.
Tools, Materials, and Safe DIY Checks You Can Do Today
In our experience, most comfort complaints start with airflow bottlenecks. Think of a clogged filter like breathing through a scarf. Simple maintenance often fixes the obvious.
- Handy items: caulk, weatherstripping, door sweeps, outlet gaskets, draft stoppers, flashlight, basic insulating materials, a stable ladder if safe, and optionally a handheld thermal camera.
- Quick checks: feel for drafts at windows, doors, and outlets; replace worn weatherstripping and add door sweeps; apply caulk to small visible gaps; change HVAC filters; clear leaves and debris around the outdoor condenser; verify thermostat settings.
- Visual duct lookover in accessible areas: note disconnected runs, crushed sections, unsealed seams, and uninsulated ducts in attics or crawlspaces.
Safety first: do not open service panels, probe live circuits, handle refrigerants, or perform combustion safety tests. Wear PPE in attics and crawlspaces, avoid unsafe ladders and fragile attic flooring. Leave electrical panel work, flue and combustion testing, blower-door and duct-leakage tests, refrigerant handling, and internal HVAC repairs to licensed pros.
Common Mistakes, Myths, and When an Energy Audit Isn't the Right Fit
Energy audits work best when they are thorough and disciplined, not quick checklists. Here are pitfalls we see and how to avoid them:
- Relying on a visual walk-through: use blower-door testing and infrared imaging to find hidden leaks and insulation gaps.
- Jumping to equipment replacement: start with the envelope, air sealing, and duct repairs for better returns.
- Judging only upfront cost: weigh life-cycle cost, maintenance, incentives, and expected lifespan.
- Ignoring how people use the home: interview occupants to explain odd utility patterns.
- Overlooking maintenance and combustion safety: include tune-ups and combustion testing where applicable.
- No test-out or follow-up: repeat blower-door or IR, then track bills.
- Uncalibrated tools: verify calibrated blower doors, manometers, and analyzers.
- Unprioritized laundry lists: rank by savings-to-investment, safety, comfort, and feasibility.
- Myth, closing supply vents saves energy: it raises static pressure, proper zoning is the fix.
- Myth, any contractor can audit: look for RESNET or BPI credentials and standardized methods.
- Myth, bigger furnaces are better: oversizing short-cycles and reduces efficiency, right-sizing matters.
When a full audit is not ideal: a single broken window with no other issues, immediate electrical or gas hazards, or strict historic constraints. Better options include targeted repairs like window glazing, local HVAC servicing, licensed electrician or plumber inspections, or partial interventions in low-risk homes.
Before the Audit: How to Prepare, What to Gather and Day-of Logistics
A little prep makes the audit smoother and more accurate, and in our experience at Budget Heating (BudgetHeating.com) it trims guesswork.
- Collect 12 months of utility bills and note seasonal highs and lows.
- Share basics: year built, square footage, stories, insulation, window age, HVAC and water heater models.
- List comfort or moisture issues: drafts, hot or cold rooms, condensation, ice dams, odors, mold, humidity.
- Flag defects: broken, fogged, or leaky windows or doors, usual draft spots.
- Record occupancy patterns, thermostat setpoints and setbacks, and which rooms are used most.
- Clear access to furnaces, boilers, water heaters, air handlers, attics, basements, crawl spaces, mechanical closets, plus exterior gates, sheds, vents.
- Day of visit, allow 2 to 4 hours, secure pets, expect brief on and off equipment tests.
Step-by-Step Home Energy Audit Checklist (DIY Walkthrough)
Think of your home like a winter coat. It only keeps you comfortable if it is zipped, sealed, and properly lined. Use this walk-through to spot the most common, high-impact issues.
- Exterior pass: Walk the perimeter. Check roof, siding, and foundation for gaps at siding joints, failing caulk, and openings where cables, pipes, or vents penetrate. Look closely at foundation and rim-joist areas for visible gaps.
- Windows and doors: Confirm latches and locks pull sashes tight. Inspect weatherstripping for continuous contact. On a cold or windy day, feel for drafts. Note condensation, fogging between panes, or cracked glass.
- Attic, basement, crawlspace: If safe to enter, check insulation depth and even coverage. Verify bath and kitchen fans vent outdoors, not into the attic. Look for staining, moisture, or pests. At rim-joists, note any air gaps that need sealing.
- HVAC and ductwork: Check filter condition. Listen for short cycling. Inspect visible ducts for disconnected joints and unsealed seams. Flag any uninsulated duct runs in garages, attics, or crawlspaces.
- Water heating: Check the tank thermostat and set to about 120°F. Look for uninsulated hot-water pipes within the first 6 to 10 feet of the tank and note opportunities for pipe insulation.
- Appliances and lighting: List appliance ages and efficiency labels. Inventory bulbs by type, incandescent vs. CFL/LED. Identify devices with standby lights or always-on power bricks.
- Finding air leaks: On a breezy day, feel around trims, outlets, and baseboards. Use a smoke pencil or incense to see if smoke pulls into cracks. A handheld infrared camera can highlight cold or hot spots, helpful for obvious issues, though it is not a substitute for professional thermography.
Document findings with photos and notes so you can prioritize quick fixes and plan deeper upgrades logically.
Advanced Diagnostics: Blower‑Door Tests, Infrared Imaging, Duct Leakage and Combustion Safety
Blower-door testing quantifies whole-house air leakage, then uses controlled pressure to expose leak paths, like turning the home into a gentle wind tunnel for targeted sealing. Infrared imaging reveals missing insulation, thermal bridges, and hidden air paths a visual check misses.
Duct-leakage testing measures how much conditioned air escapes the ducts, critical when runs are in attics, garages, or crawlspaces outside the envelope. Combustion-safety checks cover worst-case depressurization, carbon-monoxide readings, and draft tests to confirm safe operation. These tools require calibrated equipment and trained hands, and we have seen poor setup produce misleading results.
When scheduling an audit, request:
- Blower-door test with numeric leakage results and leak location notes
- Infrared scan images tied to specific rooms or assemblies
- Duct diagnostics if any ducts are outside conditioned space
- Combustion-safety testing with CO readings and draft results
- A prioritized report with photos, data, and recommended fixes
How to Interpret Findings, Prioritize Upgrades, and Use Incentives
Turn audit findings into a sequence: start with low-cost or no-cost air sealing, add insulation and duct sealing next, and tackle HVAC last unless safety dictates. Rank measures by savings-to-investment ratio, simple payback, lifetime savings, comfort/IAQ, plus feasibility. Envelope and duct upgrades cut loads and often let right-sizing to smaller, more efficient systems. In our experience, choose credentialed contractors (RESNET or BPI) and require test-in and test-out verification with blower-door and duct tests, plus documentation. Use SEER and SEER2 to compare cooling efficiency; auditors record make, model, age, capacity and ratings, then check regional minimums to project upgrade impact. After significant sealing, verify ventilation and re-test combustion appliances. Incentives: a qualifying audit may earn a federal tax credit up to $150, plus rebates. Programs require RESNET-style, whole-house documentation. Track bills and comfort, tune thermostats, and maintain filters and systems.
Next Steps: Acting on Your Energy Audit Findings
An energy audit shows where your home wastes energy and how to prioritize improvements for comfort, safety, and 10% to 30% savings. Common findings: air leaks, insulation gaps, duct leaks, and occasional combustion or ventilation issues. Start with a DIY checklist or book a pro audit, many utilities discount them. Work in tiers: sealing and thermostat tuning, then attic and duct insulation or pro duct sealing, then right sized high efficiency HVAC. Test after major sealing and document results for incentives.
- Get a Custom Quote
- Talk to Our Team by phone, U.S.-based with 30+ years
- Shop Heat Pumps and Ductless Mini Splits
 Cooling
 Heating
 Product and Brands Insights
 Buying Guides
 State by State
 HVAC Systems