Daikin 4 Zone Mini Split: What This Guide Covers and Why It Matters
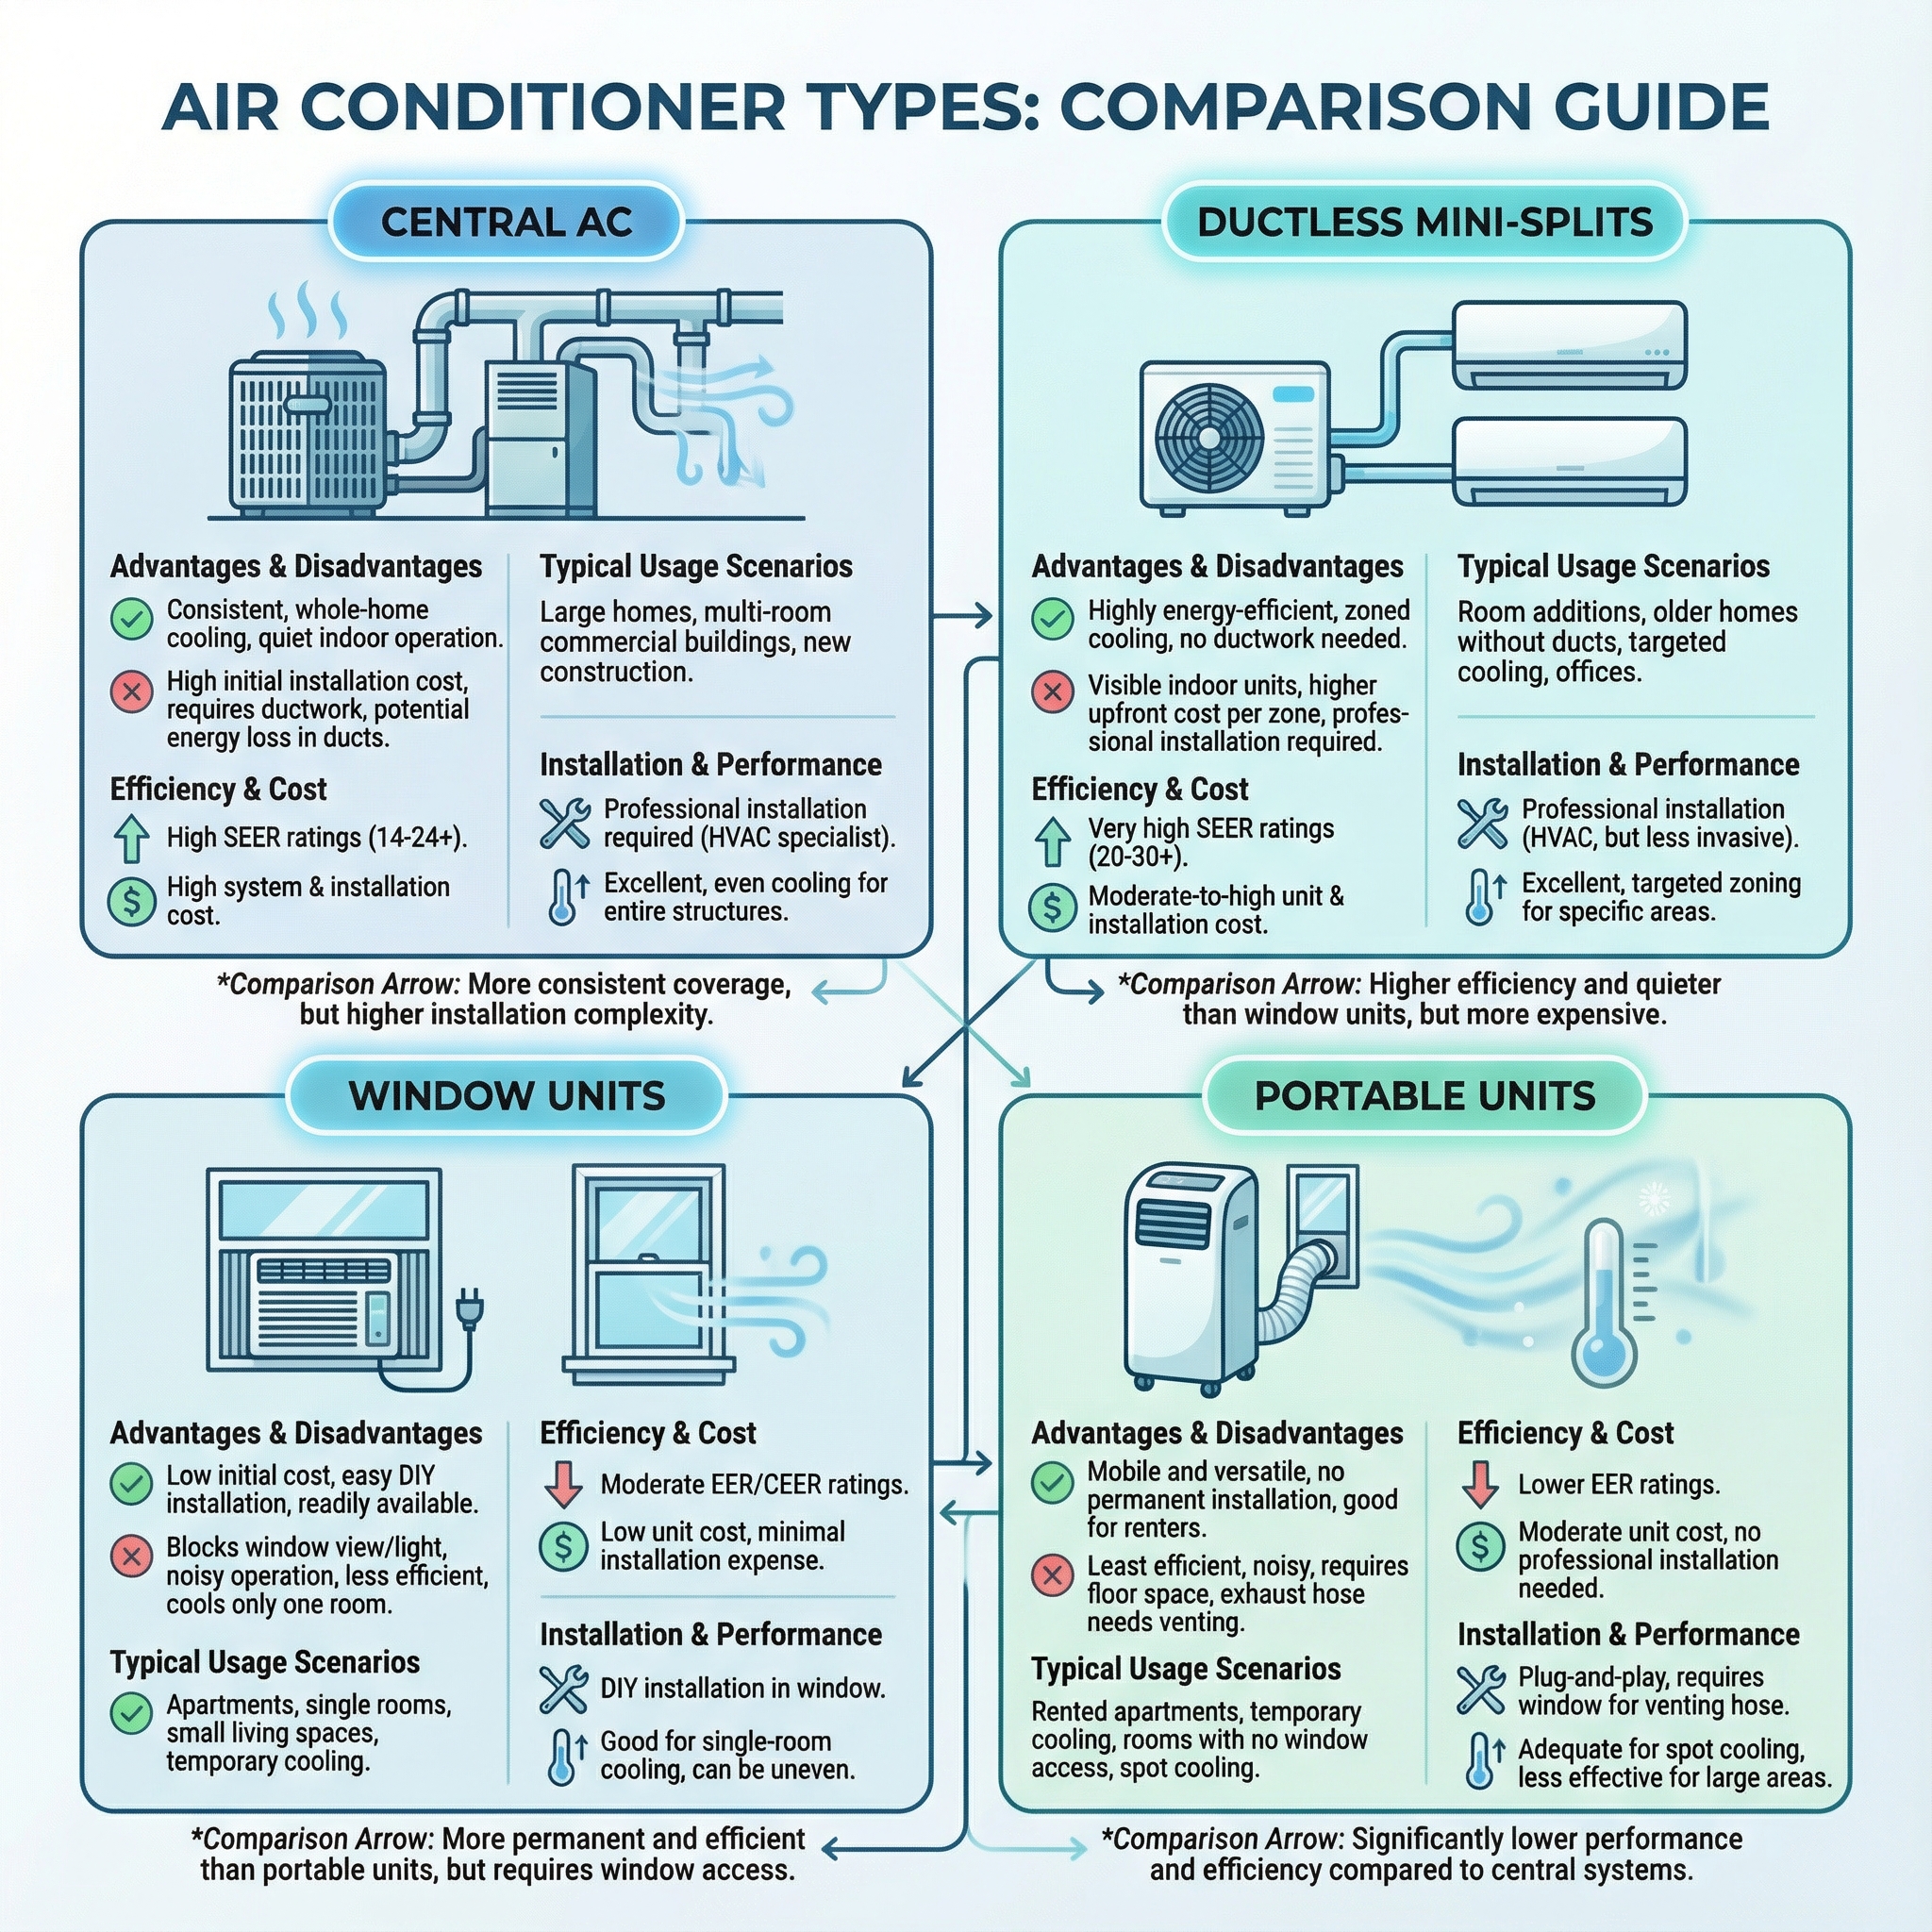
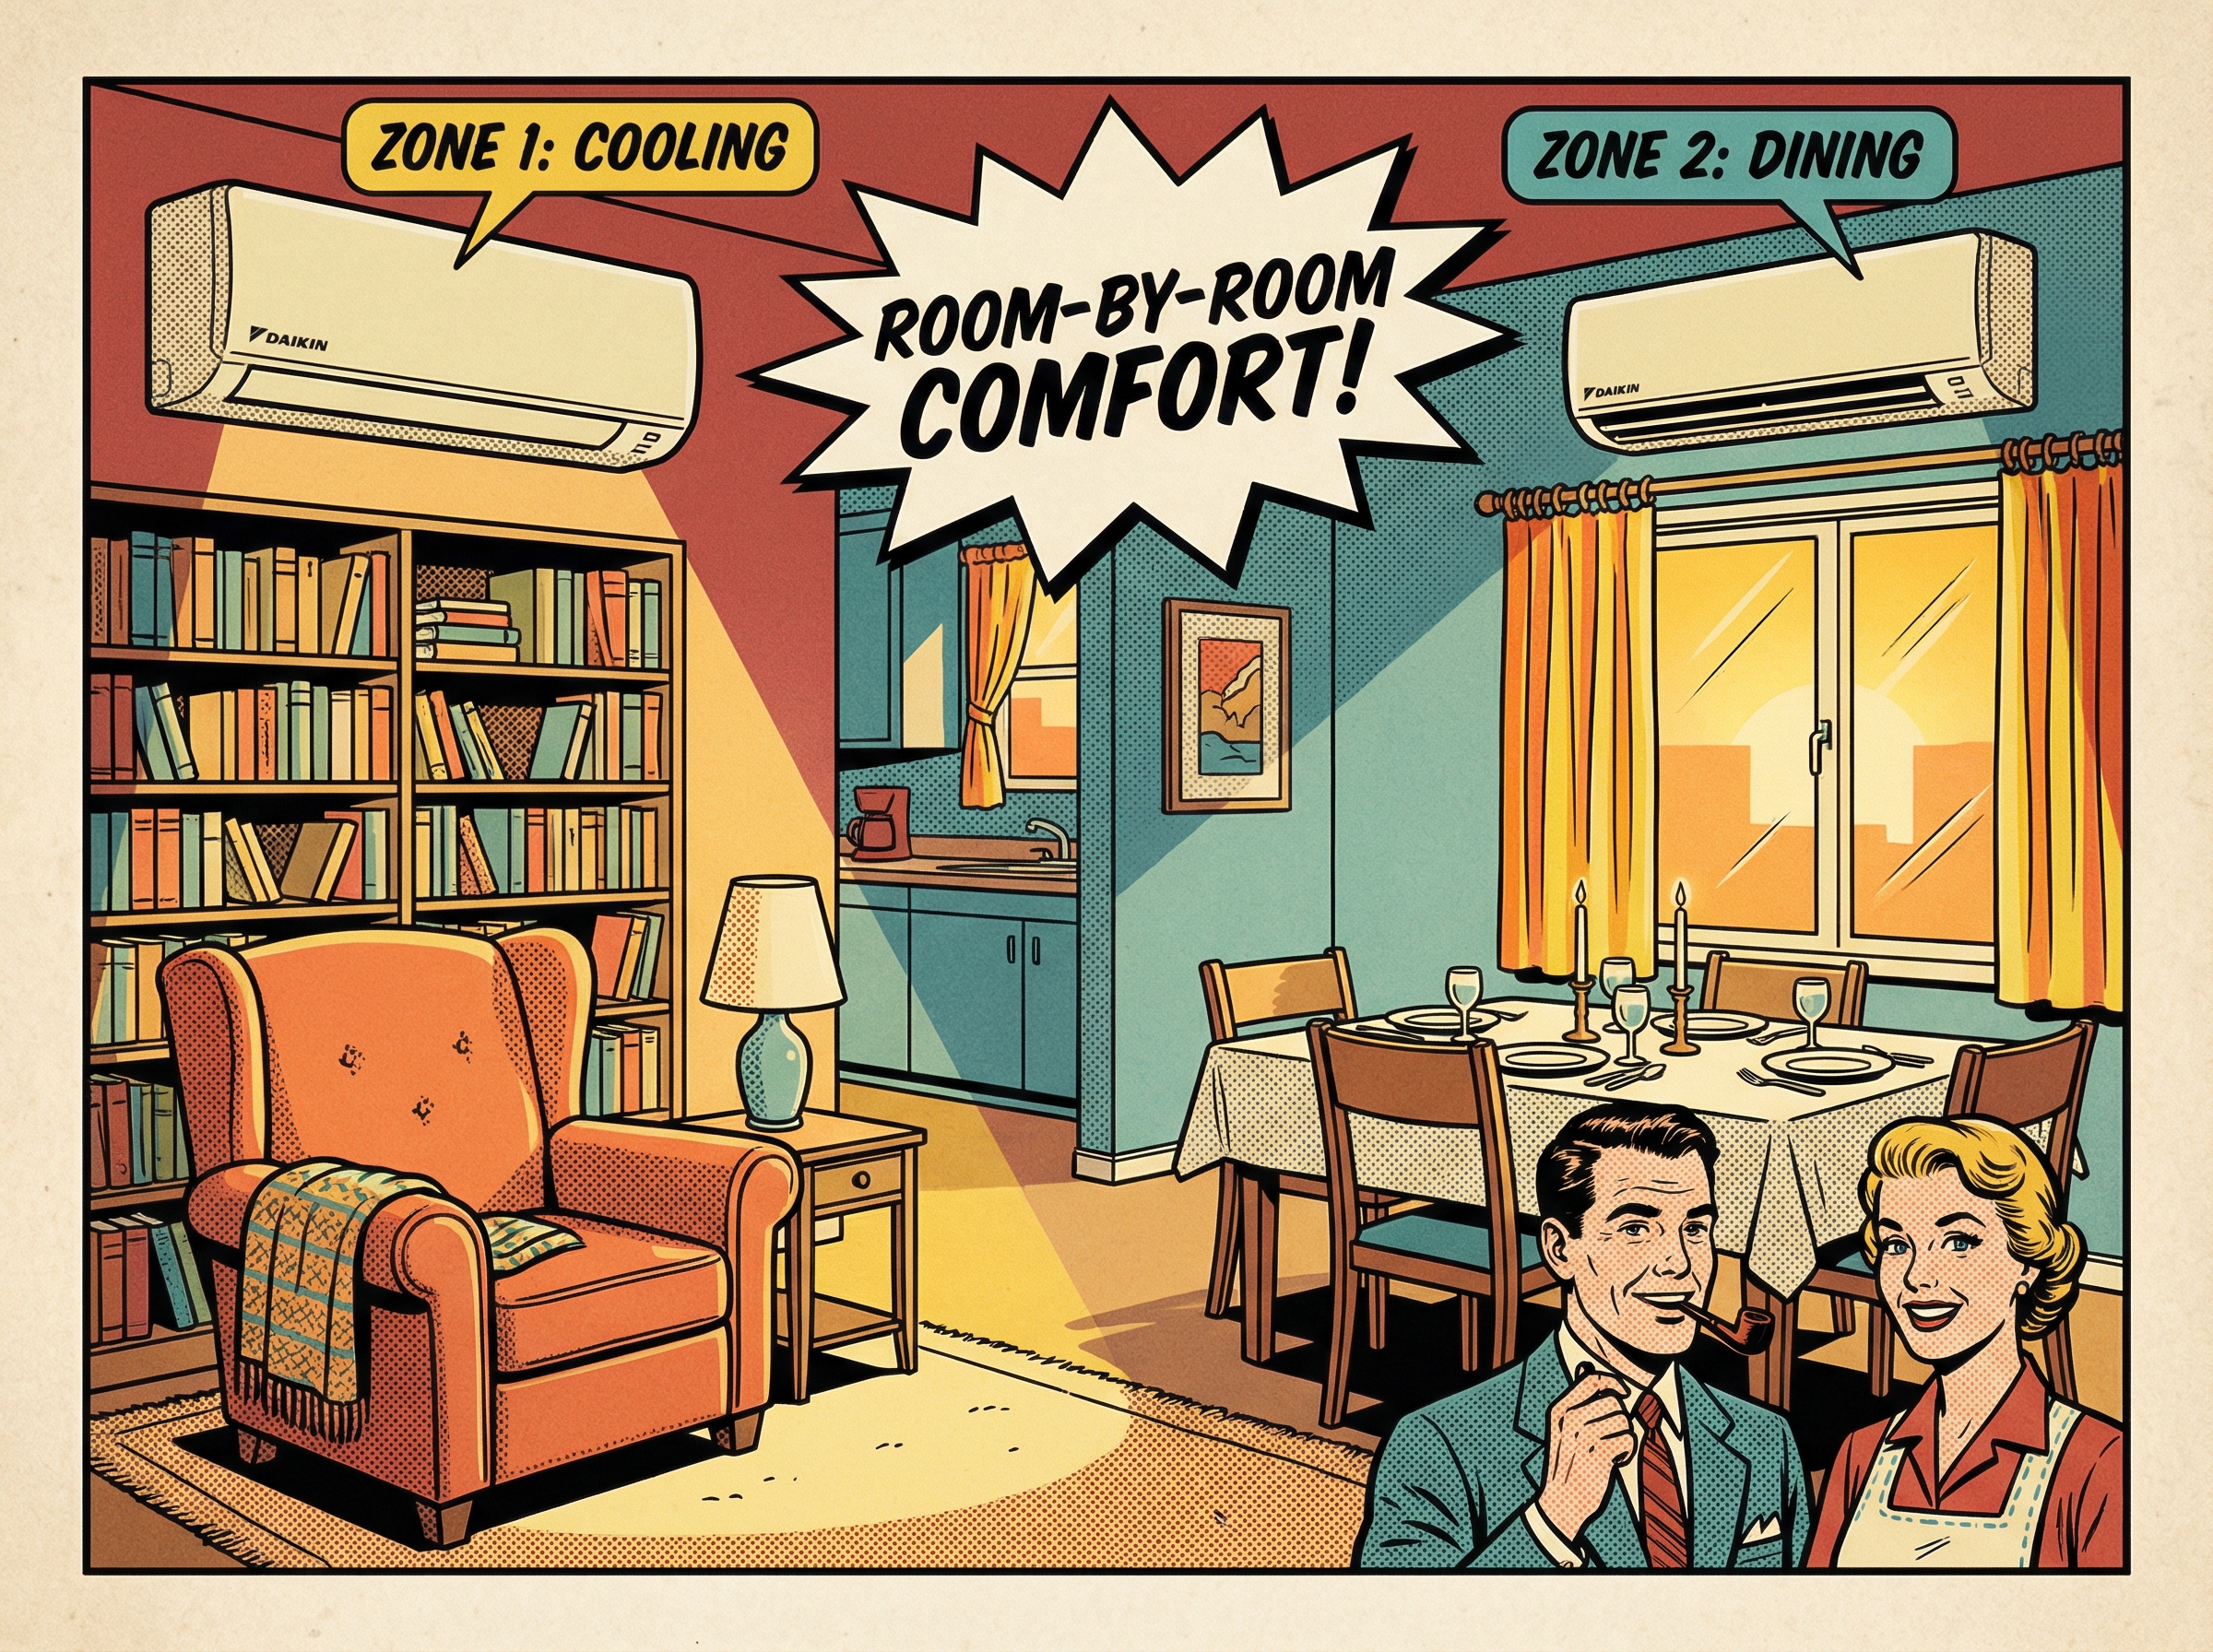
A zoned mini split uses one outdoor heat pump to feed multiple indoor air handlers, each serving its own room or area. Think of it like light switches: each zone is controlled independently, so you heat or cool only the spaces that need it. A Daikin 4 zone system pairs inverter technology with individual controls to deliver steady temperatures, quiet operation, and targeted comfort without over-conditioning the whole home.
This guide is for homeowners planning a retrofit or new build, contractors wanting a tidy checklist, and property managers looking to modernize small offices or multi-room suites. It focuses on the practical steps that determine success: planning the layout, sizing each zone correctly, choosing indoor unit placement, routing and protecting line sets, selecting and configuring controls, commissioning the system so it runs to spec, and setting a maintenance rhythm that preserves efficiency and lifespan.
When a 4 zone Daikin is designed and installed correctly, rooms hold setpoints more evenly, humidity control improves, and utility costs typically drop compared to one-speed, whole-house approaches. This section sets the scope so each later decision builds toward that result.
Benefits & Core Advantages of a Daikin 4 Zone Mini Split
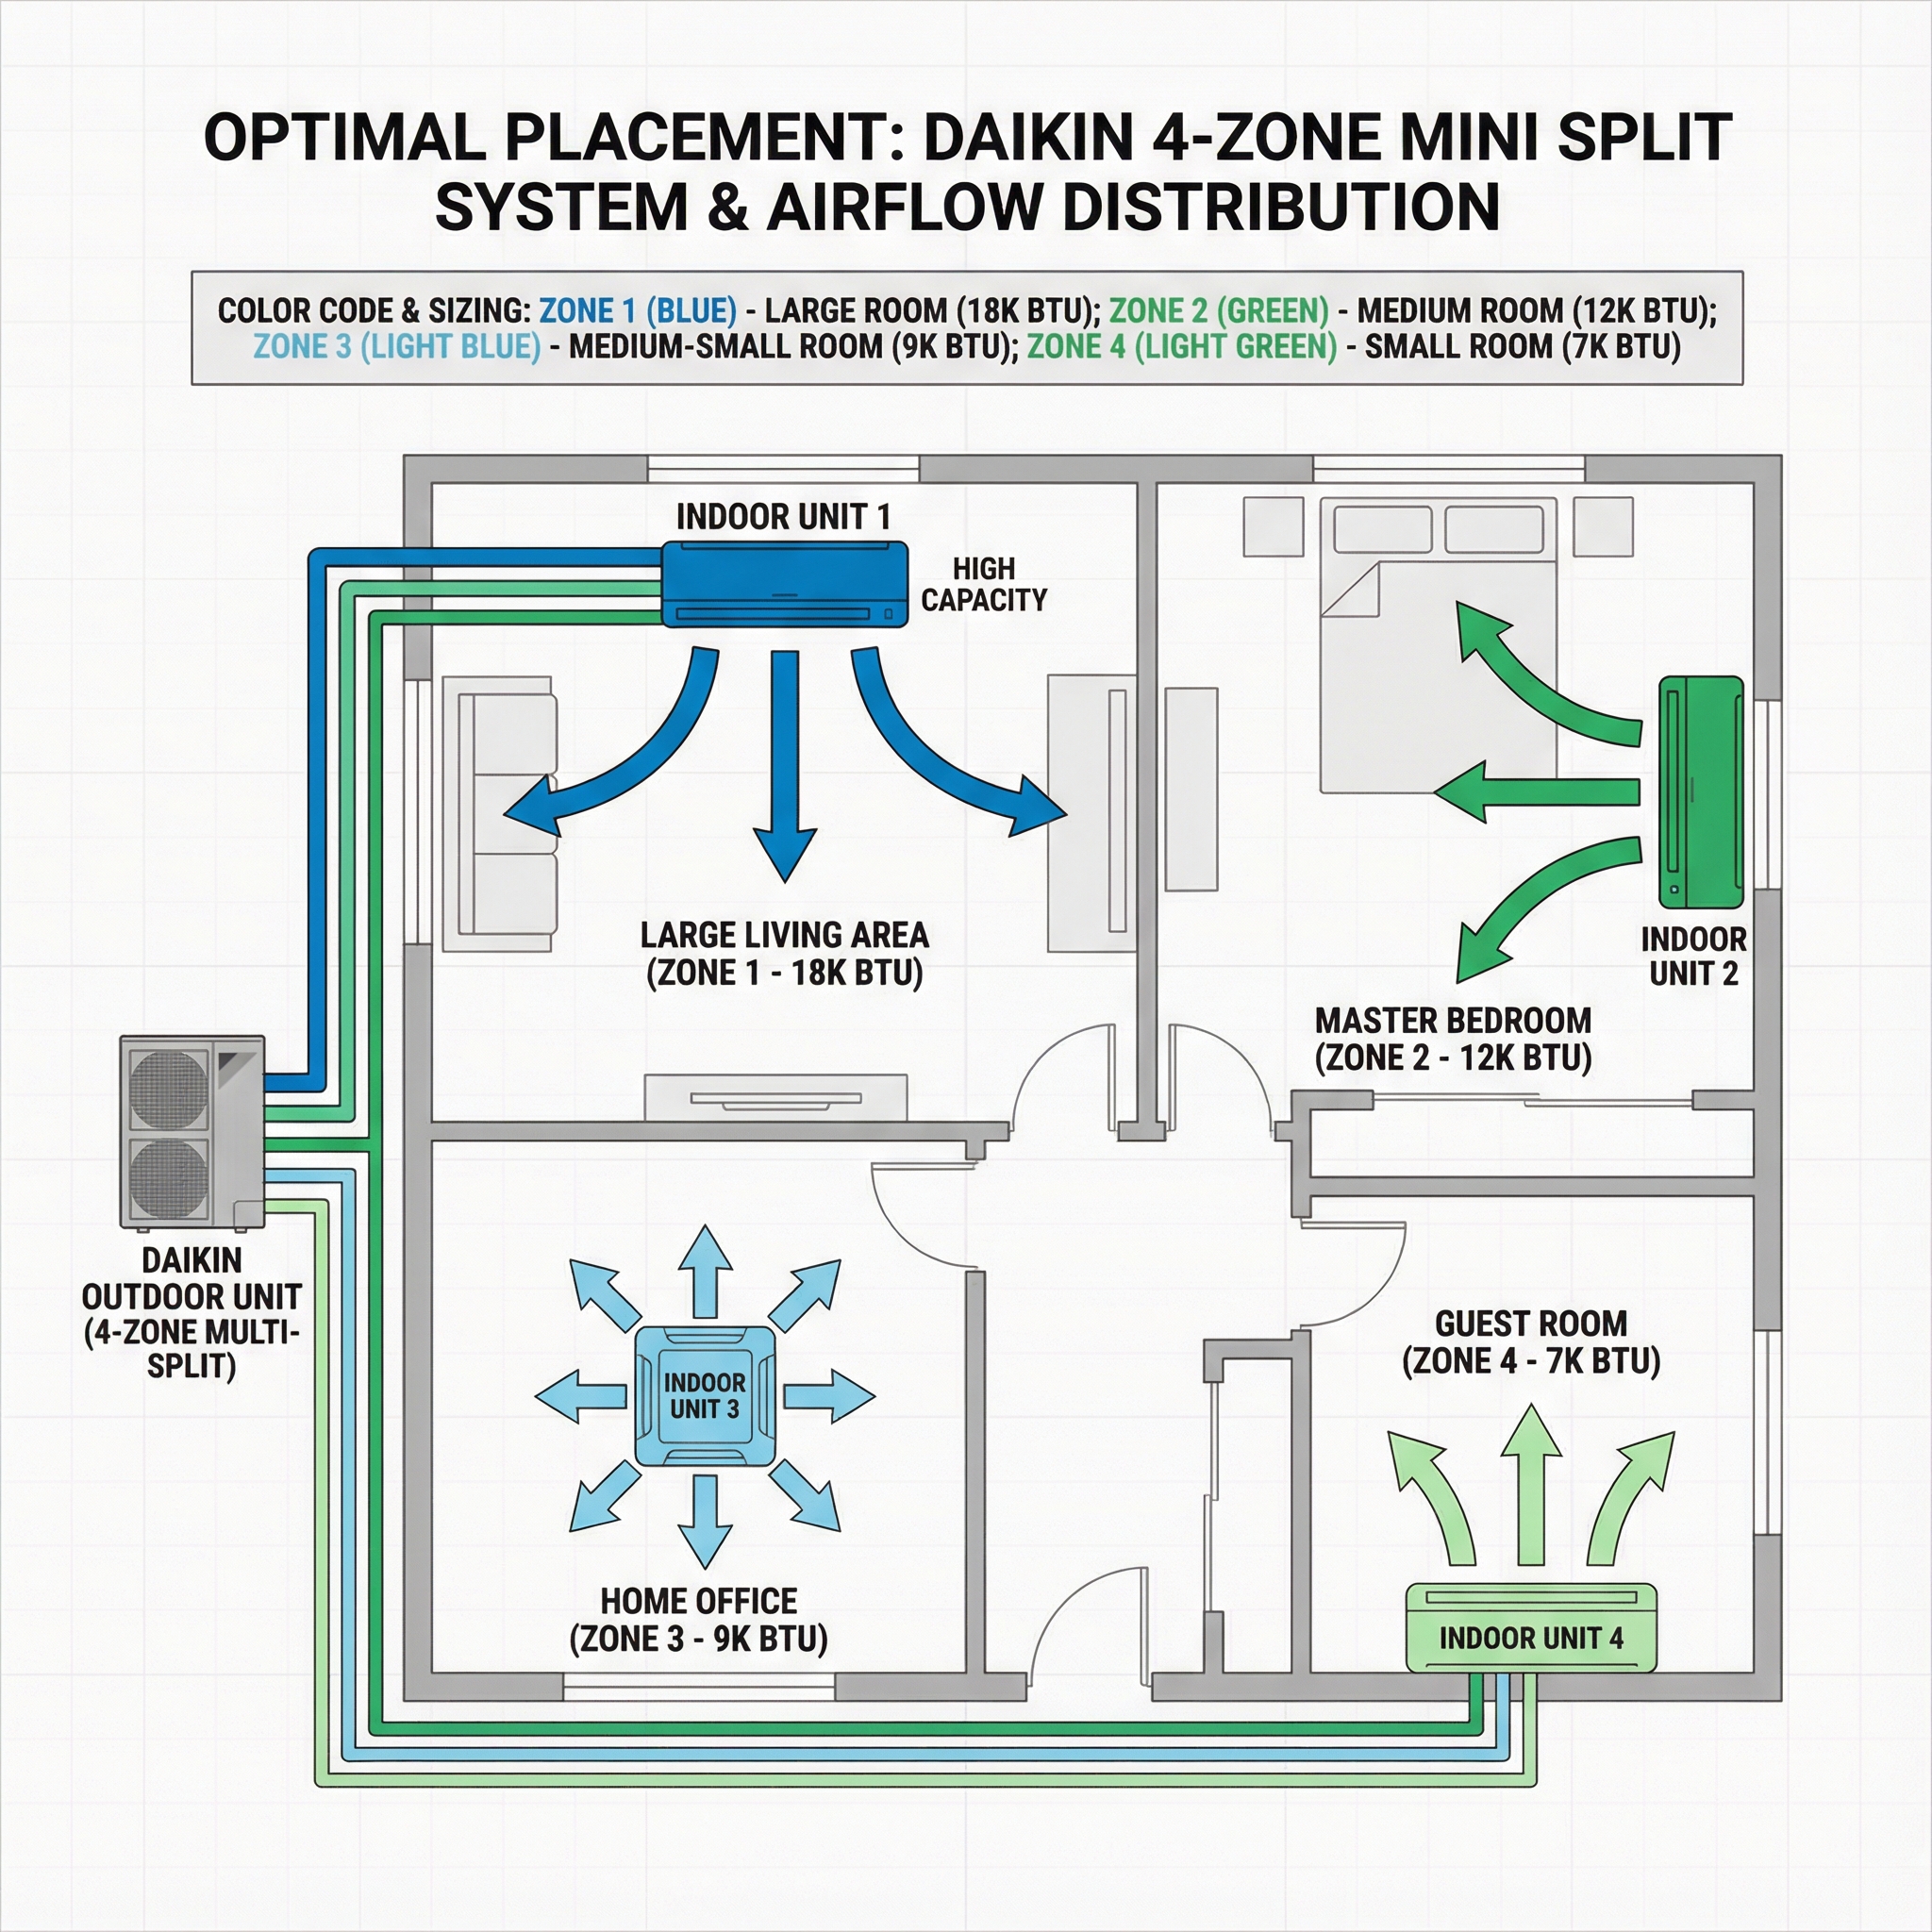
A four zone setup delivers true room by room comfort. Each indoor head runs independently, so bedrooms can be cool while the living room coasts. The outdoor unit uses capacity sharing and diversity, supplying only what the active zones need, not the full nameplate total.
Inverter modulation is the engine behind the savings. The compressor ramps up and down like a dimmer switch, holding steady temperatures and cutting the waste of full on or off cycling. In practice, this typically trims energy use 20 to 35 percent versus single stage ducted systems, and the ductless design avoids the 10 to 20 percent losses common in ductwork. As a heat pump, it moves heat instead of generating it, often delivering 2 to 3 times the heat per kWh in moderate weather for efficient year round service.
Retrofit flexibility is a major plus, since small line sets serve additions or older homes without new ducts. For best results, match head size to each room load, keep line lengths within spec, and avoid mounting heads in dead corners or above heat sources.
- Maintenance and IAQ: washable filters, fewer dust pathways, rinse filters every 1 to 3 months, and schedule annual coil cleaning to maintain efficiency and a 15 to 20 year lifespan.
Pre Installation Checklist: Plan Zones, Sizing and Questions for Your Installer
- Define zones: list rooms with doors, sun gain, kitchens, basements, and target setpoints and schedules.
- Require a Manual J room-by-room load calc: per-room BTU heat and cool drives each head size, not a single whole-house guess.
- Match indoor heads to rooms: wall, cassette, ceiling, or slim-duct by room use and load, avoid oversizing small bedrooms.
- Select the outdoor unit: confirm number of ports, connected vs usable capacity, and support for four zones if needed.
- Line sets: verify total length, longest run, and vertical rise. If using a branch box, place it centrally and follow port limits.
- Outdoor placement and cold-climate prep: clearances, stand height, wind baffles, and drain pan heat where required.
- Condensate plan: gravity routing or pump, clean termination.
- Electrical: dedicated circuit, breaker size, disconnect, wire labels at air handler and condenser.
- Refrigerant: confirm line sizes, added charge per foot, and keep safety tables with the job documents.
- Slim-duct notes: verify return path and static pressure.
- Humidity and ventilation: dehumidification strategy and any ERV or fresh air plan.
- Efficiency and incentives: AHRI matched models, SEER2 ratings, and required paperwork.
- Noise and vibration: pad, isolators, line set supports, and indoor sound targets.
- Commissioning: pressure test, deep vacuum, leak check, controls setup, owner training, and documentation.
- Maintenance: filters, coil cleaning, condensate treatment, and seasonal checkups.
- Questions to ask: Who performs the Manual J and shares room results? How will line lengths and elevation be confirmed? Where will any branch box be located? What is the condensate plan and electrical spec? Which AHRI match secures incentives, and what is your commissioning checklist? In our experience at Budget Heating (BudgetHeating.com), clear answers here prevent most change orders.
When a 4 Zone Mini Split Isn't the Right Choice: Limitations, Tradeoffs and Alternatives
Four-zone mini-splits, including Daikin systems, solve many layouts, but certain situations call for a different approach.
- Mixed room sizes with light loads: If small bedrooms share a large condenser, each head can be oversized. That hurts dehumidification and creates cool yet clammy rooms, especially with doors closed. Better fit: two separate two-zone systems, or a small ducted air handler to serve the small rooms with one right-sized coil, plus a single-zone for the main area.
- High simultaneous demand: A single outdoor unit cannot deliver full capacity to all four heads at once. It divides output like a pie, so all slices shrink during a hot spell. Better fit: two condensers, or a central ducted heat pump for core spaces paired with one or two ductless heads for bonus rooms.
- Cold-climate heating: Capacity and efficiency fall in deep cold, so expect longer run times and reduced output. Plan backup heat, such as electric strips, hydronic baseboard, or a dual-fuel furnace. In very cold zones, cold-climate single-zone units on critical rooms can outperform a shared four-zone.
Avoid common pitfalls: do not oversize, do not assume every head can run at max at the same time, place heads and route condensate carefully, and skip the myth of annual refrigerant top-ups. Proper airflow planning matters when doors are closed.
Regulatory & Climate Considerations: DOE Rules, SEER2 Regions and Cold Climate Installation Tips
The 2023 DOE move to SEER2, HSPF2 and EER2 changed how systems are tested and which models can be sold. Split ACs now have regional minimums in the North, Southeast and Southwest. Heat pumps follow a national minimum. Choose an AHRI matched pair to satisfy rules and to qualify for ENERGY STAR or utility rebates where offered.
For cold climates, plan installation like winter tires for your home. Elevate the outdoor unit above the snow line, add a snow hood or wind baffle where drifting occurs, and use a drain pan heater when required. Keep airflow paths clear. We see fewer nuisance defrost issues when units are elevated and shielded. Confirm refrigerant charge versus room floor area tables to meet safety code when placing indoor units.
SEER2/HSPF2, Efficiency Ratings and Real World Savings for 4 Zone Systems
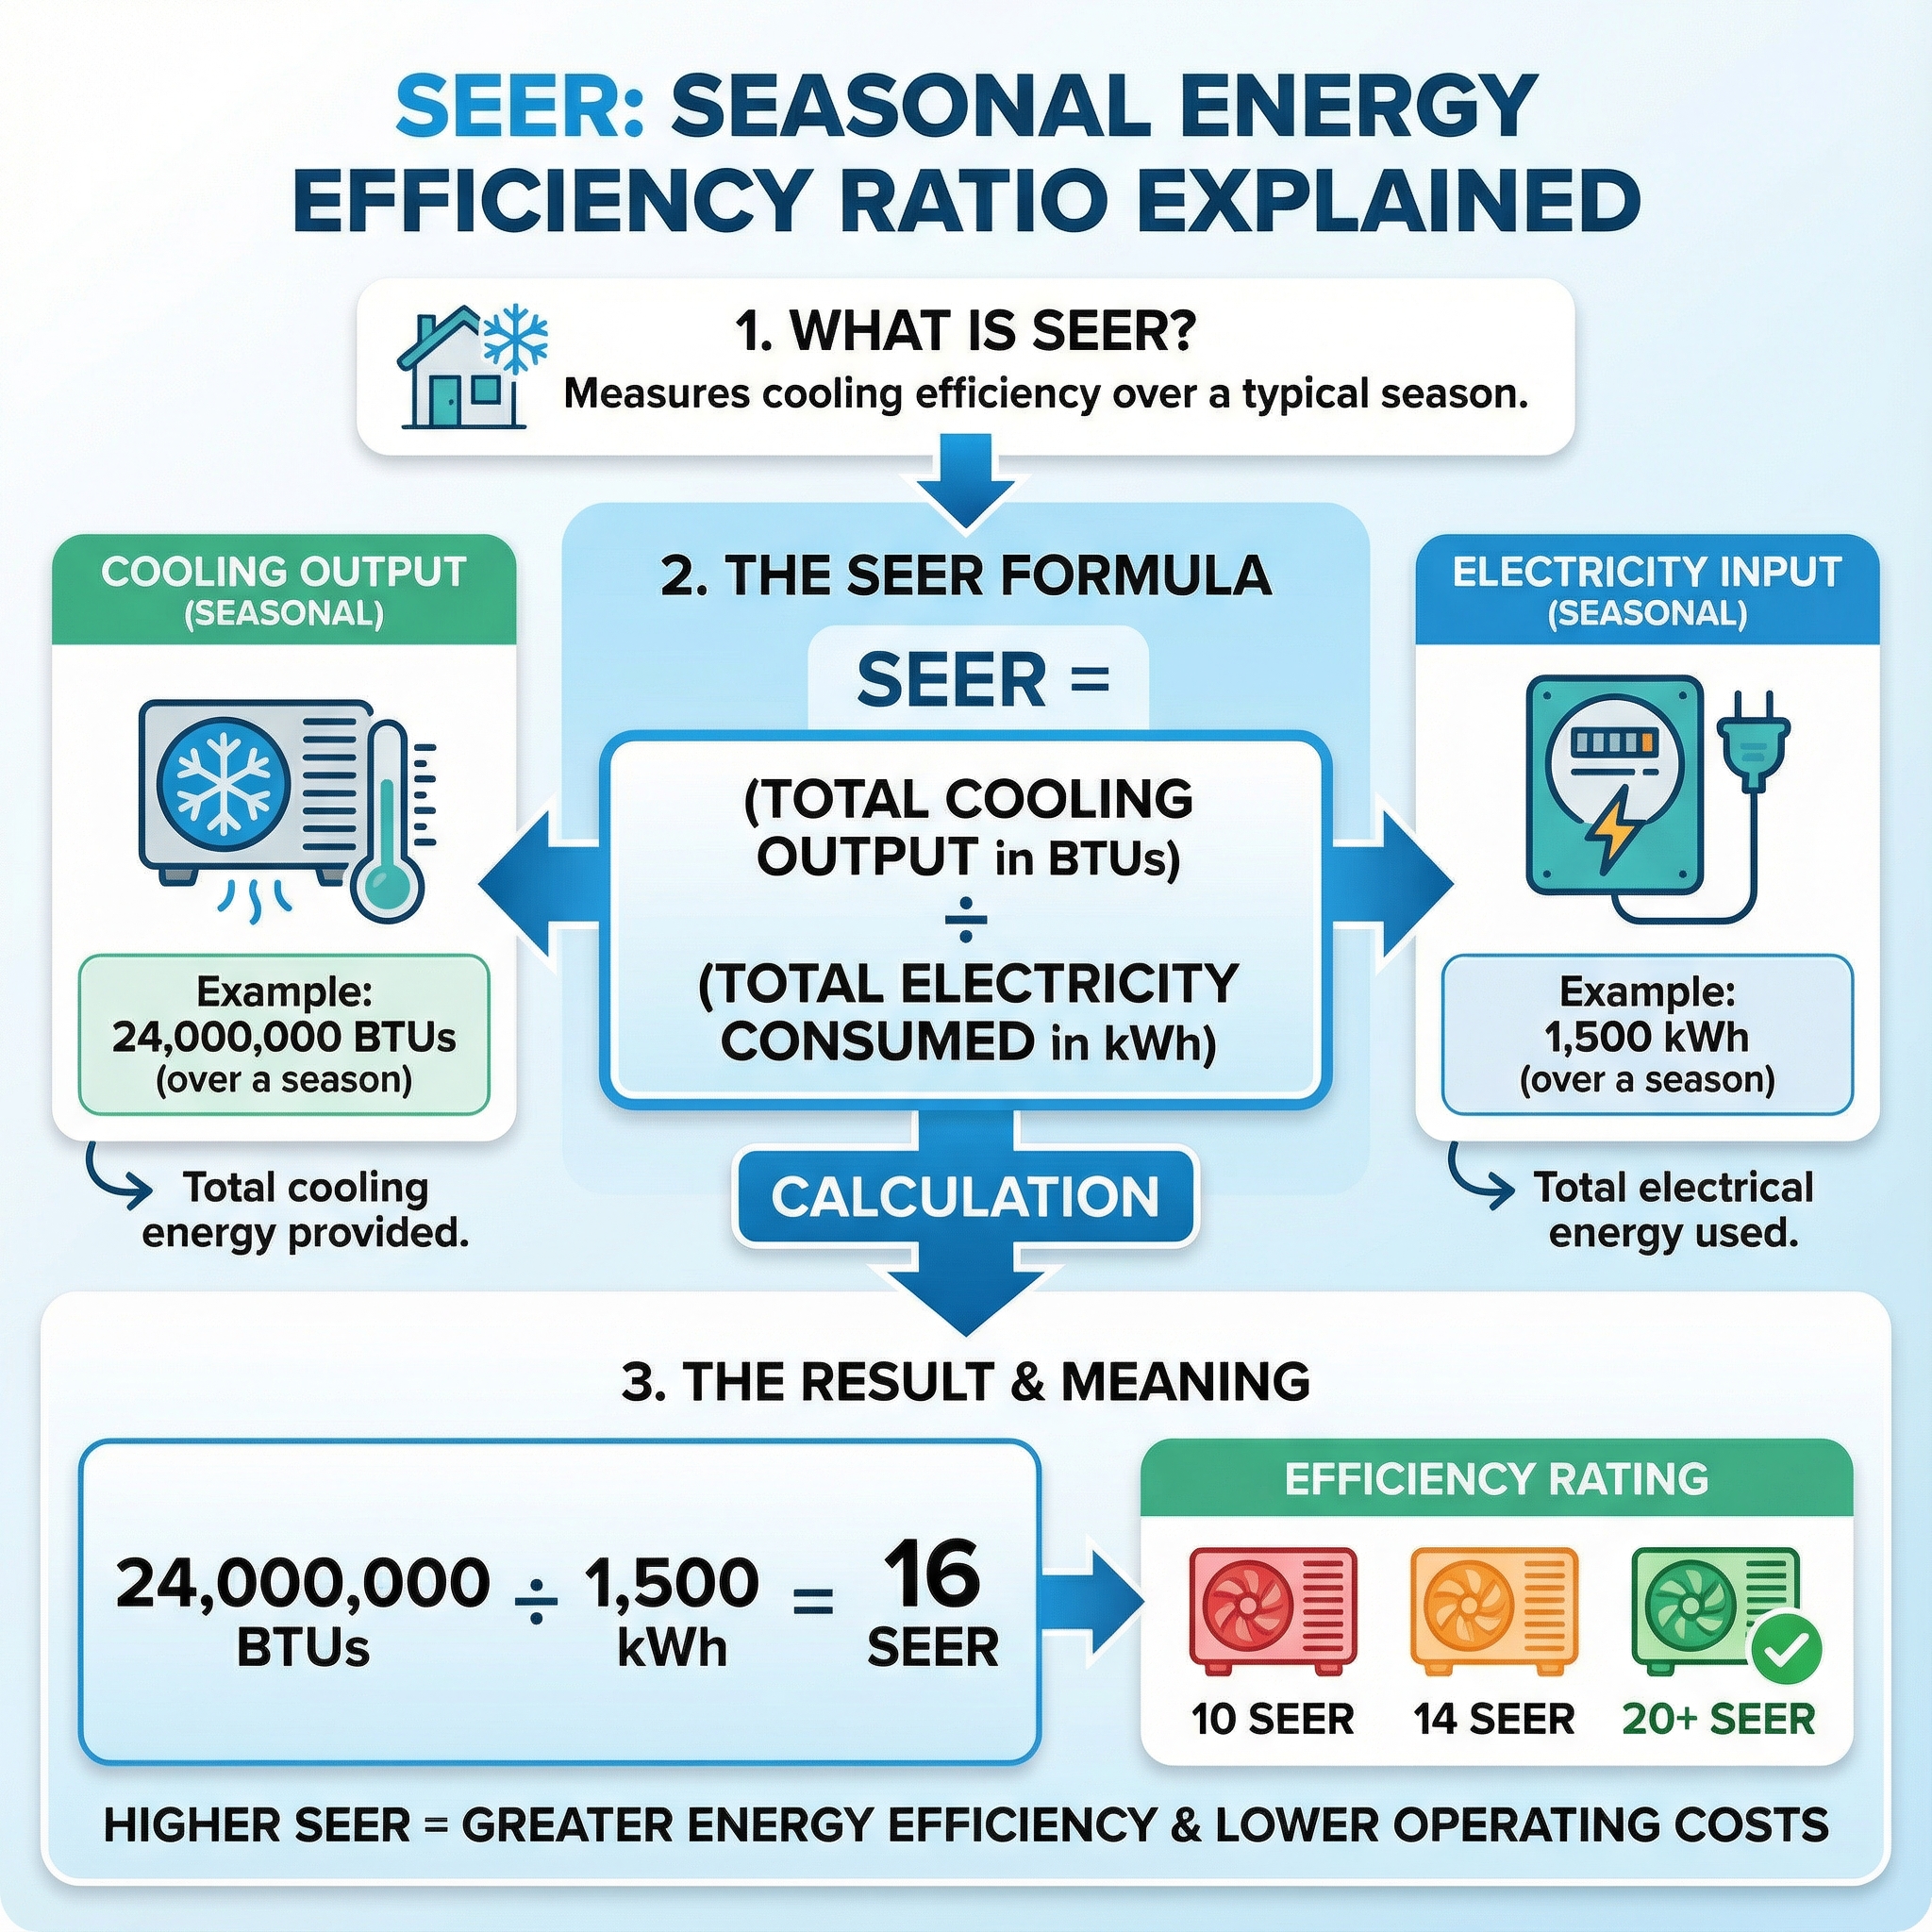
SEER2 and HSPF2 are the updated efficiency metrics from the 2023 DOE test procedure. SEER2 measures seasonal cooling efficiency, HSPF2 does the same for heating, and EER2 reflects full-load cooling performance in hot weather. With multi-zone equipment, ratings depend on the exact outdoor unit plus the specific mix of four indoor heads, so a single-zone may test higher than a comparable four-zone even from the same series.
Think of SEER2 like the mpg on a window sticker. Moving from 14 to 18 SEER2 typically trims cooling use about 15 to 25 percent. If you use 2,000 kWh per year for cooling, that is roughly 300 to 500 kWh saved, or $45 to $75 at $0.15 per kWh. ENERGY STAR and many rebates look at SEER2, HSPF2, and an AHRI certificate for the exact combination. In our experience at Budget Heating (BudgetHeating.com), missing the AHRI match is the most common rebate roadblock.
- Choose an AHRI-matched outdoor and indoor head combination.
- Right-size capacity to avoid short cycling.
- Keep line sets as short and cleanly routed as practical.
- Verify charge and indoor airflow per the manufacturer.
- Keep filters and coils clean, and maintain clear outdoor airflow.
Safety & Maintenance: What Homeowners Can Do and What Pros Must Handle
Some upkeep is safe for homeowners, and some belongs to licensed technicians. Always shut off power at the disconnect or breaker before any check.
- Filters: Replace or wash every 30 to 90 days, more often with pets or heavy dust.
- Outdoor coil and clearance: Keep about 18 inches of space, trim vegetation, and gently rinse the coil with a garden hose only with power off.
- Condensate: Verify a steady drain in cooling season and clear algae with a small vinegar flush.
- Visual inspection: Look for loose panels, damaged insulation, debris, and listen for unusual noises.
Leave the following to licensed professionals: refrigerant charging or recovery, leak checks, brazing line sets, evacuating with a vacuum pump, and any electrical diagnostics or repairs. Refrigerant can cause frostbite and displace oxygen, and high voltage as well as charged capacitors can shock. Plan annual professional service to verify refrigerant and electrical health and to deep clean coils as needed.
Cost, Savings and Payback: What to Expect from a High Efficiency 4 Zone Installation
In our experience, a high efficiency 4 zone upgrade trims energy use 20 to 40 percent versus older equipment, depending on usage patterns. Translating that into dollars by efficiency tier:
- 15 to 16 SEER2: typical annual savings of about $200 to $400 per home.
- 18 to 20 SEER2: typical annual savings of about $350 to $800 per home.
The step up from base efficiency to higher tiers usually pays back in 3 to 5 years through utility savings, faster in heavy use homes or where rates are higher. Over the lifecycle, lower run costs often outweigh the initial premium.
Maintenance protects the math. Without routine service, efficiency can drift 5 to 15 percent, eroding savings and shortening equipment life. A yearly tune up in the $150 to $250 range often returns 4 to 10 times its cost by preserving efficiency and avoiding failures, for example preventing a $2,000 compressor loss.
About This Guide: The Daikin 4 Zone Scope and Recommended Setup Elements
This guide focuses on typical four zone Daikin multi zone condensers paired with common indoor units: wall mount, floor console, and slim duct heads. It is written for owners and installers planning or validating a four room layout. We define what a solid setup looks like regardless of exact model, covering load matching basics, head mix planning, outdoor and indoor placement clearances, line set routing at a high level, power and condensate considerations, control grouping, and commissioning checkpoints. We skip the mini split overview and focus on practical, model agnostic steps.
Final Checklist & Next Steps for a Successful Daikin 4 Zone Installation
A flawless Daikin 4 zone comes from smart planning up front and tight commissioning at the end. Refrigerant work must be done by a licensed tech: nitrogen-braze the line sets, pressure test, evacuate to 500 microns with a calibrated digital gauge that holds, then charge by weight to factory spec, adding or subtracting for line length. Commissioning verifies each head's airflow, drain performance, sensor readings, coil temperatures, superheat and subcool, proper inverter modulation, and quiet, vibration-free operation.
- Confirm room-by-room loads and choose indoor locations with clear return and service access.
- Set outdoor unit with proper clearances, within line-set limits, and on a stable base.
- Provide dedicated electrical and correct controls wiring to each zone.
- Add isolation pads and secure line sets to curb vibration and noise.
- Schedule regular maintenance to preserve efficiency and longevity.
Whether you are coordinating an install or hiring a contractor, the goal is predictable comfort and efficiency without callbacks.
Our team has 30+ years getting multi-zone systems right on the first startup, and we can size, kit, and ship what you need at wholesale pricing.
- Get a Custom Quote
- Talk to Our Team (U.S.-based phone support)
- Shop Daikin Multi Zone Mini Splits