How Much Does It Cost to Add AC to a Finished Basement? A Quick Overview
Finished basements can be warm and humid, and adding AC makes them livable year-round while protecting finishes from moisture issues. This overview sets the stage for understanding what drives cost and which options fit different spaces.
Here is what this guide will cover: the main paths for cooling a basement, whether to extend existing ductwork or use a dedicated ductless system, how to select the right capacity, and what affects pricing such as moisture control, electrical access, and the level of finish already in place. We will also outline layout choices like supply and return placement, zoning, and noise considerations.
Your next steps are simple: confirm the square footage and room count, note ceiling heights and obstructions, consider typical occupancy, and identify any humidity concerns. With that picture in hand, you can compare solutions and understand where most of the budget goes, from equipment selection to installation complexity and any dehumidification needs.
Why Finished Basements Need a Different AC Approach (Moisture, Loads, and Access)
Basements run cooler than above grade rooms, so sensible cooling loads are modest, yet moisture is high. Prioritize dehumidification to protect finishes, stop musty odors, and keep relative humidity near 50 percent. The first decision is system type: extend the central AC or add a dedicated unit. Extending can work if load, duct capacity, and return paths are verified, otherwise it can rob airflow from upper floors or short cycle. Dedicated systems provide true zoning and independent control to prevent overcooling. Expect more labor in finished ceilings and walls for ducts, drains, and wiring. Plan condensate management with gravity drains or pumps, traps, cleanouts, and leak sensors. When adding a split, line set access and condition affect feasibility and cost.

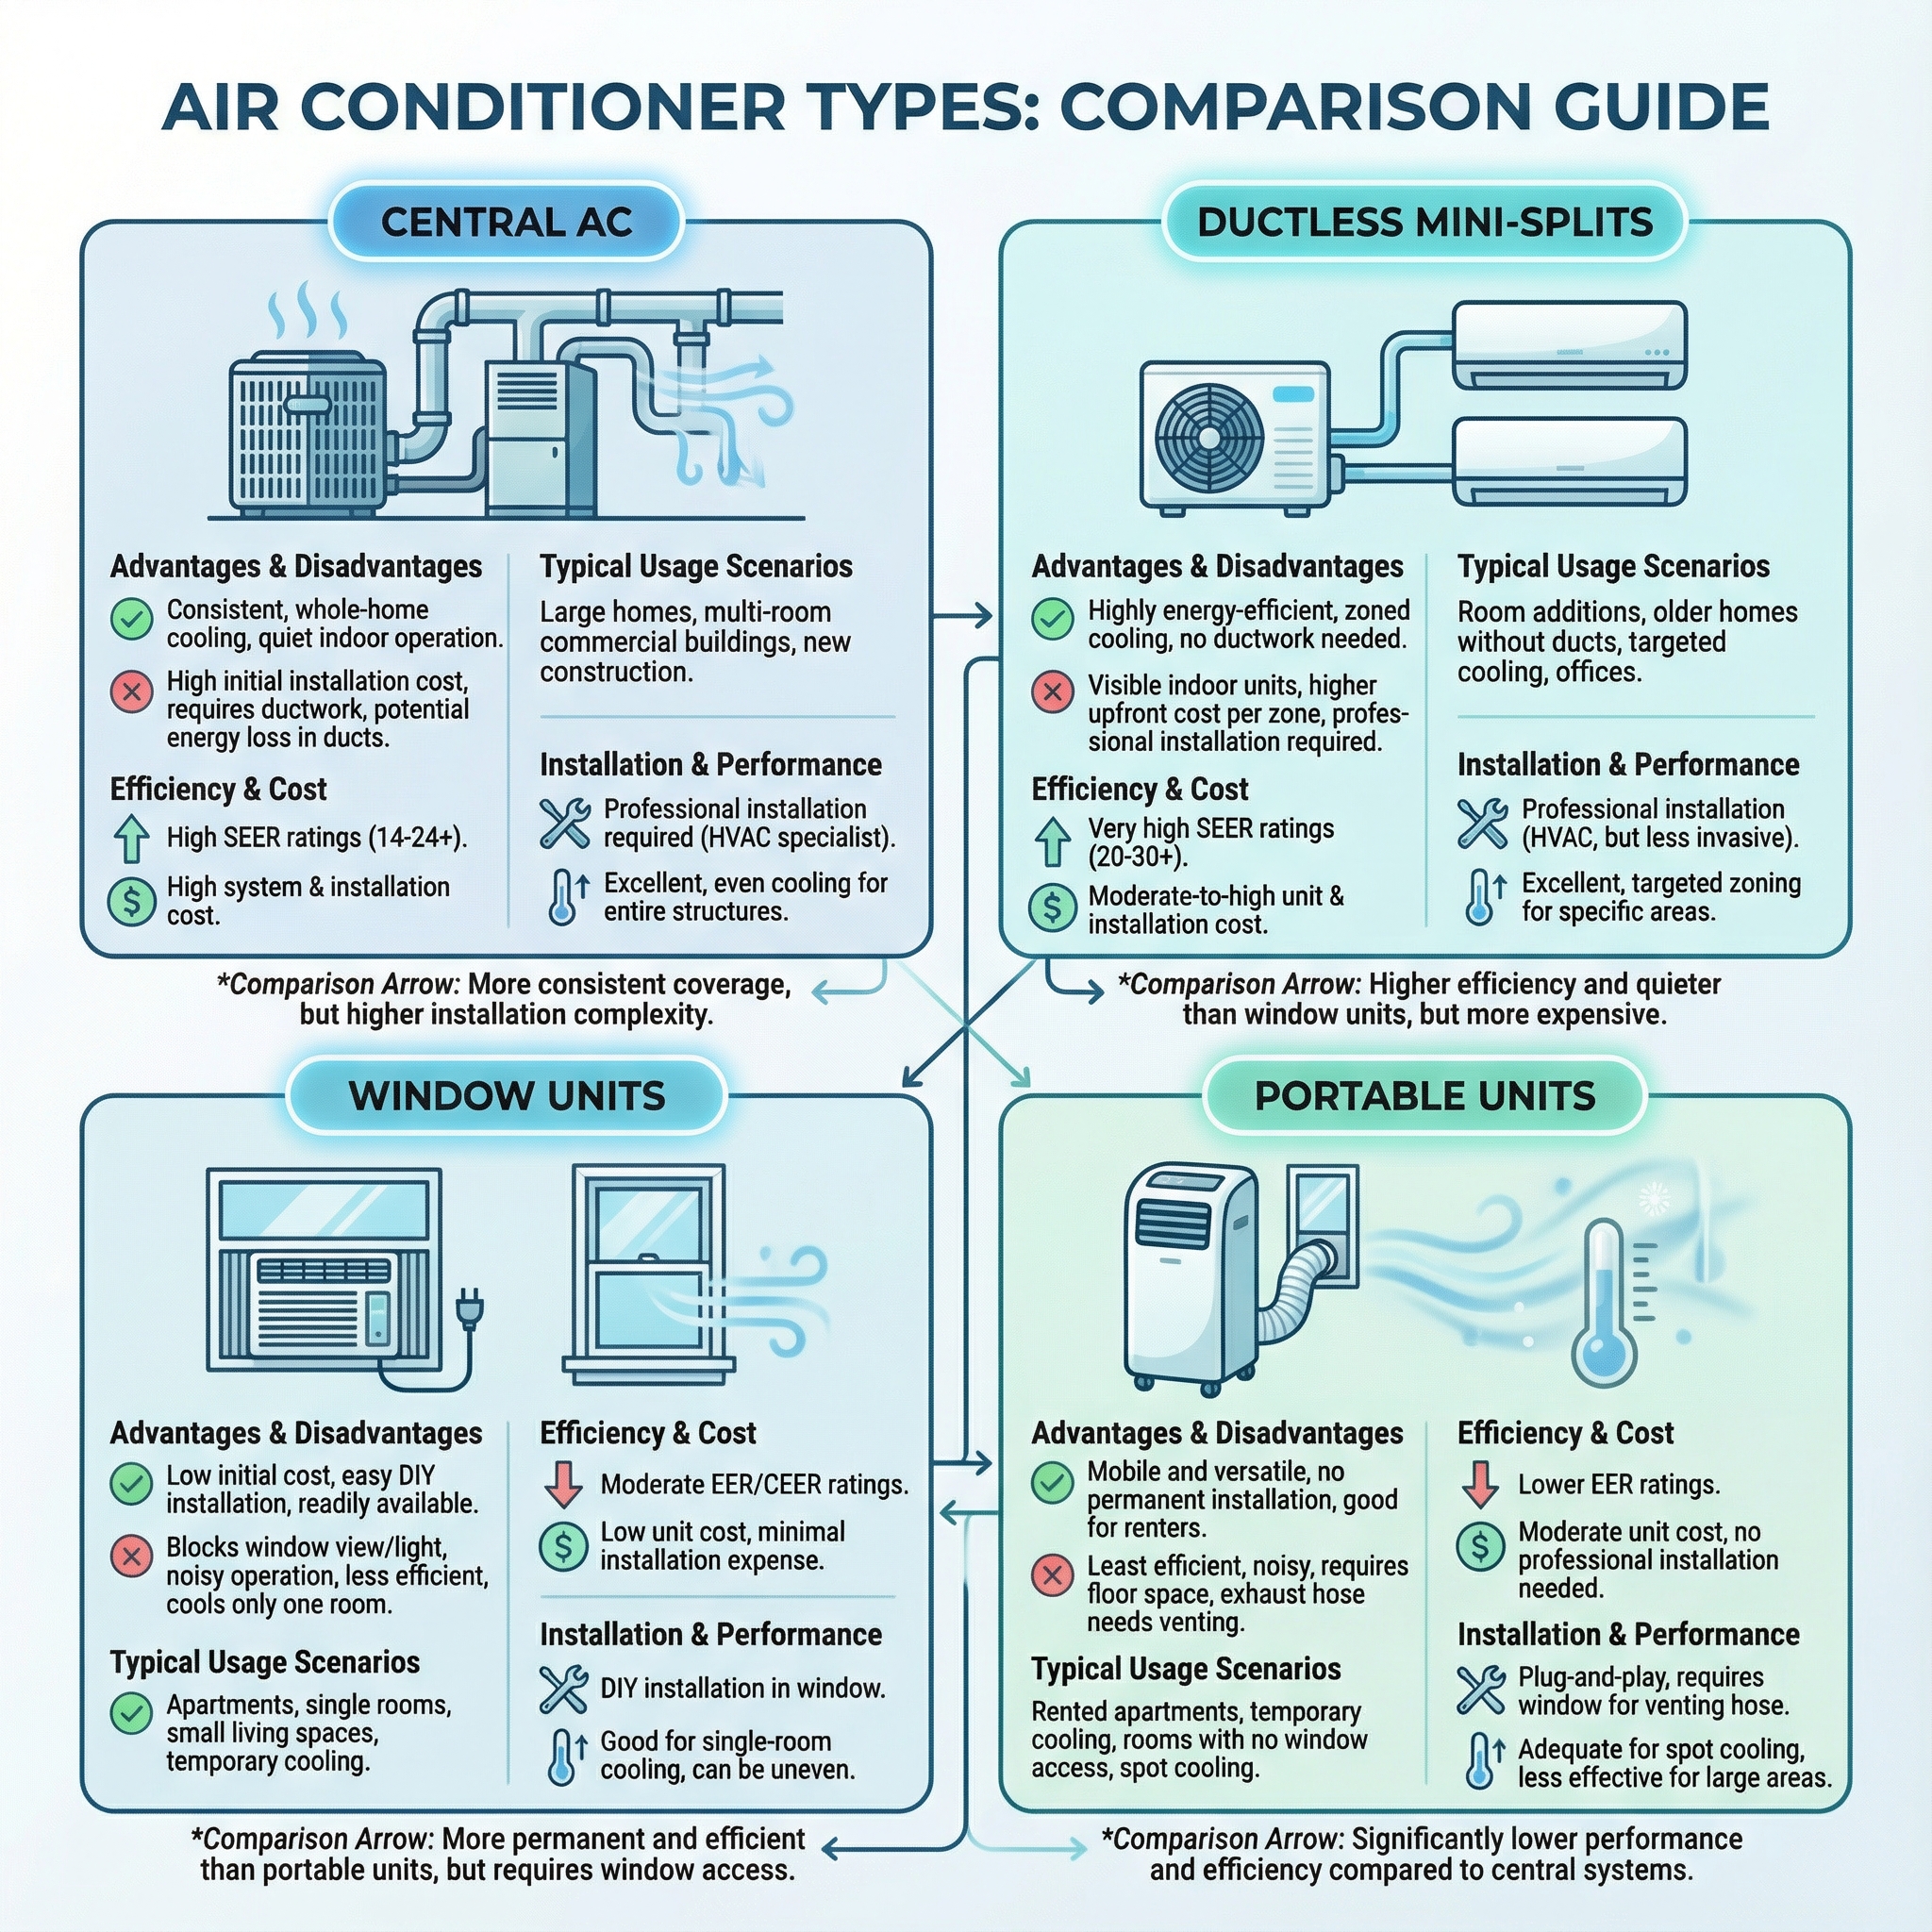
Common Cooling Options for Finished Basements: Pros, Cons, and Use Cases
Match the system to your room count, insulation, and budget. In our experience at Budget Heating (BudgetHeating.com), these are the practical options and when they fit.
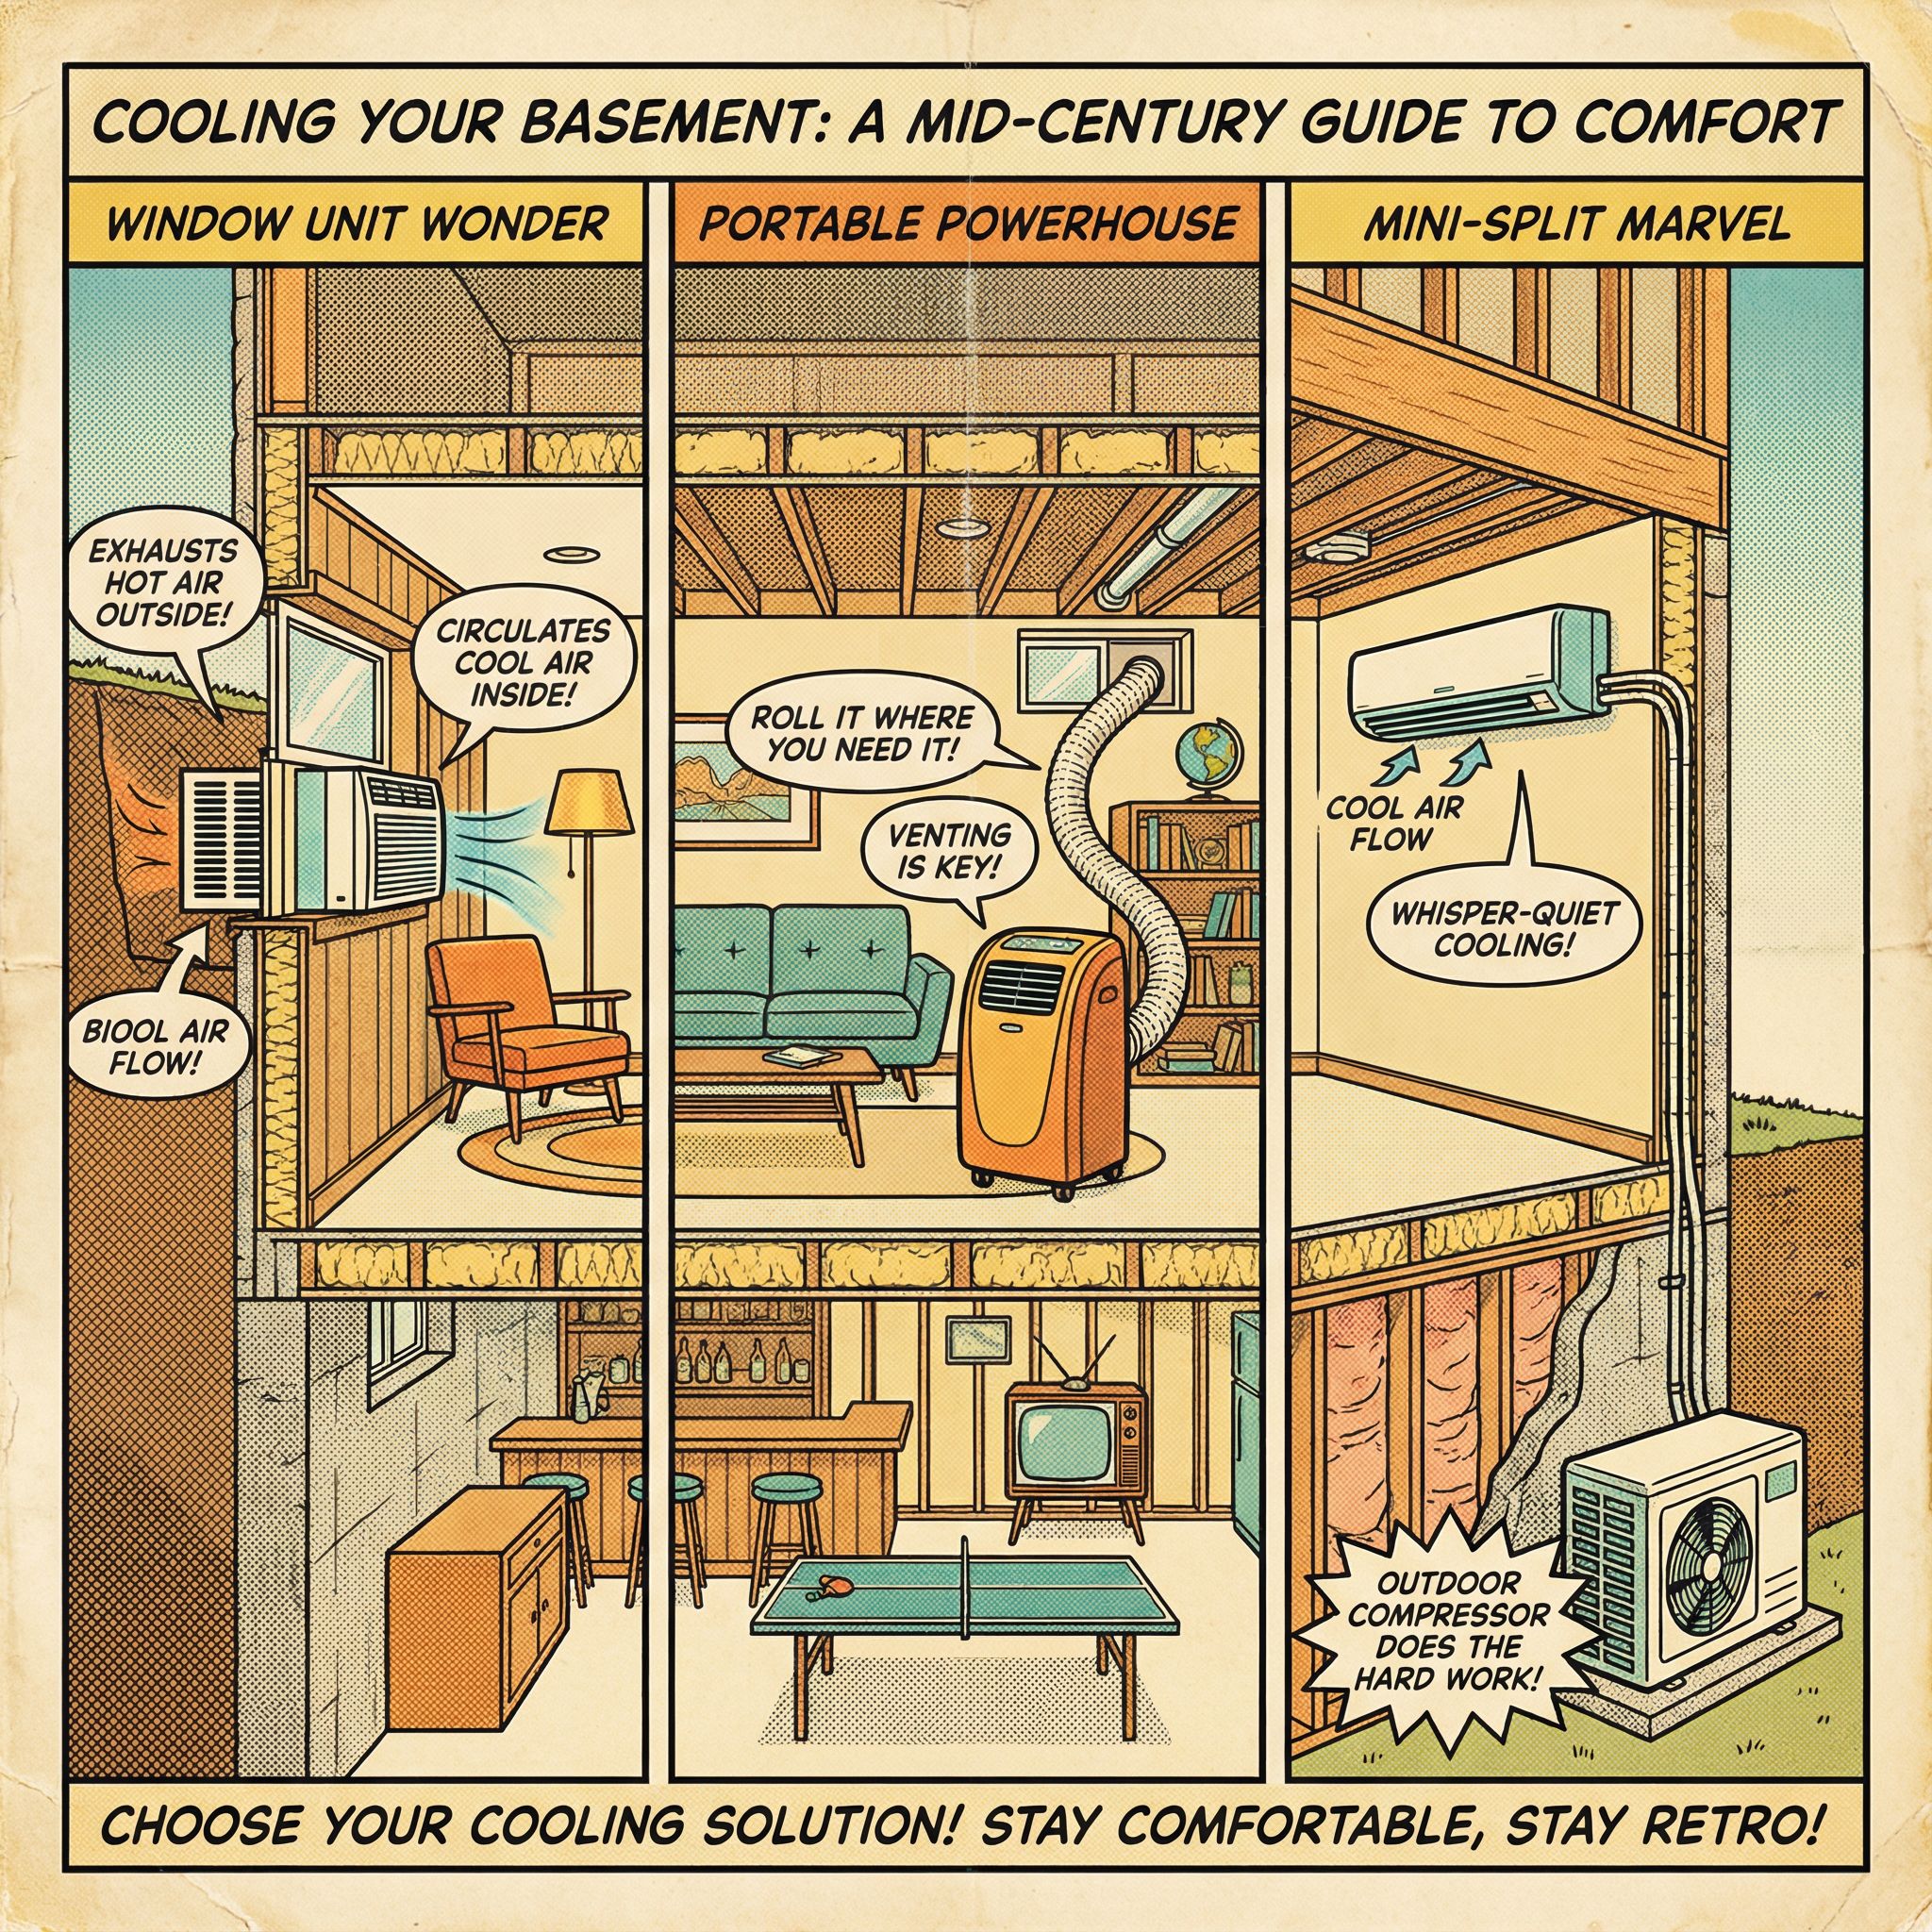
- Ductless mini-split: indoor head plus outdoor compressor, efficient dehumidification and independent control. Pros: quiet, targeted. Cons: visible head. Best for a single room or open plan.
- Extend central AC: add supply or return ducts, dampers, and controls if capacity allows. Pros: shared thermostat. Cons: imbalance if undersized. Best when the air handler has headroom.
- Full new HVAC with ductwork: integrated, ducted distribution. Pros: hidden, even air. Cons: most disruptive and expensive. Best for major remodels.
- Multi-zone mini-splits: several indoor heads on one outdoor unit. Pros: room-by-room control. Cons: higher upfront. Best for multi-room basements.
- Portable or window AC: low upfront cost, limited dehumidification and circulation. Best for temporary or supplemental cooling.
Cost Breakdown by System Type: Window/Portable, Central Extension, and Mini Splits
Here are realistic installed cost ranges so you can build a sensible budget for a basement or addition. Numbers below reflect typical quotes we see in the field.
- Window and portable units: roughly $150 to $1,000 installed. This is the lowest upfront path, but performance and comfort are limited.
- Extend your existing central AC: roughly $500 to $5,000+. The range depends on how accessible the ducts are and whether your current equipment has the capacity to handle the added load.
- Full new HVAC with new ductwork: often lands in the high four figures or into five figures, depending on scope and how much finish restoration is required.
- Ductless mini splits:
- Single zone: approximately $1,500 to $6,000 installed. A typical wall mounted setup serving about 900 sq ft often quotes around $4,500 to $6,500 installed.
- Multi zone: roughly $3,000 to $12,000+, depending on the number of indoor heads and overall complexity.
In our experience at Budget Heating (BudgetHeating.com), quotes tend to cluster near the middle of these ranges when access is straightforward. Expect higher totals when duct access is tight, existing equipment lacks capacity, or a multi zone layout adds complexity.
DIY vs. Hiring an HVAC Pro: When to Save and When Not To (Honest Tradeoffs)
We hear this a lot: DIY installation looks like an easy way to save. In reality, refrigerant handling, charging, and code compliance require licensed professionals. Skipping that can void warranties, fail inspections, and create hazards. Permits are not optional in many jurisdictions, and inspections often apply to AC, ducts, and electrical work.
- Myth: Lowest bid is always best. Very low quotes often skip Manual J and D, duct balancing, permits, or proper refrigerant work.
- Myth: SEER alone determines savings. Right sizing, run time, and duct design drive real-world results.
- Myth: No ductwork modifications are needed. Finished basements usually require added supply and return runs along with sealing.
- Myth: You can simply tie a finished basement into the existing system. Without a Manual J review, this often overloads the equipment, like hitching a trailer to a compact car.
When the ceiling is tight and routing is complex, DIY or simple duct extensions are not ideal. A ductless mini-split or hiring a licensed contractor is the safer path. If the current system is already at capacity, tying in the basement leads to imbalance. A dedicated mini-split or a full system upgrade is the better alternative. In high-moisture basements with no drains, avoid relying on portable or window units alone. Choose equipment with reliable condensate management and add a standalone dehumidifier.
Smart savings come from doing what you safely can, then bringing in licensed pros for Manual J and D, permits, and all refrigerant work.
Typical Price Add-Ons: Permits, Electrical Work, Drainage, Ducts, and Line Sets
The sticker price covers the equipment, but real-world installs often include code and fit-up items that add to the total. From years of field work, we see these line items most often:
- Permits and inspections: Many jurisdictions require them, typically $250 to $400. Regional rules can change scope.
- Electrical upgrades: Service, panel, or breakers may need updating, usually $500 to $2,500.
- Drainage: A condensate pump and drain routing commonly add $100 to $600, with many jobs around $200 to $500 for pump plus labor.
- Refrigerant line set: Replacement when undersized or contaminated is about $500 to $1,200, depending on run length and routing difficulty.
- Ducts and finishes: Airflow tweaks can be needed. Any openings for ducts or lines often lead to drywall or trim repair, $200 to $2,000+.
- SEER2 impacts: New regional minimums influence equipment selection and have lifted equipment pricing roughly $350 to $1,500.
Local code drives requirements, so budget a cushion for these items, not just the equipment.
What Drives the Price: Size, Layout, Insulation, Headroom, and Access
From our field work, installation difficulty and total price track the space itself. Cost hinges on the approach, extending the central system or adding a dedicated unit, plus basement size and layout and whether the existing equipment has capacity to spare.
- Low headroom, tight joist bays, and finished ceilings slow routing and add labor compared with an open, unfinished basement.
- If ducts or line sets require opening finished ceilings, soffits, or access panels, expect higher labor and repair costs.
- If the air handler or condenser lacks spare capacity, upsizing or a supplemental unit raises both equipment and install cost.
How to Plan and Size Basement Cooling: A Homeowner’s Checklist (Manual J, Ducts, and Moisture)
Basement comfort starts with math and moisture control. Think of Manual J as the measuring cup for load and Manual D as the duct recipe for airflow.
- Define goals: cooling only or add heat and dehumidification, target RH, expected hours of use.
- Fix moisture first: address bulk water, then plan condensate routing. Prefer gravity drain or a pump with overflow protection.
- Choose approach: extend central, use a ductless mini split, or install new HVAC. Weigh duct feasibility, headroom, disruption, and future zoning.
- Demand Manual J and Manual D, not rules of thumb. Confirm room by room loads and duct sizes.
- Tying into central: verify air handler and condenser capacity and static pressure. Add a separate thermostat or zone.
- Airflow plan: balanced supplies plus at least one return, sealed and insulated ducts, balancing dampers.
- Placement and noise: pick indoor and outdoor locations that favor quiet operation, clean condensate routing, and low visual impact.
- Controls: confirm zoning and check remote or Wi Fi control for mini splits if desired.
- Electrical and codes: panel capacity, circuits, disconnects, GFCI or AFCI, clearances near combustion appliances.
- Compare features: SEER2 or EER2, compressor type, and sound. Mid range efficiency often fits basement loads.
- Permits and inspections included in scope. Get three itemized quotes with model numbers, AHRI certificates, warranties, and a commissioning checklist.
- Rebates and financing: ask about heat pump and high efficiency incentives.
- After startup: verify delta T, humidity, and condensate. Register warranties and schedule annual maintenance.
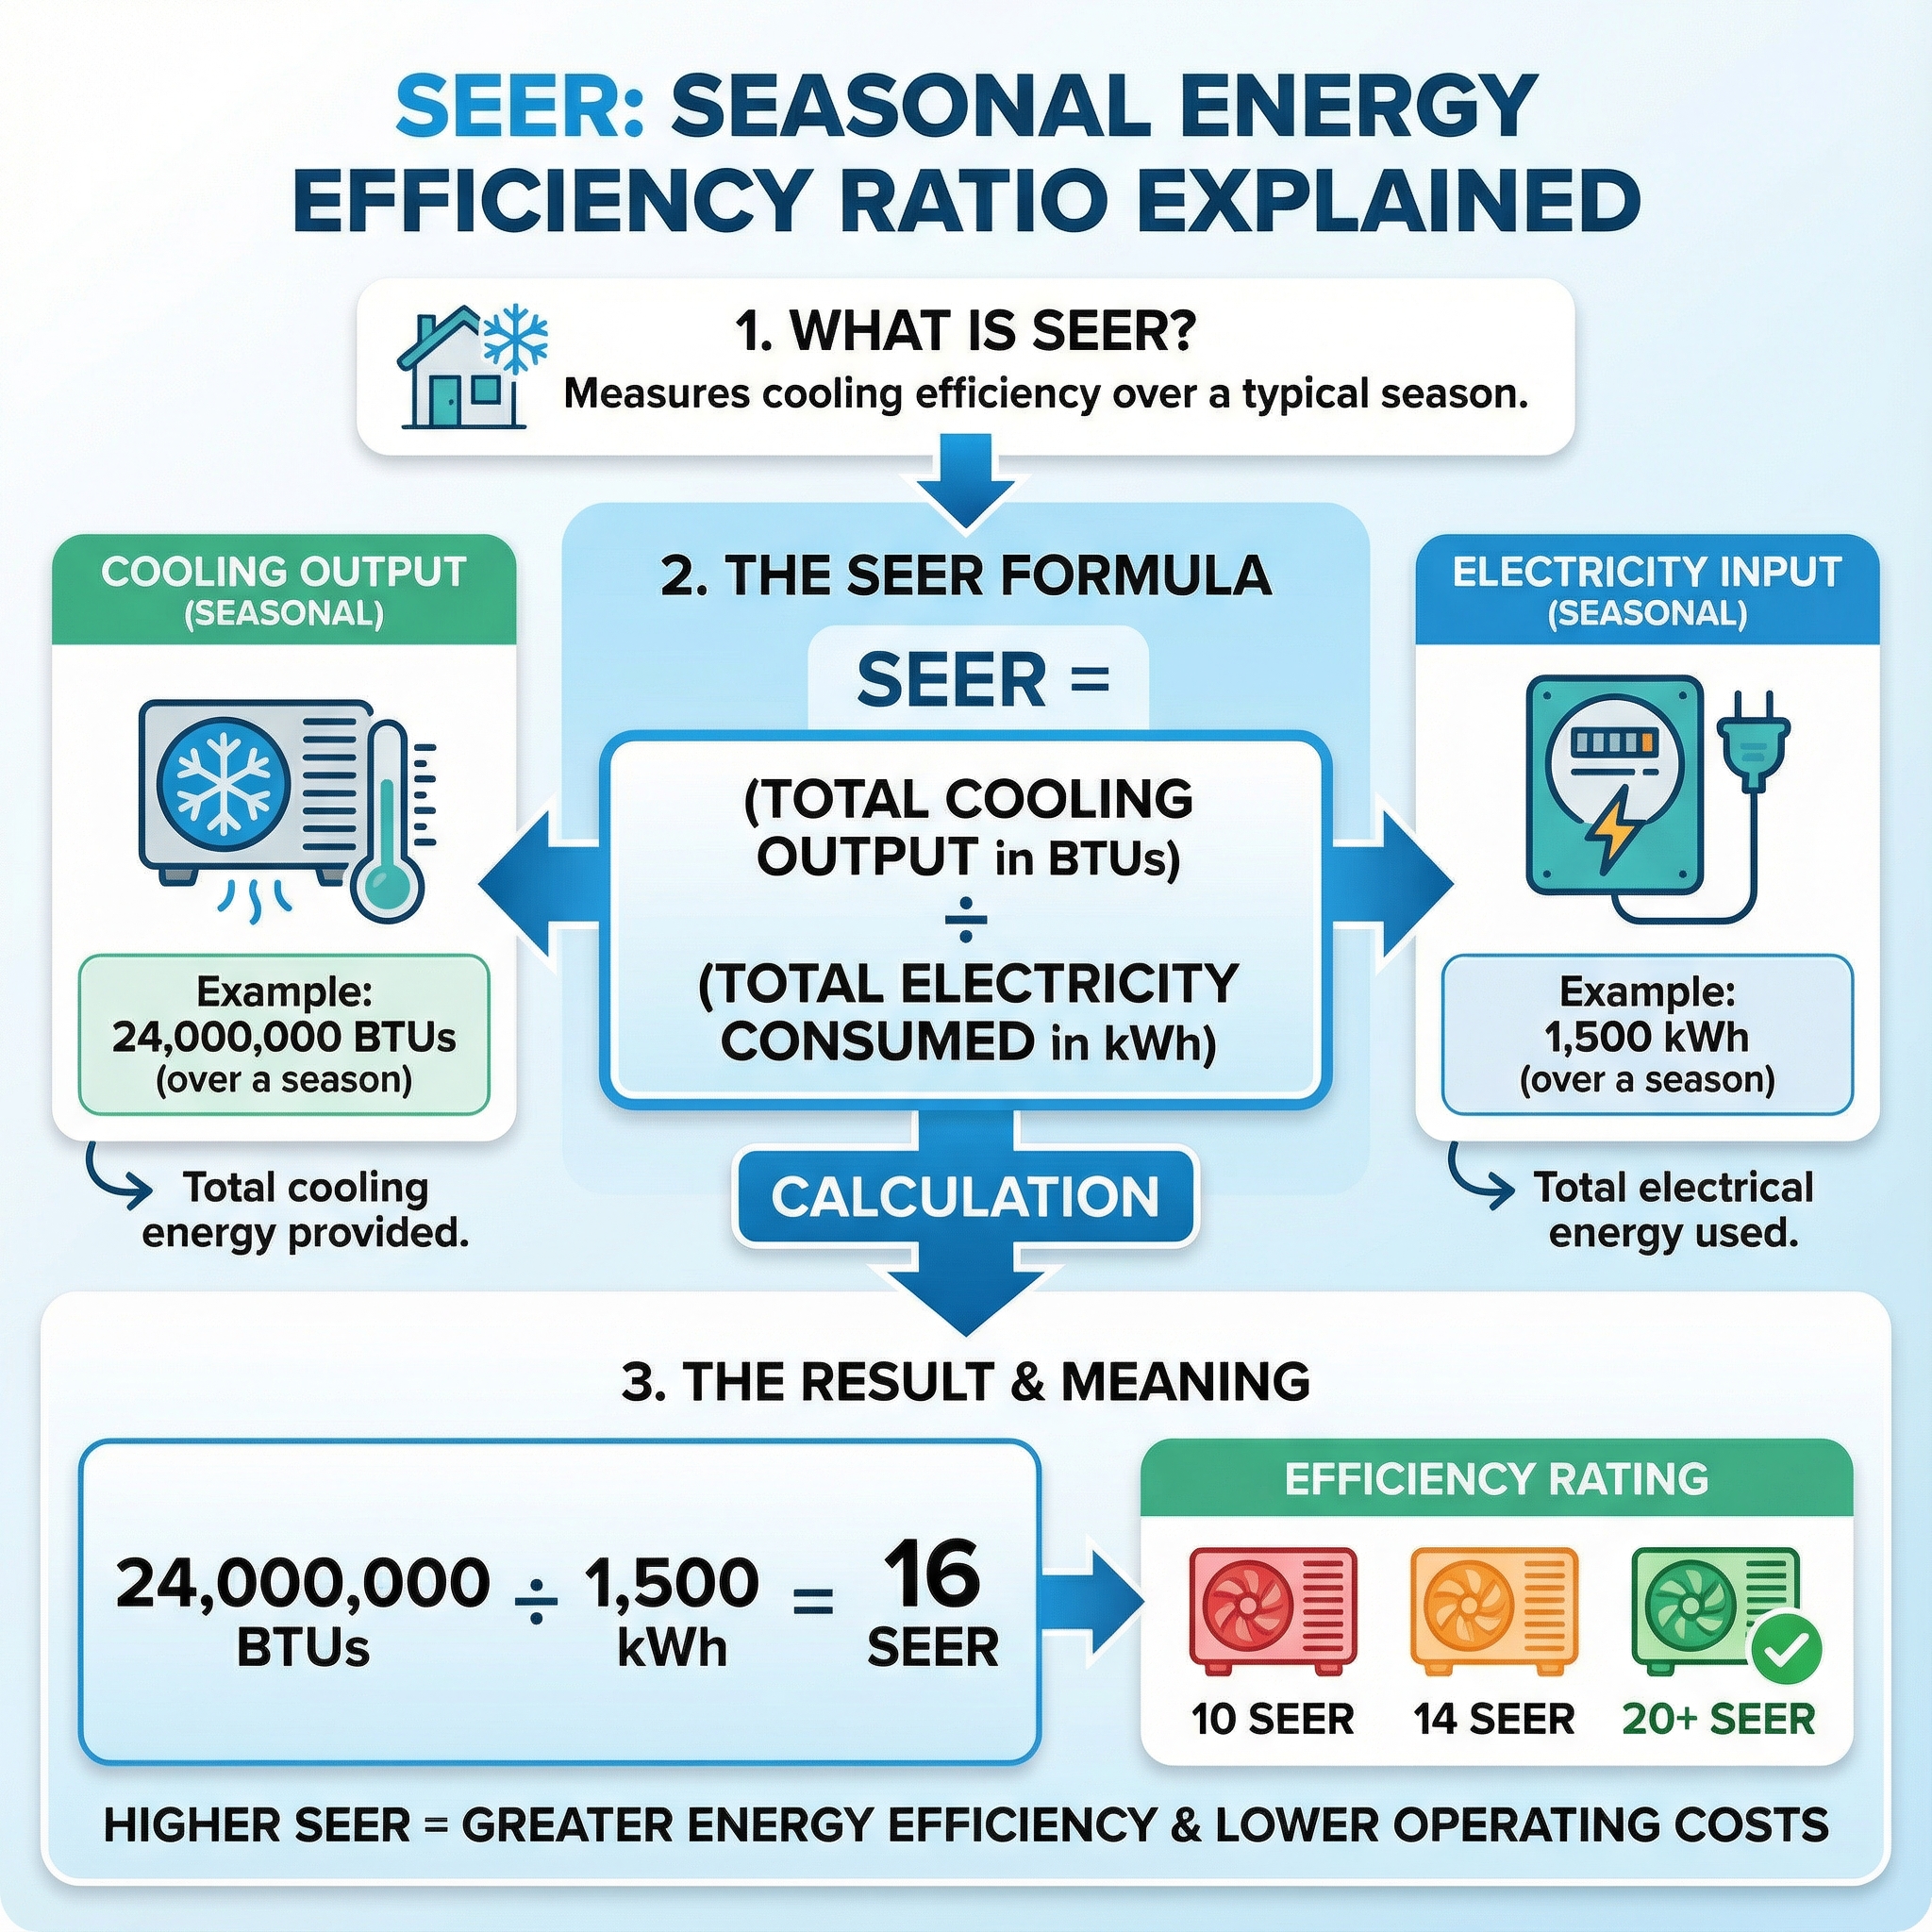
Energy, SEER2, Maintenance, and the Total Cost of Ownership
SEER2 is the current federal test (2023). Numbers differ from legacy SEER because the method is stricter. More SEER2 means less energy for the same load. Moving from 14 to 16 SEER2 trims cooling use about 12%, and replacing an old SEER 10 unit with modern high SEER2 gear often saves 15 to 30%. Typical tiers: mid 14-16, higher 16-18, premium 18+, with upper tiers usually quieter and better at humidity control. Higher efficiency costs more up front. In our experience, for modest basement loads a mid tier often balances purchase price and bills.
- Homeowner-safe: change or clean filters, keep the condenser clear, seal obvious duct leaks with mastic or foil tape, map line-set routes, test a condensate pan alarm, register warranties.
- Pro only: refrigerant circuit work, major electrical, duct changes in fire-rated assemblies, and permits or inspections. These involve refrigerant, shock, and water or mold risks, so certified technicians should handle them and perform annual service.
Budgeting and Next Steps: How to Move Forward with Adding AC to Your Finished Basement
The single best next step is a professional assessment that includes a load calculation, a duct or line-set review, and a permit and code plan. That is how you get accurate quotes, right-size equipment, and avoid issues like poor airflow, noise, hot spots, or failed inspections that can cost far more to fix later.
Every finished basement is unique, so a clear plan keeps your budget honest and your comfort on target. Our team pairs real-world HVAC know-how with wholesale-access pricing to help you choose the right path, then price it confidently. With 30+ years in HVAC and over 200,000 orders fulfilled, we back you with U.S.-based phone support, factory-authorized warranties, free shipping on most systems, and financing options through Affirm.
- Get a Custom Quote: Send us your goals and layout for fast, line-item pricing.
- Talk to Our Team: Call and speak with a U.S.-based HVAC tech for guidance.
- Shop Ductless Mini Splits: Great for finished basements with limited ductwork.
- Shop Central AC and Heat Pumps: Explore matched systems for whole-home comfort.