Mr. Cool DIY Mini Splits: Discover Year Round Comfort, A Quick Overview
Mr. Cool DIY mini splits are pre charged, plug and play ductless heat pumps designed for homeowner installation. In our field experience, they go in fast, run quieter than window shakers and space heaters, and deliver measurable comfort improvements with even, controlled temperatures. If you want lower installed cost and flexible, efficient heating and cooling for rooms, additions, or a small home, this overview shows what to expect and why these systems stand out.
Why Choose Mr. Cool for Your DIY Mini Split Project
MRCOOL DIY systems favor homeowners: factory-precharged Quick Connect line sets mean no vacuum pump and no on-site charging. That simplicity can eliminate labor on many single-zone installs, cutting upfront cost. Each indoor head is a zone, so you condition only occupied rooms. Users report much quieter operation and better comfort than window A/Cs or space heaters. Modern kits use lower-GWP refrigerants suited to current transitions. App and remote controls support schedules and precise setpoints. Limited multi-year compressor and parts coverage applies when installed and registered per instructions.

How Ductless Mini Splits Deliver Year Round Heating and Cooling
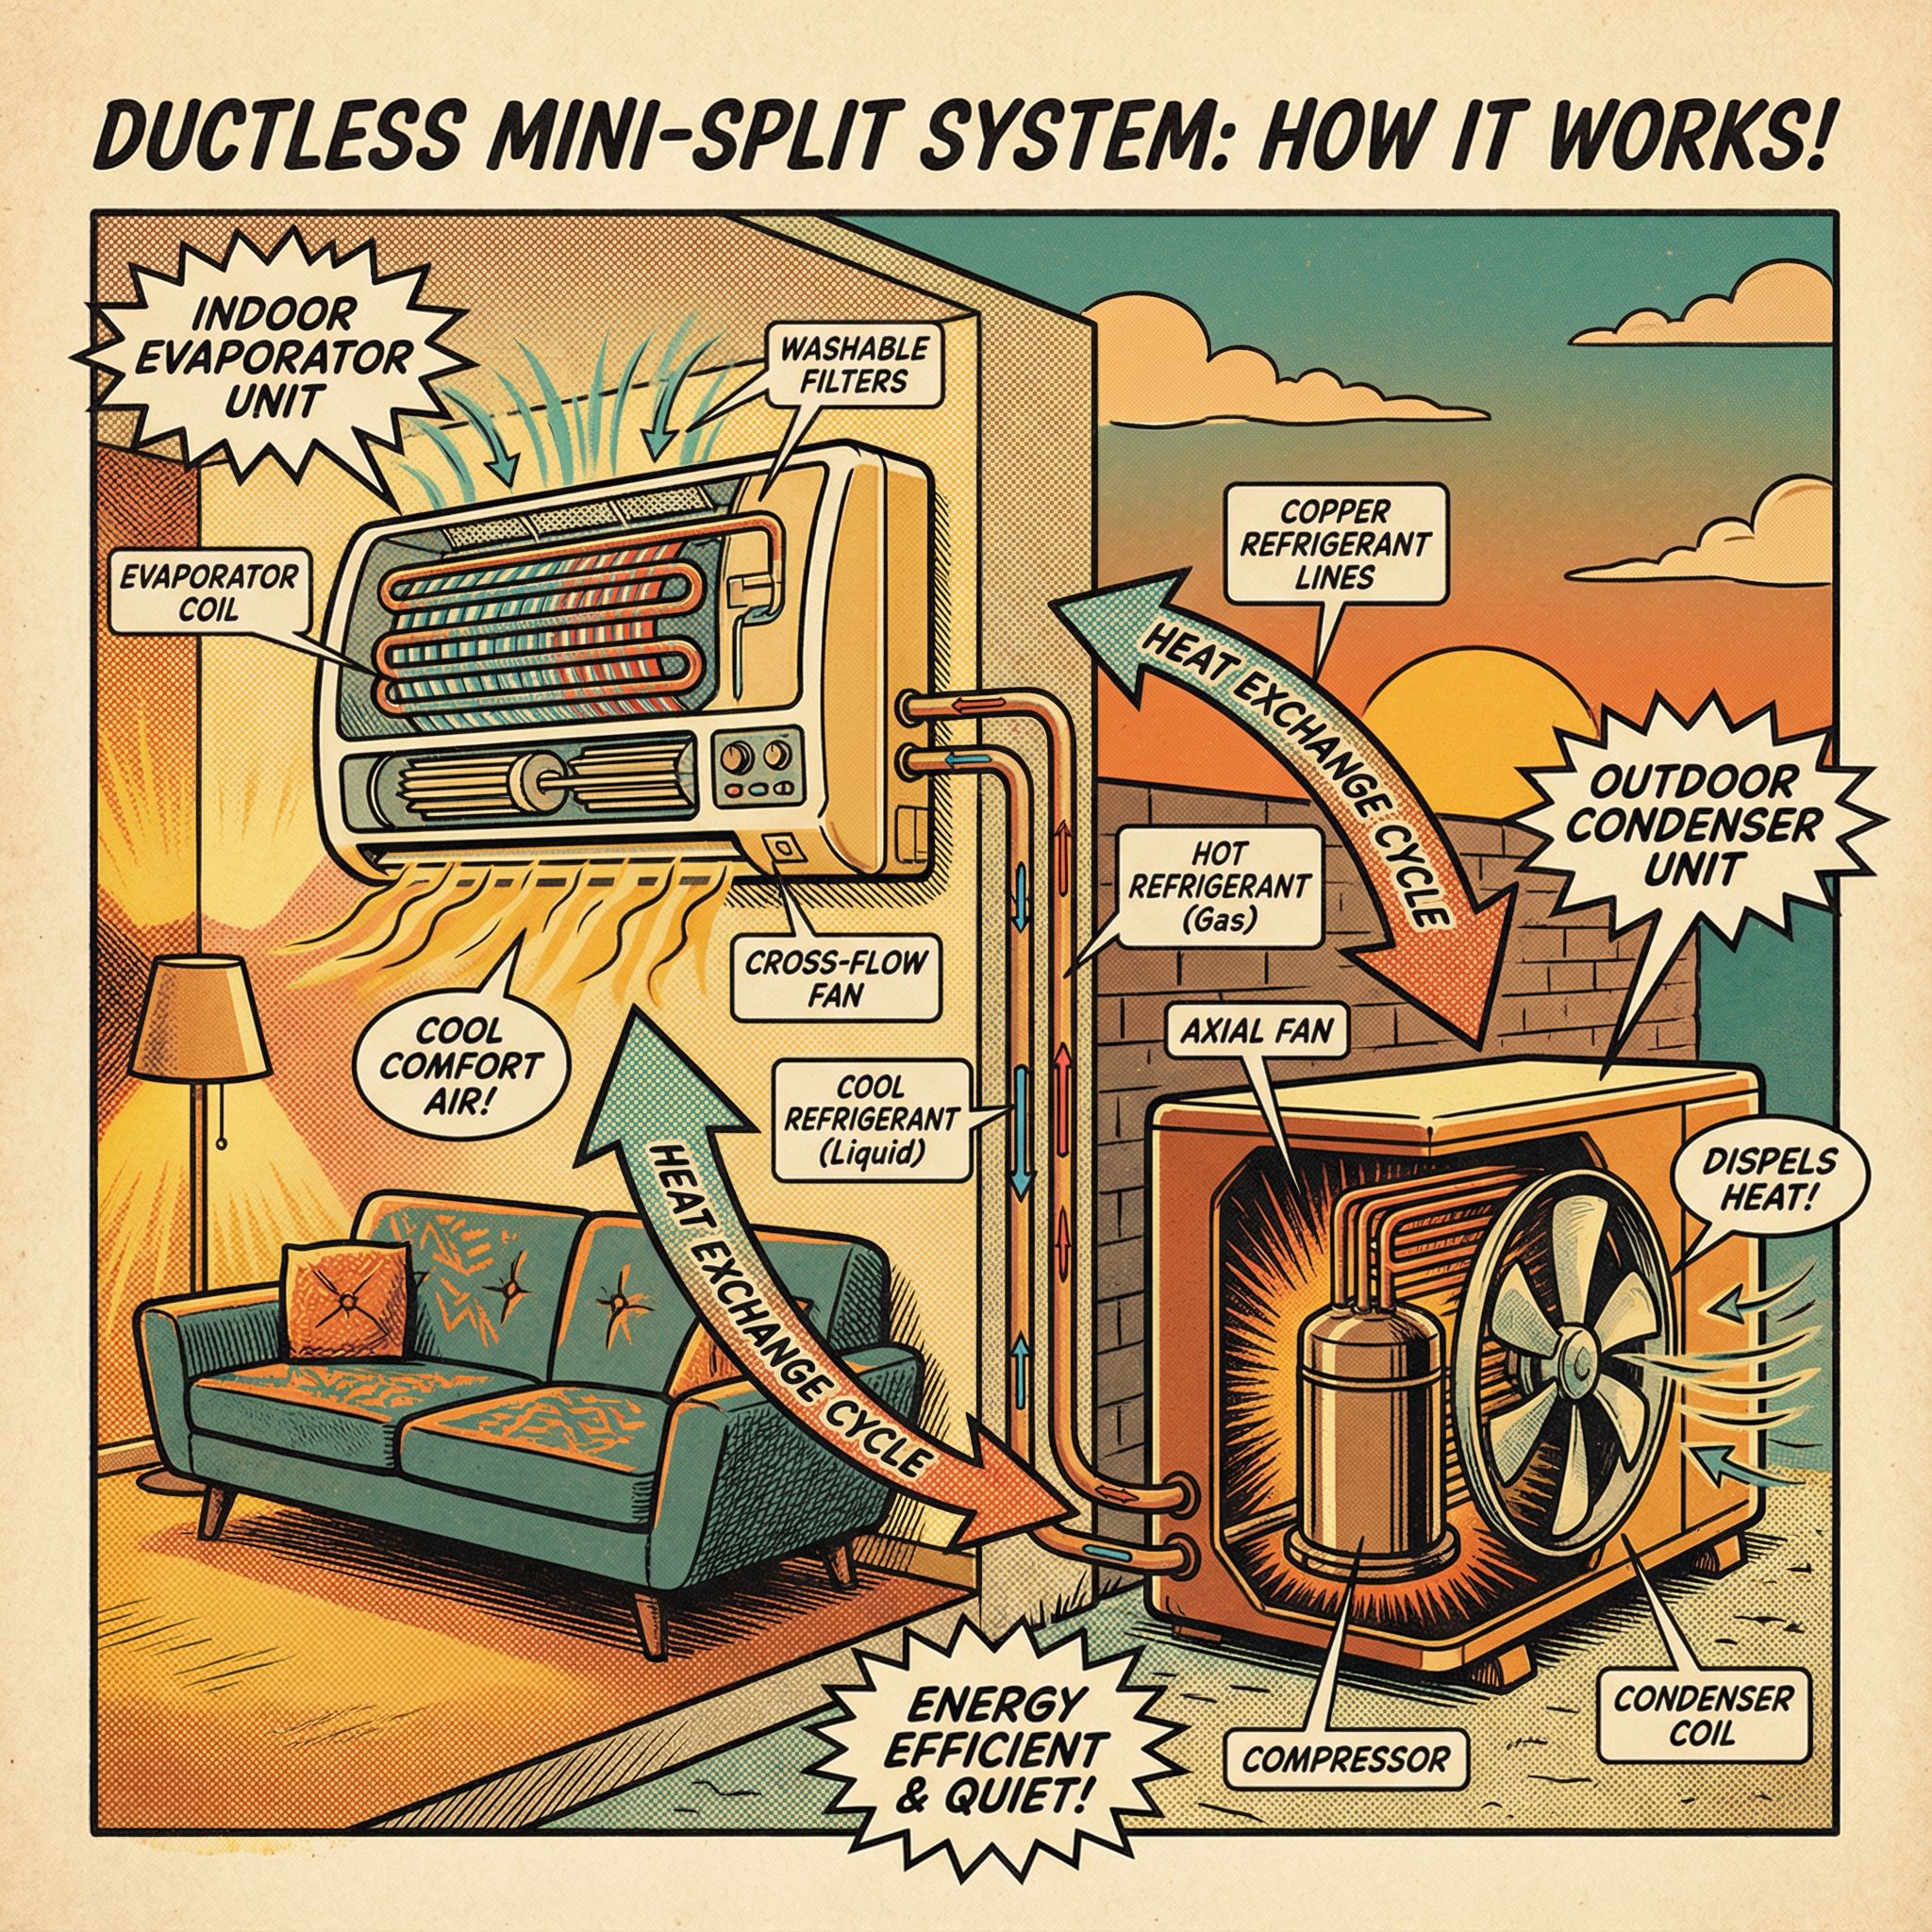
Ductless mini-splits are heat pumps, so they move heat instead of making it. In cooling mode the refrigerant absorbs indoor heat and rejects it outside. In heating mode a reversing valve flips the flow, pulling heat from outdoor air and releasing it indoors. Think of it as a two-way conveyor belt for heat, working in both summer and winter.
A typical DIY setup pairs an outdoor unit with an inverter, variable-speed compressor and one or more wall-mounted indoor heads for single or multi-zone coverage. Inverter control ramps the compressor up or down to match the load, which keeps temperatures steadier and sound levels low while trimming energy use. Many models add modern controls like Wi-Fi and app access. Mr. Cool DIY units are inverter heat pumps that move heat in or out to provide both heating and cooling from one system.
Which Mr. Cool Models Fit Your Project: Single Zone vs. Multi Zone and Typical Capacities
Choosing MRCOOL DIY comes down to how many rooms and how much square footage you need to cover. Single zone kits are ideal for one space, like a bedroom or home office, and they deliver the biggest upfront savings because you avoid most install labor. Multi zone kits add indoor heads for several rooms, giving flexibility, but they need more planning for line set routes and electrical capacity. In our experience at Budget Heating (BudgetHeating.com), think of multi zone like a power strip, each outlet must be fed correctly to perform well.
As a quick guide, MRCOOL DIY models are commonly marketed around coverage bands of roughly 500, 750, or 1,000+ square feet. Match a single zone to an individual room that falls in one band. Choose multi zone when you want two or more heads sized to their rooms, then confirm the combined load fits your electrical panel and routing plan.
Common Installation Mistakes to Avoid: When a DIY Mini Split May Not Be the Best Choice
We often see DIY mistakes: skipped permits, no dedicated 208/230V circuit or disconnect, and code misses. Bad equipment placement, ignored clearances, and a condensate line without steady downward slope cause noise, efficiency loss, or water damage. Treating a DIY kit like a pro build is risky: brazing, vacuuming, modifying pre charged lines, or exceeding approved line set length or vertical separation can cause leaks and void warranties. Maintenance still matters: clean filters and keep outdoor clearance.
- Long or buried line runs, major electrical upgrades, or complex multi zone layouts call for a licensed pro and a professionally designed system.
- In extreme cold, use supplemental heat or a gas furnace, or select a cold climate heat pump sized by a professional.
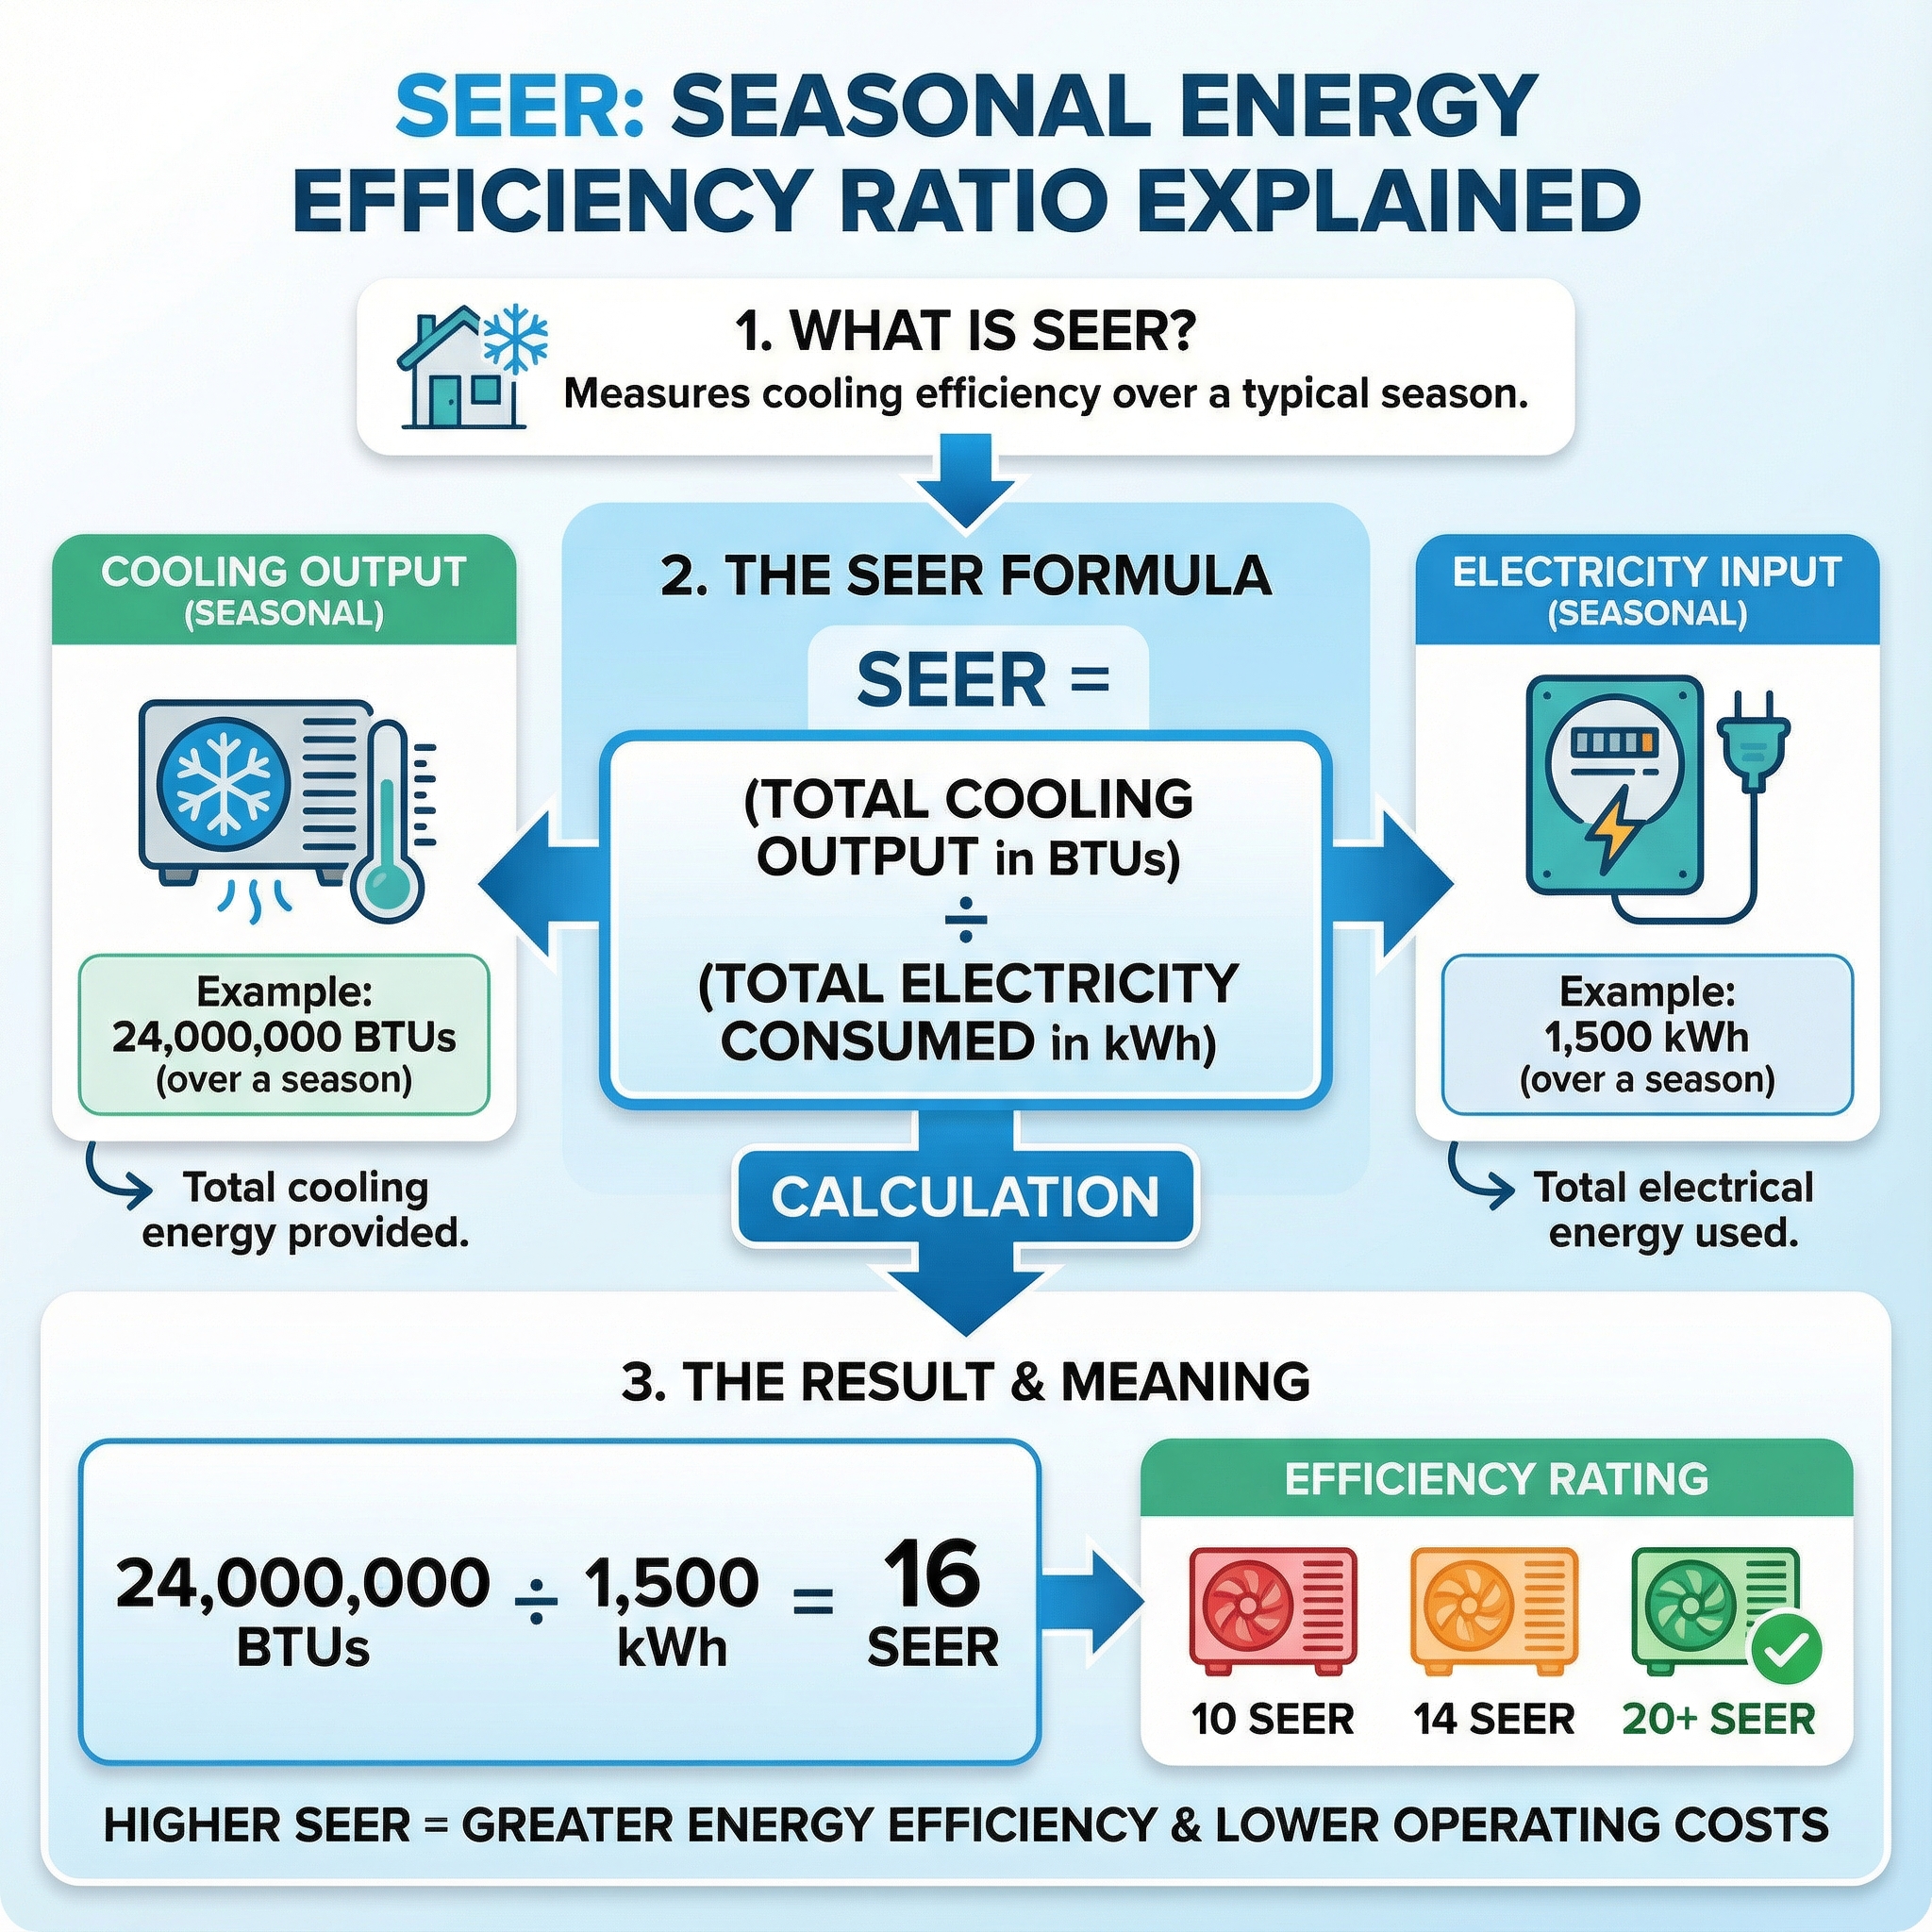
Key Benefits: Efficiency, Real World Savings, and Why SEER2 Matters
SEER2 is the DOE's updated seasonal cooling efficiency test. Higher SEER2 means lower electricity use. Energy scales roughly inversely with SEER2, so moving from about 14 to about 22 SEER can cut cooling kWh around 36 percent in similar loads. MRCOOL DIY models typically sit in the low to mid 20s SEER or SEER2, with some multi zone kits near 21.8 to 23.9 SEER2, exceeding federal minimums. HSPF2 defines heating season efficiency, and DIY setups commonly post about 8 to 9.5. In our experience at Budget Heating (BudgetHeating.com), real homes show double digit reductions, about 17 percent in a 13 home pilot and higher in certain multi zone installs, though climate and usage still drive the bill.
Sizing Your Mini Split: How to Pick Capacity and Avoid Oversizing
Proper capacity is a calculation, not a guess. We size mini splits in steps that keep comfort steady and humidity in check.
- Define zones and goals: list rooms to condition, how many indoor heads you need, and flag high load spaces like sunrooms or garages.
- Estimate capacity from square footage, then adjust for window area, insulation, ceiling height, sun exposure, and occupancy; step up in challenging rooms.
- Account for climate: in very hot or humid or very cold regions, increase capacity about 10 to 20 percent; in cold climates verify low temperature rated output and plan backup heat.
- Compare efficiency ratings: SEER2 and EER2 for cooling, HSPF2 and COP for heating, so performance matches expectations and regional rules.
- Single vs multi zone: multiple rooms need multiple heads. One head rarely serves an entire home.
Avoid oversizing. Too big short cycles, leaves air clammy, wastes energy, and wears faster. Right sized equipment runs longer, quieter, and dehumidifies properly.
DIY Installation Overview: What to Expect (Indoor Unit, Outdoor Unit, Line Set)
MRCOOL DIY uses factory sealed, precharged Quick Connect line sets, so homeowners connect fittings without pulling vacuum or adding refrigerant. The safe install scope covers mounting, routing, sealing, and standard electrical. Keep the refrigerant circuit sealed, avoid kinks, follow torque steps, and never cut or recharge factory lines. De energize at the breaker and use PPE for all electrical work.
- Indoor unit: mount with the template, drill the sleeve, route the bundle, and seal both sides. Provide a continuous downward drain slope or add a condensate pump, then test by filling the drain pan.
- Line set: keep caps on until mating, hand start threads, then torque per instructions. Route gently through the sleeve and seal penetrations against air and water.
- Outdoor unit: place level, connect lines and wiring after power is off.
- Commissioning: restore power, run cooling and heating, confirm airflow and drainage, then set up the remote or app.
Tools, Materials, Permits, and Prep Work for a Successful Mr. Cool Install
Confirm electrical and code items first: required voltage, a dedicated breaker, an outdoor disconnect, proper wire gauge, plus permits and inspections. Hire an electrician if unsure. Plan the route and choose pre charged line sets that fit, avoid tight bends, and stay within model length and vertical separation limits. Place the outdoor unit on a level pad or bracket with clearances, away from roof runoff and hot air recirculation, and elevate in snowy areas. DIY kits use factory sealed R 454B A2L line sets, so follow A2L placement and the kit's handling rules. Have basic hand tools as listed in the kit.
Warranty, Maintenance, and Next Steps: Is a Mr. Cool DIY Mini Split Right for You?
MRCOOL DIY mini-splits fit best when you want high efficiency, zoning, and a lower installed cost, provided you follow permit and electrical requirements and the kit instructions. Keep it reliable: clean or rinse filters monthly in heavy use, keep 2 to 3 ft clear around the outdoor unit, verify condensate drainage each season, inspect line-set insulation, and book a yearly checkup. Register the product, keep receipts and serials, and follow maintenance to protect the warranty. Call a licensed pro for suspected refrigerant leaks, complex electrical work, long line runs, persistent error codes, or weak cold-weather heat.
You are weighing a solid DIY path. With 30+ years in HVAC, our team can sanity-check your plan and help you finish strong.
- Get a Custom Quote
- Talk to Our Team by phone for U.S.-based support
- Shop DIY Mini Split Systems
- Ask about wholesale pricing, free shipping on most systems, and Affirm financing