Why Ductwork Is the Silent Key to HVAC Efficiency
Your HVAC can only be as efficient and comfortable as the ductwork that carries air through your home. This guide shows how to optimize ducts for efficiency, comfort, IAQ, and longevity. In The Ultimate Ductwork Guide: Optimize Your HVAC for Maximum Efficiency, the focus is on the part of the system most people never see but feel every day.
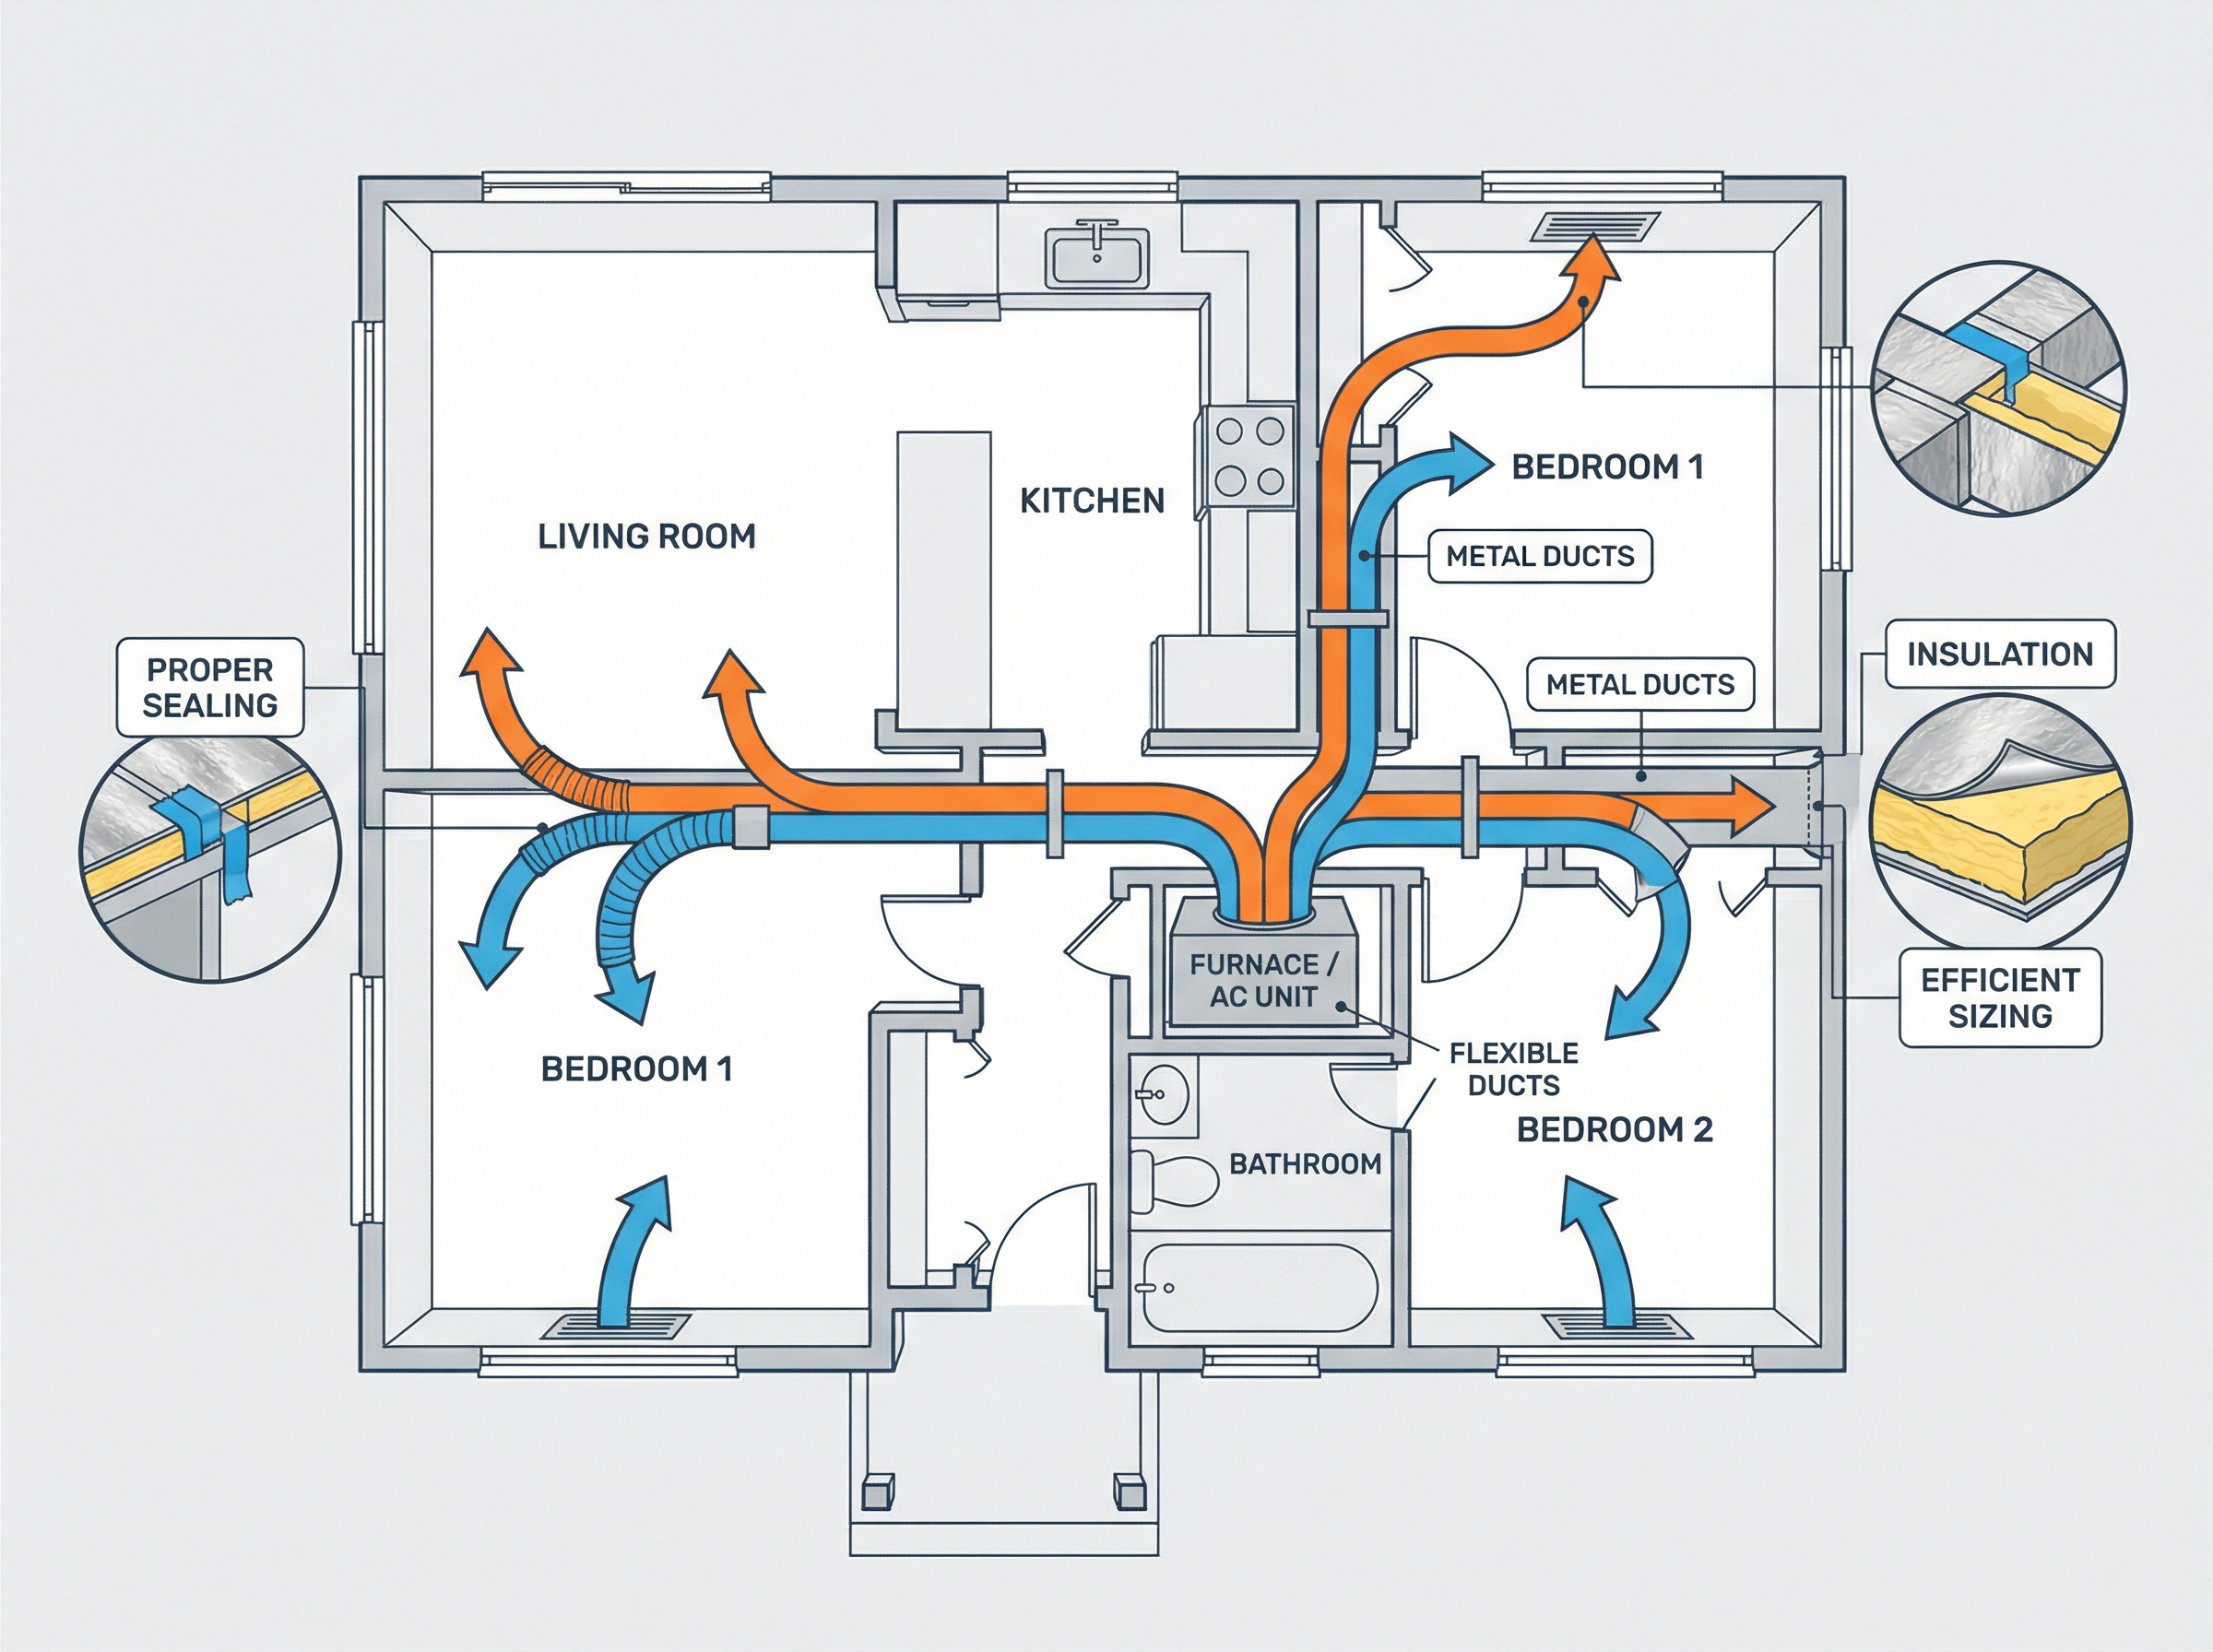
What ductwork does: it moves conditioned air from the equipment to each room, then returns air back for reconditioning. Think of the system like lungs, the ducts are the airways that let the equipment breathe. Correctly sized, sealed, and balanced ducts deliver the right amount of air to every space, maintain even temperatures, and keep noise in check.
Why it matters: ducts determine real world performance. Poor design or installation forces equipment to work harder, hurts comfort with hot and cold spots, increases energy use, and can shorten system life. In practice, brand new units can underperform if the duct system restricts airflow or leaks.
What to expect from this guide: homeowners will learn how to spot common duct issues and understand simple improvements, while pros will find design and testing considerations that set systems up for lasting efficiency and comfort.
How Ductwork Impacts Energy Use, Comfort, and Equipment Life
We treat ductwork like a home's circulatory system. When ducts are sized, sealed, and balanced correctly, rooms feel even, the system breathes easily, and energy use drops. Trouble shows up as hot and cold rooms, whistling grilles, dust, and long run times. Those symptoms usually trace to leakage, restrictive returns, sharp turns, crushed flex, or uninsulated runs through attics.
- Comfort: Right-sized trunks and returns with smooth transitions and balancing dampers deliver consistent room temperatures.
- Energy: Mastic-sealed seams, proper insulation, and shorter, straighter routes reduce airflow losses and fan power.
- Indoor air quality: Quality filters and tight ducts beat routine whole house cleaning. Clean only when contamination is confirmed.
- Equipment life: Lower static pressure prevents short cycling and blower strain, helping systems reach their typical 15 to 20 year lifespan.
- Practical steps: DIY filter changes, sealing accessible joints, insulating exposed runs, and register balancing. Leave load calculations, design changes, and static pressure testing to a professional.
- Process and codes: Assess, test, correct, balance, maintain. Follow local duct tightness and R value rules, and adapt for climate to control heat gain or condensation.
Common Signs and Myths: How to Spot Inefficient or Damaged Ductwork
From decades in the field, we spot duct trouble by: rooms that miss the thermostat, weak airflow at far registers, dust puffs at start-up, whistling or rattling, musty odors, rising bills, and visibly crimped flex or peeling tape. Think of ducts as the home's lungs. Any blockage or leak makes the system work harder.
- Closing vents saves money: it raises static pressure and drives more leakage.
- Ducts do not affect efficiency: leaks and undersized returns waste capacity.
- Household "duct tape" is acceptable: only mastic or UL-listed foil tape seals.
- Nameplate efficiency guarantees low bills: poor ducts erase gains.
- Skipping maintenance is fine: dirty filters and coils spike pressure and noise.
Common mistakes we find include undersized returns, crimped flex runs, and relying on equipment upgrades without fixing ducts.
Duct Sizing and Design Basics: Manual J, Manual D, and Practical Layout Rules
Good duct design follows a simple sequence: Manual J to determine room by room heating and cooling loads, Manual S to select equipment that matches the sensible and latent loads, then Manual D to size ducts to deliver target airflow at reasonable static pressure and velocity. Rules of thumb like CFM per ton or one size trunk sizing miss the mark because every home's envelope, orientation, and climate differ. Like a tailored suit, being even a little off shows up as noise, drafts, high static, short cycling, and humidity issues. In our experience at Budget Heating (BudgetHeating.com), the systems that perform best start with a true Manual J and end with clear Manual D layouts.
Practical layout matters as much as math: keep runs short and straight, use smooth radius fittings, minimize flex, and avoid sharp transitions to keep static low. Place returns thoughtfully, either dedicated in major rooms or with verified transfer paths, so supply air can get back to the air handler. Regional codes such as IECC or IRC and California Title 24 can dictate duct location, insulation levels, sealing, and require duct leakage testing. Plan around joists and trusses early, and whenever possible keep ducts inside the conditioned space for comfort and efficiency.

Cost, Savings, and ROI: How Duct Upgrades Pay Back (Realistic Framing)
There is no universal price tag for duct upgrades. Actual cost and savings depend on house size, climate, how accessible the ducts are, existing duct condition, and local contractor rates. In our field experience, the right question is not just what does it cost, but where is energy being lost now. A leaky duct system is like a bucket with a hole, you keep paying to refill what slips out.
- Sealing: stops conditioned air from escaping, often delivering quick comfort and efficiency gains.
- Insulating: keeps supply air from picking up or losing heat in unconditioned areas.
- Balancing: corrects pressure and airflow so rooms reach setpoint without overrun.
Duct work often beats premature equipment replacement when the existing system runs but the distribution is wasteful. If ducts are already tight and insulated, payback skews site specific. A site estimate is required for accurate ROI.

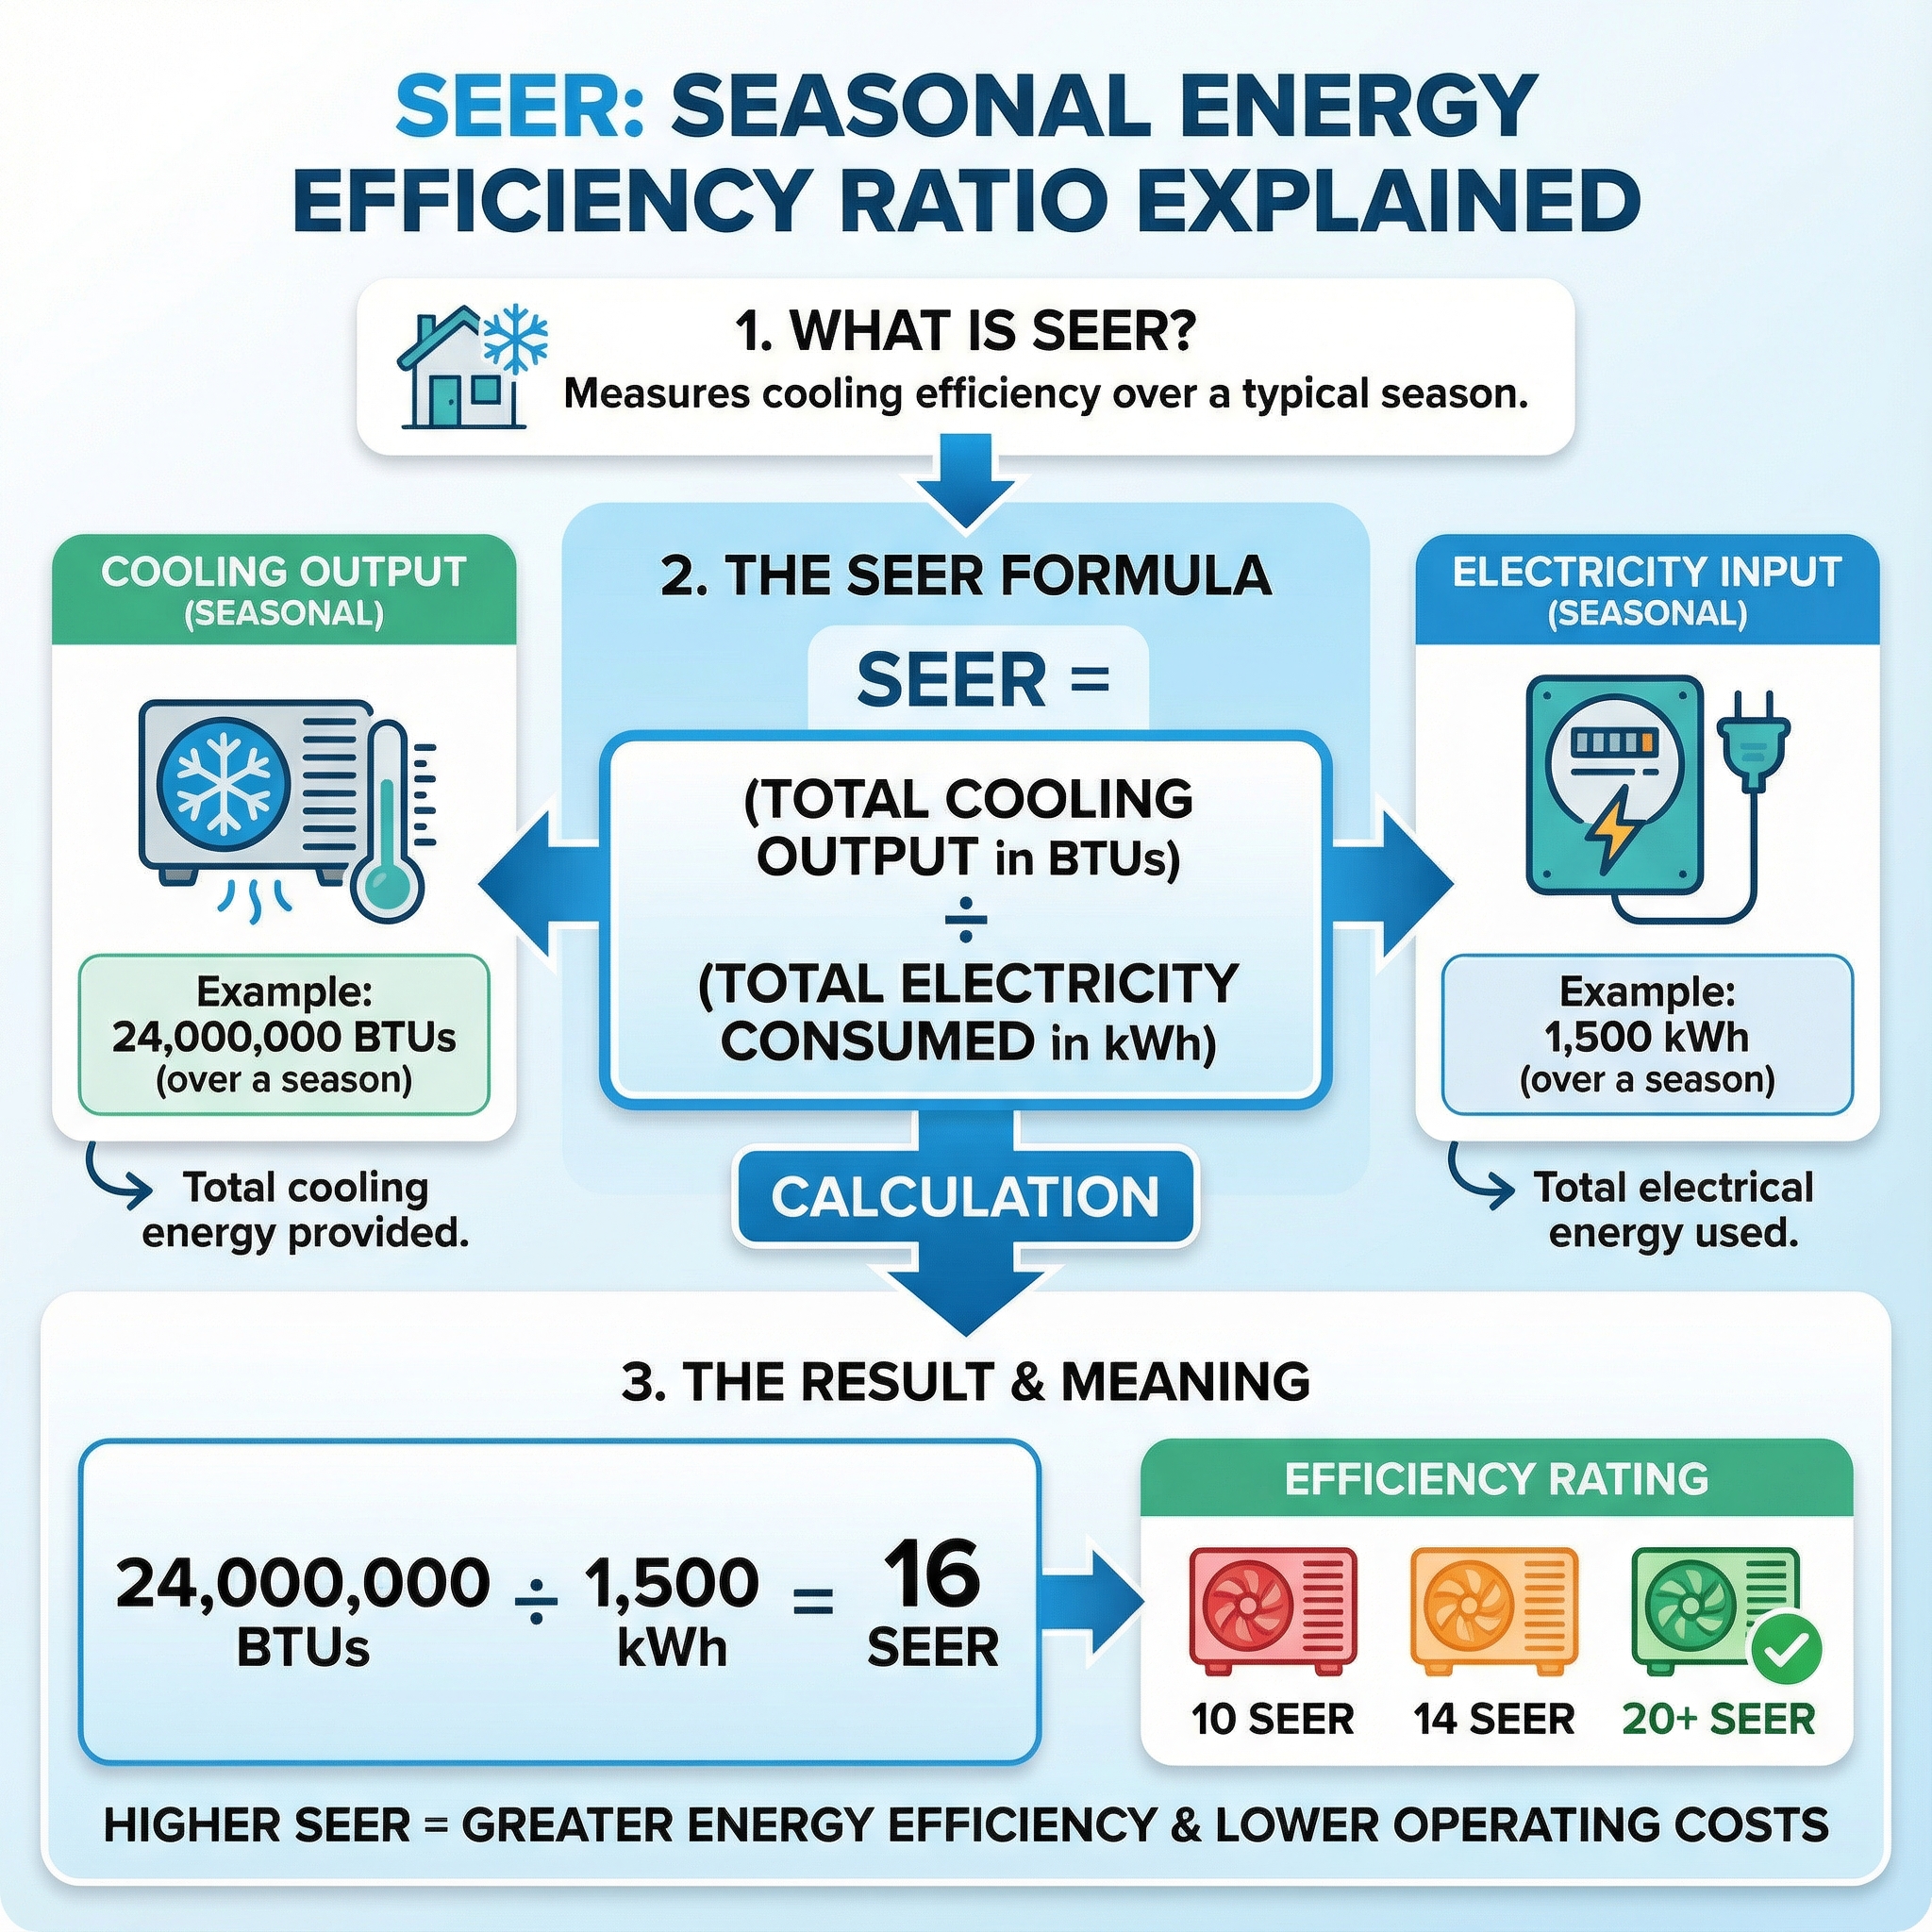
Static Pressure, Airflow, and SEER2: Why Duct Resistance Changes Real-World Efficiency
SEER2 replaced the old SEER by testing at 0.5 in. w.c. external static pressure, a closer match to real ducts. As static rises, the blower draws more power and airflow falls, so labeled efficiency becomes difficult to achieve. Think of static pressure like headwinds on a bike, the harder the wind, the more effort for the same speed. In our experience at Budget Heating (BudgetHeating.com), systems that keep external static low and hit manufacturer airflow track closest to their SEER2 rating.
To verify performance, focus on two readings:
- Measure supply and return static at the cabinet with a manometer, add them for total external static. Keep it below the 0.5 in. w.c. SEER2 test point.
- Confirm airflow meets the equipment's published CFM per ton using blower tables or an airflow tool. Use low resistance filters and pinpoint restrictions by checking pressure drops across the filter and coil, then correct duct sizing and sealing as needed.
If your numbers are high or airflow is low, lower duct resistance first and reassess efficiency.
Local Resources, References, and Where to Find Qualified Help
Finding reliable guidance starts local. Your city or county building department site lists adopted mechanical codes, permit forms, and HVAC inspection checklists. Download the installation manual for your exact model from the manufacturer's website. From decades in the field, we see inspectors and warranty reviewers follow that document first. To vet pros, use your state's contractor license lookup to confirm an active license, insurance, and complaint history, then compare against utility or manufacturer preferred contractor lists.
- SEER2 overview: seer2.com
- 2023 minimum efficiency changes: FieldEdge
- Ductwork fundamentals: ACDirect guide
- Duct install best practices: Call All Heart guide
- Common HVAC myths: Norse Home Solutions
Maintenance, Sealing, and Honest Tradeoffs: What You Can DIY, and When to Hire a Pro
Safety comes first. In our field work, we find most homeowners can handle light upkeep, but anything involving power, gas, or refrigerant belongs to a licensed professional.
- Change filters on schedule.
- Do visual inspections for loose connections and rust.
- Seal small exposed leaks using UL 181 mastic or UL 181 foil tape, not cloth duct tape.
- Vacuum supply and return registers.
- Make minor register or damper tweaks to balance rooms.
Mastic is like caulk for ducts, great for gaps and joints. Foil tape is best for clean seams. Cloth duct tape dries out, loses adhesion, and should not be used on HVAC.
Call a pro for electrical issues, refrigerant problems, combustion work, duct redesigns, formal duct leakage testing, suspected mold or asbestos, and any job that needs a permit. Always disconnect power before opening equipment and use PPE. Never handle refrigerant or combustion repairs yourself.
When duct upgrades are not the right first move: uneven rooms caused by poor insulation or envelope leaks are better solved with air sealing and added insulation. High bills from oversized or aging equipment may need right sizing or equipment upgrades. Noisy airflow from high static pressure is often improved with a larger filter rack or blower settings, not new ducts.
Homeowner Checklist: Step-by-Step Actions to Improve Duct Efficiency Today
We use this prioritized checklist to keep duct improvements practical and verifiable.
- Confirm duct sizing and layout match equipment and floor plan.
- Favor short runs, smooth transitions, and gentle elbows.
- Get room-by-room load calculations with a recognized method.
- Identify and clear obstructions that pinch or block ducts.
- Design for airflow balance with adequate, well placed returns.
- Plan insulation for ducts in unconditioned spaces.
- Build an installation or retrofit plan, access, and materials list.
- During install, require mechanically fastened joints, then seal all seams.
- Confirm final grille and register placement, sizes, and clearances.
- Request commissioning: airflow spot checks, external static pressure within manufacturer limits, and written maintenance intervals.
Action Plan: Optimize Your Ductwork for Comfort, Savings, and Long-Term Reliability
Here is the bottom line: well-designed, properly sized, sealed, insulated, and balanced ductwork is one of the highest-impact upgrades for efficiency, comfort, indoor air quality, and equipment life. Think of ducts as your HVAC's bloodstream, clean and open ducts keep every room healthy and consistent. We know budgets are real and every home is different. With 30+ years in HVAC and 200,000+ orders fulfilled, our team can map a practical path and verify results, not guesses.
- Seal and insulate accessible ducts first, especially boots, plenums, and trunks.
- Reduce restrictions: correct crushed flex, add returns, smooth tight elbows.
- Balance and zoning: set dampers, consider simple zoning for problem areas.
- Upgrade materials where needed: replace undersized or long flex with rigid metal.
- Commissioning and measurement: verify static pressure, supply and return CFM, leakage rate, and temperature split, then document before and after so you know the gains are real.
- Maintain and comply: change filters, keep grilles clear, and follow code and safety basics.
Ready to schedule a duct audit or coordinate a certified technician visit? We offer wholesale-direct pricing, free shipping on many items, and financing with Affirm.
- Get a Custom Quote
- Talk to Our Team by phone with U.S.-based tech support
- Shop Ductwork and Accessories
- Need it fast? Ask about same-day pickup at our warehouses