From Tatooine to Hoth: Why Mini Splits Are a Smart Choice for Extreme Climates
Whether your summer feels like Tatooine or your winter resembles Hoth, the goal is the same: reliable, year round comfort. This guide helps homeowners and building managers tailor equipment, installation, and maintenance to local conditions. Heat pumps do not create heat, they move it, like a conveyor that carries heat out in summer and back in during winter. That reversible process lets one mini split handle cooling and heating all year.
Extreme temperatures push systems harder. If a unit is undersized, poorly placed outdoors, or neglected, it will run longer, use more energy, and wear faster. The solution is deliberate model selection, smart controls, proper outdoor placement, and a simple care plan: clean filters, clear coils and airflow, plus periodic professional tune ups. Done right, mini splits deliver steady comfort, cleaner air, and lower operating costs over many years. After 30 plus years in HVAC, we see these fundamentals make the difference.
How Mini Split Heat Pumps Work: Components, Reversing Valve and Inverter Advantage
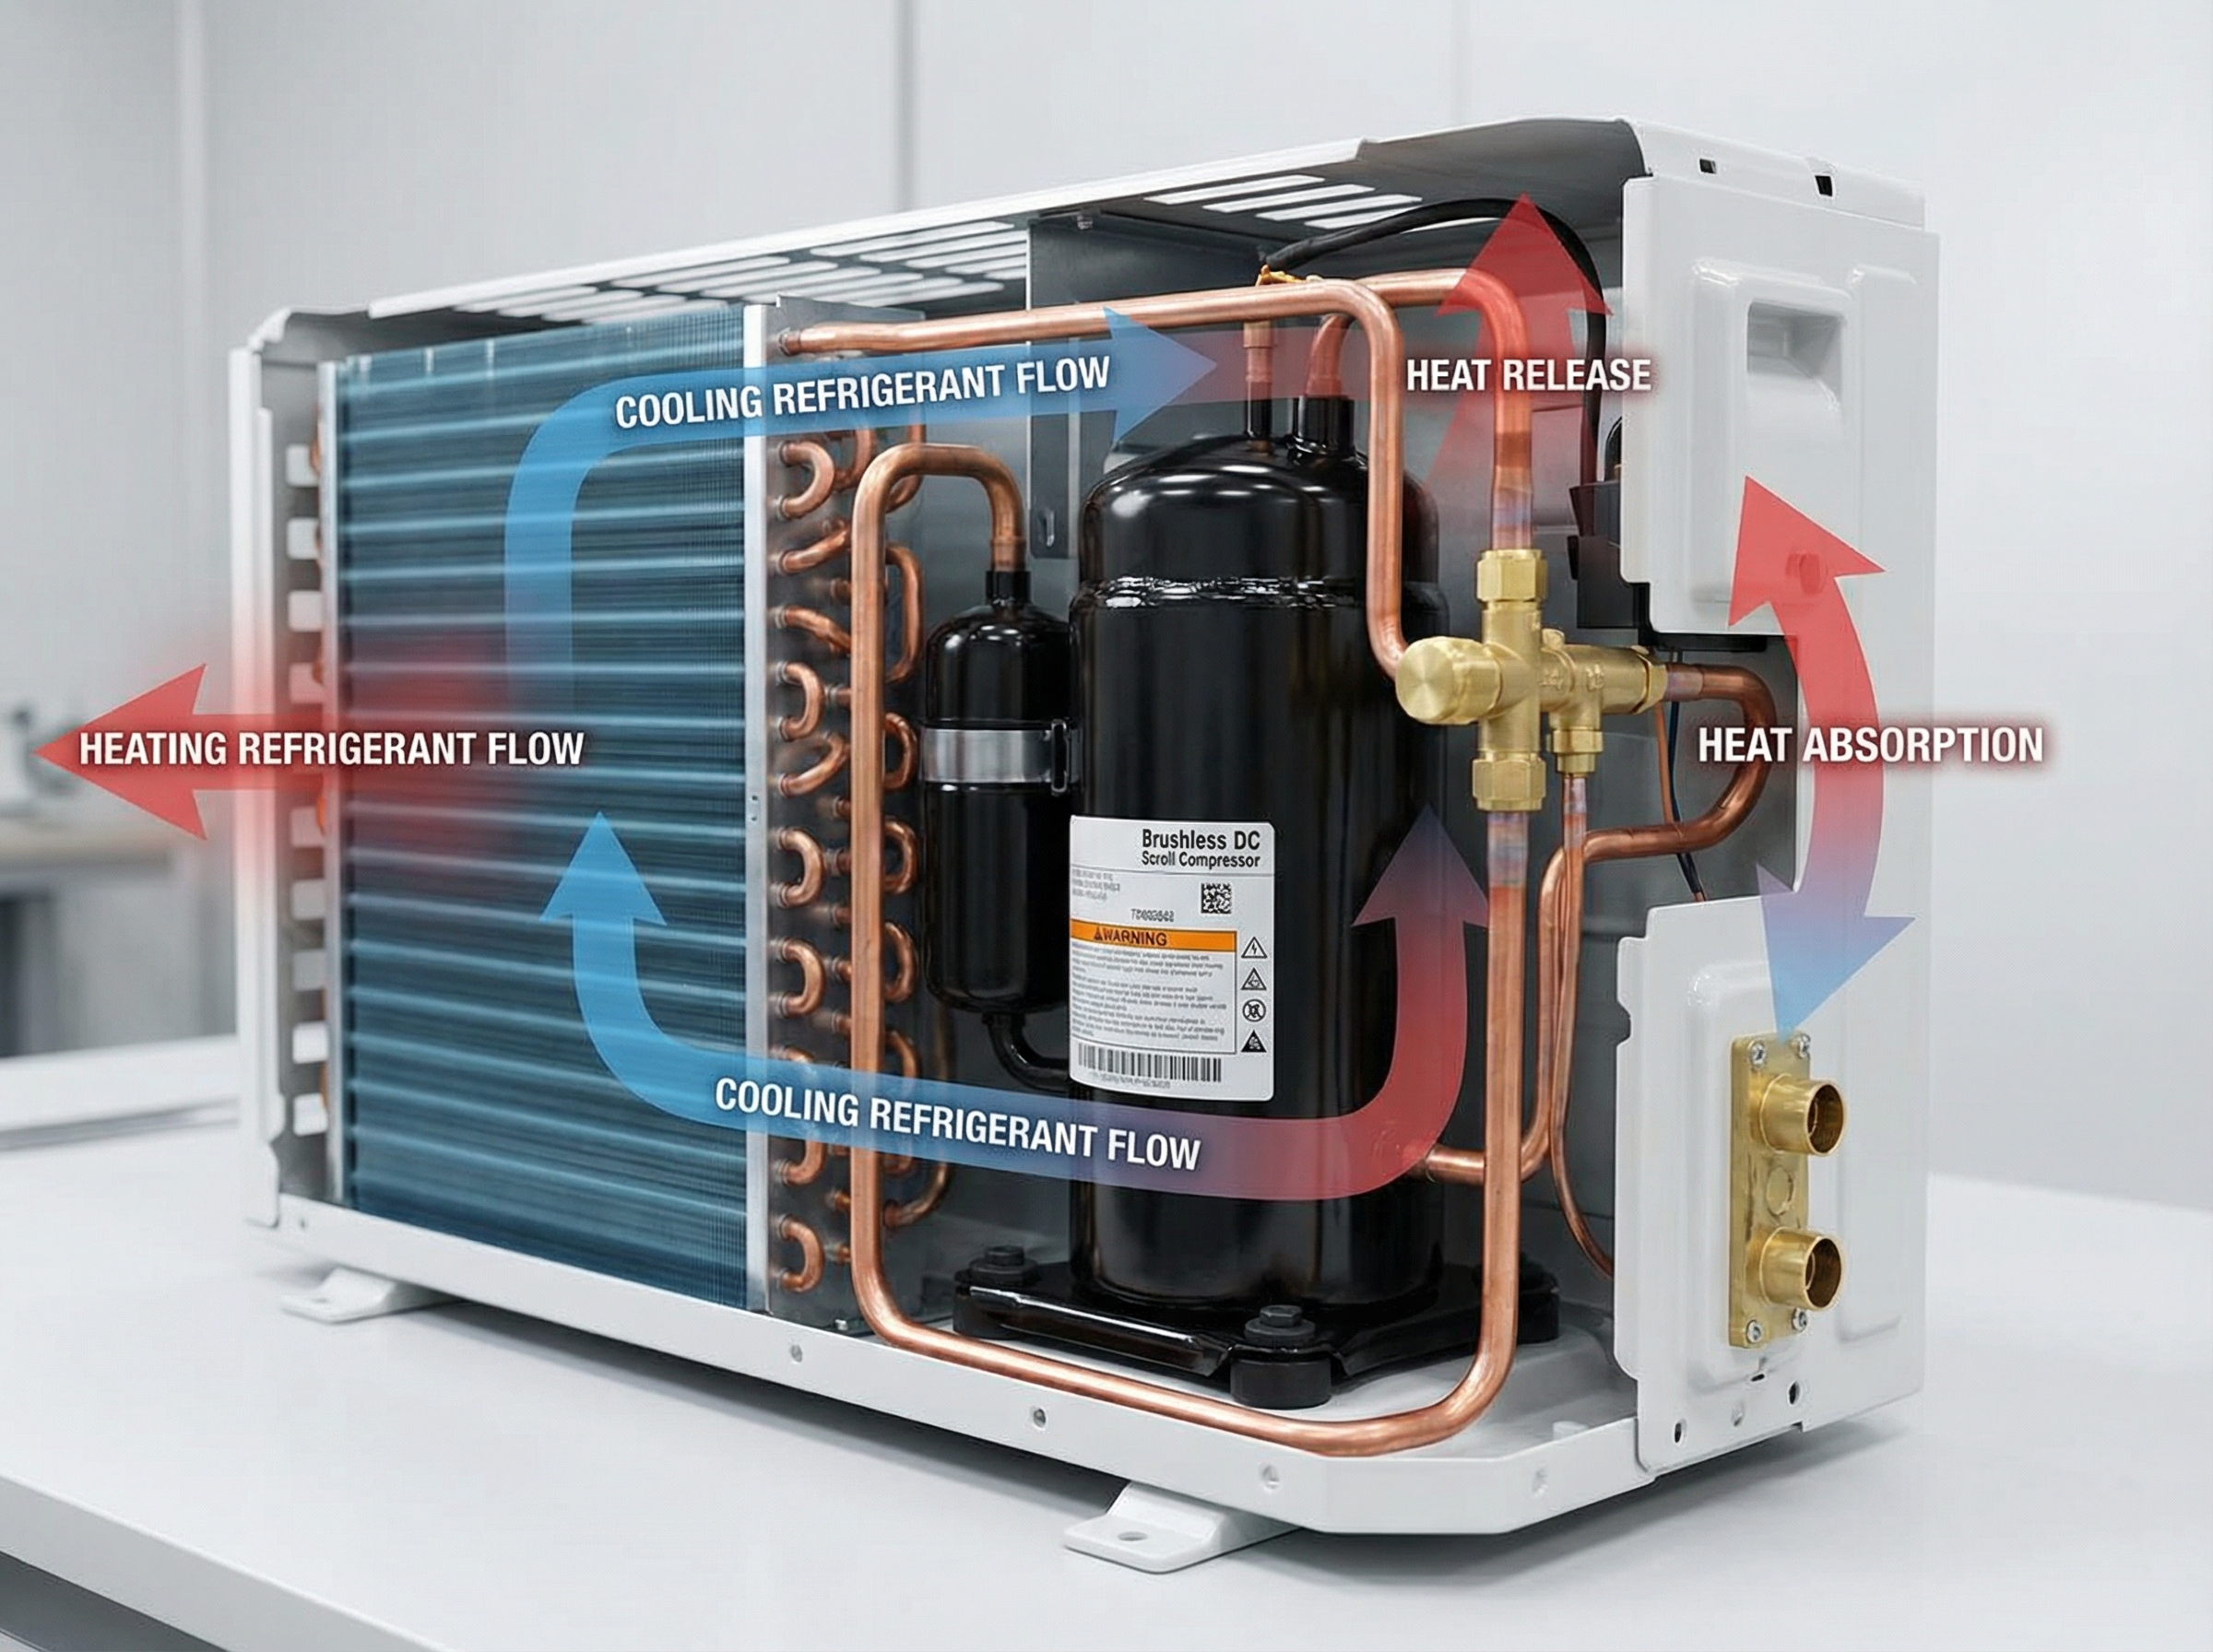
Mini-split heat pumps move heat using a refrigeration cycle. The core parts are the compressor, condenser, evaporator, and a reversing valve for mode switching. The compressor drives refrigerant through the circuit, the outdoor coil acts as a condenser in cooling to release heat, and the indoor coil acts as an evaporator to absorb heat. When you call for heating, the reversing valve reroutes flow so those coils trade jobs and the system pulls heat into the living space.
Modern units use inverter-driven compressors that vary speed to match the load, like a dimmer switch rather than an on-off lamp. That modulation avoids short cycling, trims wasted energy, lowers noise, and improves part-load efficiency while keeping temperatures steadier. Because they can run longer at low speed, they also control humidity better through gentle, extended dehumidification. In our experience, this steadiness matters most in sweltering afternoons and cold snaps, where matching the load prevents big swings and keeps comfort consistent when conditions are toughest. This is why inverter and variable-speed specs matter.
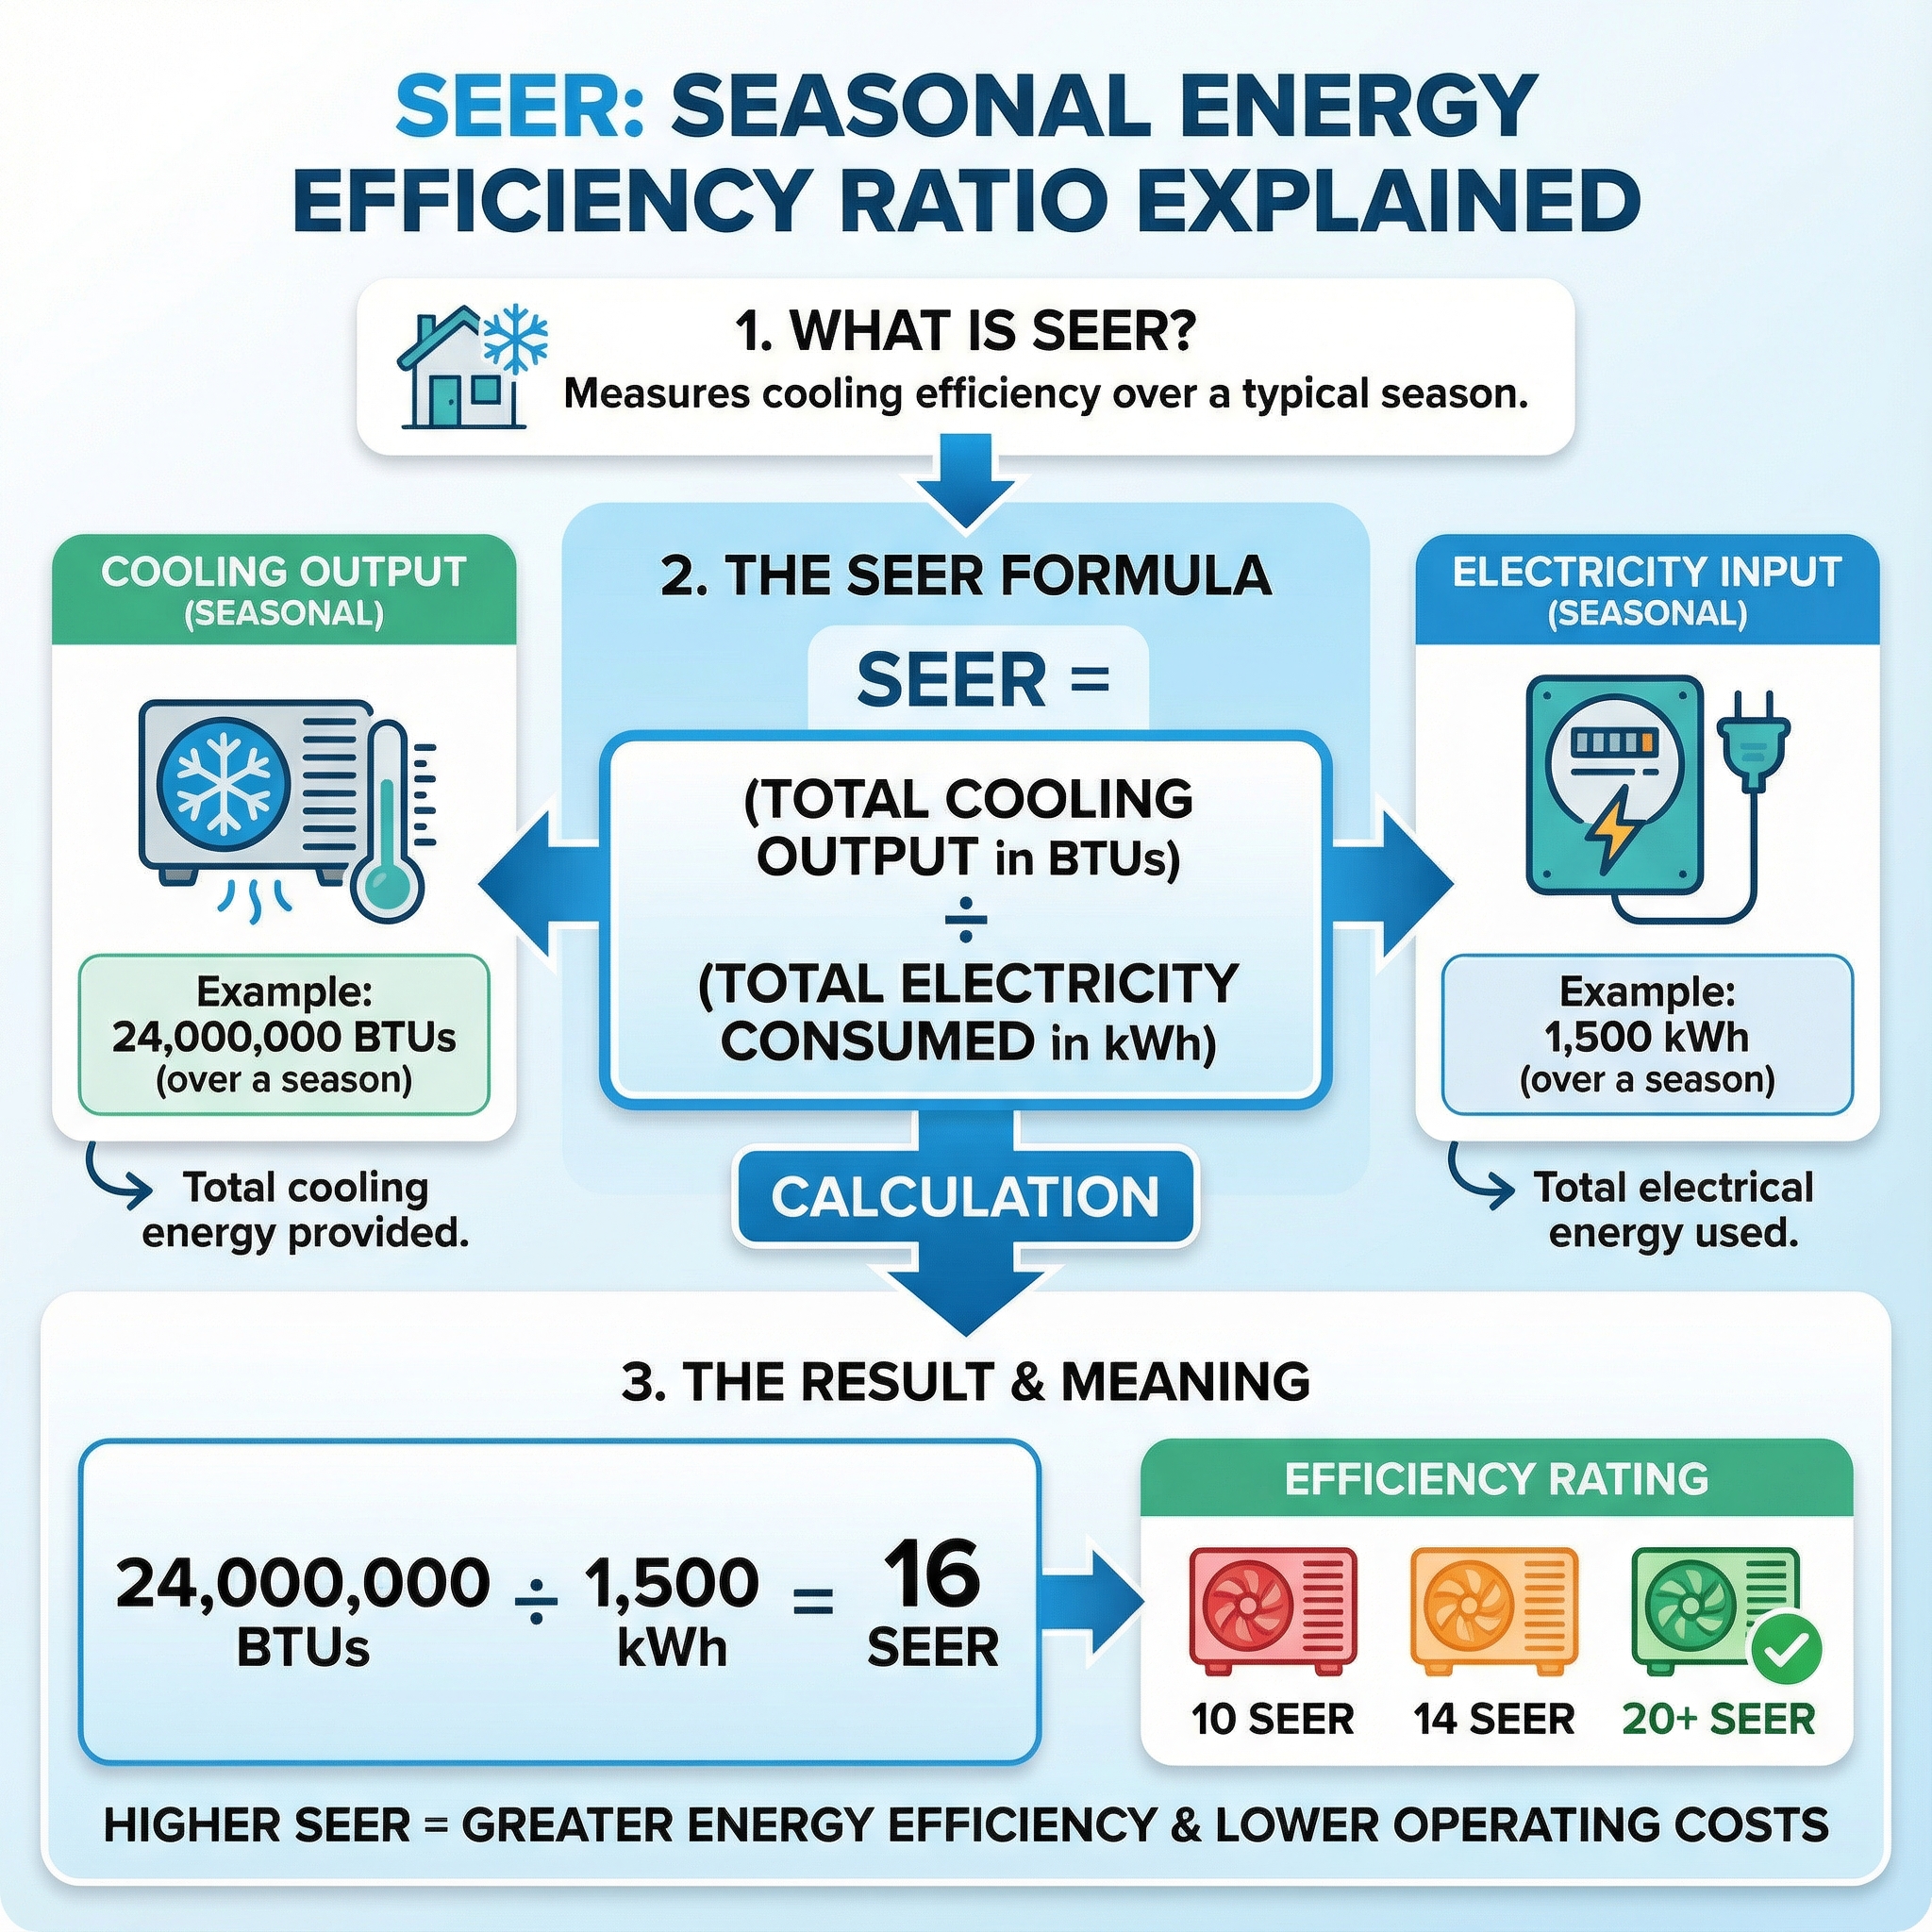
Key Performance Metrics: SEER2, EER2 and HSPF2: What to Read on the Spec Sheet
Think of efficiency ratings like a nutrition label for comfort. SEER2 is the updated 2023 DOE metric that better reflects real-world cooling performance than legacy SEER. It measures seasonal efficiency, while EER2 shows full-load performance at high outdoor temperatures. For heating, HSPF2 captures seasonal efficiency, and the COP at low ambient temperatures tells you how well a heat pump holds output in cold weather, including single-digit or sub-zero ratings where available. In our experience at Budget Heating (BudgetHeating.com), spec sheets and labels now list SEER2, EER2, and HSPF2 together, which makes apples-to-apples comparisons easier.
Know your region. The North has a minimum around SEER2 13.4 for split systems under 45,000 Btu/h. Hot-dry Southwest markets add an EER2 requirement to ensure units do not wilt in extreme heat. Federal incentives frequently start at SEER2 16, so aiming there can improve payback. As a rough yardstick, moving from an older 10 SEER to 14 SEER typically trims about 450 dollars per year on a 1,500 dollar cooling bill. Higher SEER2 saves proportionally more, and simple paybacks of 3 to 5 years are common depending on climate and run time. Practical picks: in hot-dry areas, prioritize EER2 at high temperature; in humid or mixed climates, SEER2 16 or higher is a solid target; in cold climates, focus on HSPF2 plus low-ambient COP so heating stays efficient when the mercury drops.
Adapting Mini Splits for Extreme Heat: High Ambient Kits, Shading and Refrigerant Considerations
In very hot, sunny climates, capacity drops fast if the condenser cannot dump heat. Start with outdoor units rated for high-ambient cooling and check published EER and SEER2 performance at 95 to 115 F, not just at mild test points. Where offered, add high-ambient or high-temp kits to maintain fan speed and coil performance. To keep rooms dry, favor models with strong latent capacity and low-speed dehumidification modes, and avoid oversizing that leads to short cycling. In our experience at Budget Heating (BudgetHeating.com), choosing equipment with sensible capacity shown at 115 F prevents surprises on the hottest days.
- Site the condenser in shade with free airflow, and avoid reflected heat from walls or roofs.
- Provide clear intake and exhaust paths so the unit can reject heat effectively.
- Use correct line-set sizing and verify refrigerant charge, especially on long runs, since mischarge or oversizing costs peak performance right when you need it.
Sizing, Installation and Commissioning Best Practices (Do This, Not That)
Start with sizing that matches the real load. Document room counts, square footage, ceiling height, insulation quality, window area and orientation. Run a professional Manual J for the load and Manual S for equipment selection. Do confirm capacity at local design temperatures, not just nominal BTU. Do not guess by square feet or oversize, short cycling hurts humidity control and efficiency.
- Line set and refrigerant: Do follow manufacturer limits for line length and vertical separation, use the correct tubing size and insulation thickness, pressure test with nitrogen, pull a deep vacuum to 500 microns or less, then charge by weight with subcooling and superheat verification. Do not skip pressure testing or vacuum quality checks, and do not tune only by gauges.
- Electrical and controls: Do provide a dedicated circuit sized to the nameplate with a proper disconnect and grounding, add surge protection if exposure warrants it, and plan smart control integration and commissioning steps. Do not share circuits or leave controls uncommissioned.
- Condensate and start up: Do prefer gravity drains, specify quality pumps if needed, verify routing and traps. On install day confirm supply and return temperatures, stable pressures, correct airflow and quiet operation. Do not leave drains untrapped or skip final measurements.
When a Mini Split Might Not Be the Best Fit: Honest Tradeoffs
Mini-splits are excellent in many homes, but there are cases where they are not the best tool. Here is the candid view.
- Consistently extreme cold: Standard units lose heating capacity as outdoor temps drop below roughly 25 F, and deep cold often needs supplemental heat. In very low design temps, a gas furnace or other combustion system can be the better primary, or use a hybrid setup with a heat pump plus furnace.
- Segmented floor plans and one-head expectations: One wall cassette cannot reliably condition multiple closed rooms, which leads to uneven temperatures and weak humidity control. A properly sized ducted central system, multiple indoor heads, or a small ducted air handler is a better match.
- High redundancy or harsh environments: If downtime is unacceptable, or in salty coastal and dusty shop conditions that demand frequent cleanings, consider combustion heat, hydronic systems, or ducted equipment with robust filtration and planned backup heat.
Guiding rule: if your design temperature, runtime profile, or required redundancy exceeds heat pump ratings, step up to a cold-climate model, add backup heat, or choose an alternative system. Also avoid choosing by headline SEER or oversizing, which invites short cycling and poor humidity control.
Protecting Outdoor Units from Dust, Sand and Wind: Filtration, Enclosures and Maintenance
In dusty or desert climates, fine grit behaves like sandpaper on coils and fan blades. Start with washable filters, add pre-filters or condenser screens, and consider purpose-built enclosures or wind and sand baffles that deflect particles without choking airflow. Any screen you add will collect debris, so plan to clean what you install.
- During dust or sand events, clean or rinse filters and screens weekly. Keep a monthly habit of clearing leaves and trash from around the condenser.
- Rinse outdoor coils gently once or twice a year with power off. Use low pressure and a straight stream, never a pressure washer.
- Book annual professional service for deep coil cleaning, electrical checks, and performance verification. Leave refrigerant circuit and major electrical work to licensed technicians.
- In areas with unstable power or frequent storms, add surge protection and use secure mounting to resist wind and flying debris.

Challenges on Hoth: Capacity Loss, Defrost Cycles and Condensate Ice
In deep cold, heat pumps deliver less than their rated output. We see longer run times, occasional calls for backup heat, and higher compressor stress. Oil can migrate to the wrong spot during long, cold starts, which is why the unit may stage conservatively.
Defrost is normal: the system briefly pauses heating, shifts to clear the outdoor coil, and you may see a plume of steam like a breath on a cold day. Heat should resume promptly. Continual ice buildup after defrost points to a problem with the defrost control or with drainage.
Ice from condensate is a separate risk. Frozen pans or drains can overflow and refreeze. Do not chip ice from coils. Use gentle melt methods and route, insulate, or heat-trace drains to avoid freezeups.
Cold Climate Solutions: Crankcase Heaters, Low Ambient Packages and Snow Protection
In sub freezing climates, a heat pump’s success hinges on two choices: pick a cold rated platform and add a cold climate accessory suite. We look for hyper heat models that retain capacity at low ambient and include strong low ambient control logic for stable performance.
- Crankcase heater: warms compressor oil to prevent refrigerant migration and hard starts.
- Base pan heater: keeps the drain pan clear so meltwater leaves instead of refreezing.
- Wind baffles or snow hoods: shield the coil and fan from gusts and blowing snow.
- Insulated, heat traced condensate drains: prevent ice blockage during meltwater runoff.
- Thicker line set insulation: reduces heat loss and helps prevent frosting in exposed runs.
Placement matters: elevate the outdoor unit 12 to 18 inches above expected snow, or above local drift lines. Avoid roof drip zones and keep clear airflow around the coil. For rare cold snaps beyond the unit’s rating, plan a small backup heat source.
From Tatooine to Hoth: Next Steps for Choosing, Installing and Maintaining Mini Splits
Mini split heat pumps can thrive from desert heat to deep freeze when selection, installation and controls match your climate and codes. Make it real: run a Manual J, pick cold climate or high ambient models, site and protect the outdoor unit for sand or snow, follow correct line set and electrical practices, then keep a tight maintenance schedule. If you are ready to proceed, partner with a qualified contractor for Manual J, rating checks and climate aware commissioning. With 30+ years in HVAC and 200,000+ orders, we will supply the right system and support.
- Get a Custom Quote, sizing, model matching and wholesale pricing
- Talk to Our Team, U.S.-based phone support before you buy
- Shop Mini Split Systems, many models ship free and financing with Affirm